The Novice’s Guide to Mining
Before we begin, let’s get something out of the way first. Yes, mining is somewhat like gambling. Don’t gamble with money you cannot afford to lose. Yes ‘mining’ has become a four-letter word in certain circles. Do not let this scare you. If you really want to get into it – and you probably are interested as you are reading this series of articles – embrace the ‘basket of deplorables’ moniker some people will put you in. Not that long ago some of the loudest, most vocal detractors hurling curses at their fellow GPU buyers were also called similar names. Those were ‘gamers’ who were ‘wasting electricity for mindless entertainment’. Do not react to them. Instead smile and move along… just like they did when mainstream society called them names. Time will heal this rift in the PC enthusiast community and those yelling loudest will be seen as the backwards thinking people they are. This is because your new hobby is just a valid reason for owning video cards as theirs. No one group has a ‘right’ to buy video cards at the expense of others.
So with that out of the way we will give you our opinion. Mining crypto currencies is probably one of the most additive hobbies a tech enthusiast can have. It is however one of the more lucrative hobbies to have as well. What starts out as a single video card ‘mining’ for NiceHash quickly escalates to the point every system in your household is renting hashing power to NiceHash in return for bitcoin. Then you start dreaming about Return On Investments… and at a certain point it becomes obvious to everyone around you that more power is needed.
A dedicated mining system built from the ground up to do one thing and one thing only- mine that sweet, sweet altcoin to get Bitcoin to turn into Fiat (aka cash). Maybe this is because your significant other is tired of you asking her to not use the system for gaming, maybe it just is because every system has two or three cards in it and you just ordered another half dozen. Regardless of how you came to the realization, at some point you will hit the same brick wall. Don’t worry, we have all been there and we are here to help you. We are here to enable your current addiction.
After building many, many mining rigs we can say that the process is a unique one that only vaguely resembles building the typical personal computer. The learning curve can and will be a steep one. This is how this series of articles came about, as we want to help you the reader run into as few ‘learning moments’ as possible, waste as little time as possible, and loose as little hashing power as possible. In the coming articles we are going to guide you through this process with step by step instructions and the reasoning behind each step so as to flatten that learning curve out. To this end we will not only show you the ins and outs of actually building the rig, but
also go over configuring the motherboard, the OS and even the software used. By the end you will have a fully functioning mining rig as well as a ‘Coles Notes’ list of tips and tricks to help you.
To ensure that this article is not as big as an old-fashioned encyclopedia we are going to make a few assumptions. We are going to assume that you have an interest in mining but either have never done it or are currently a NiceHash user. We are going to assume that you do however know how to build a system from parts. We are also going to assume you have a BTC wallet (for example Electrum).
These assumptions on our part mean that these articles should not be considered the be all and end all of mining. This is an introductory series meant to guide you to your goal of becoming a crypto miner. It is however the process that we have found that works the best for us so while geared towards the novice it should help you as you grow and develop as a miner. So please do not be afraid to experiment as your future experiences may differ from ours. All we ask is you follow these first-time builders guides as closely to the letter as possible for your first build. After that feel free to improve upon the foundation we have hopefully given you.
The Novice’s Guide to Mining: The checklist
These are the parts you will need to have on hand to complete your build. We have included some recommendations and reasoning behind each. These recommendations are only that – recommendations. They are not written in stone.
1) A Mining chassis – aka open air mining ‘case’
First things first. Do not buy a regular case for you new mining monster. Do not buy the typical open air test-bed. You will want to either build or buy a dedicated mining chassis. We usually build our own from wood, but the Vehedda8 GPU mining case is a good choice. Terrible instructions, but a good case that will get the job done – and can be stacked for later expansion. These can be found on Amazon, at most PC enthusiast parts online stores, but we recommend Bleev.in. These are good people to deal with and their prices are very reasonable.
2) Two 850watt Power Supplies.
Do not buy one monster PSU. They are a waste of money. But two smaller 850s. They can be EVGA, Corsair, Seasonic. Etc. But they need to be from a reputable company. We like Seasonic Focus+ Gold and Platinum 850w power supplies – no need for Titanium. Which ever model you choose, we strongly recommend picking one model and sticking with it. You do not want to swap the PSU and use a different brand’s cables. Bad things can happen. Plan on buying only this model for all your builds in the future… as the extra cables from a ‘normal’ build will come in handy for future mining builds!
3) Dual PSU adapter cable.
These adapters allow one system to control two power supplies. They are cheap and worth their weight in gold. No need for ‘Add2PSU’ type adapters. Get the bog standard dual 24pin adapters. Thermaltake’s are good and cheap. Amazon Basics also work. Some will recommend even going cheaper and simply using a paper clip to make the second work, but we do not recommend this to novices. A dual header 24pin adapter will allow the second PSU to start up without you having to be there – which comes in handy after a power outage! Plus there is no risk of fire hazards. Be safe, spend the couple dollars.
4) 8 120mm fans. Fans are critical to a builds long term stability.
While the manufacture does not really matter we recommend looking at Fluid Dynamic Bearing based models. Ignore Sleeve Bearing. They wear out faster and are louder. A decent choice is Artic Cooling’s F12. At a couple bucks a pop they are reliable, cheap, and move enough air to get the job done without sounding like jet engines. No need for Noctua or uber-expensive fans. Budget in an extra fan (you will need 7 for the above chassis listed) so that if one does fail you can replace it ASAP. Cooling is critical. Do not skimp on spare parts.
5) 8 way fan hub.
Silverstone makes a very decent fan hub that allows you to power all those fans via a simple SATA cable. Buy it. Its worth its weight in saved cables… and ignore the Molex powered versions as you will have better use of those precious cables at some point in the future.
6) 1 – 6 (or even 8) Video Cards.
We recommend starting with NVIDA as they are easier to source, require less power and provide a good ROI. AMD are great choices as well but right now are harder to find. If the opposite is true – go AMD. It doesn’t really matter beyond sticking to one or the other as you just want to have to install either NV or AMD drivers. Doing both is not for the novice / first build. Instead of thinking in brands think of in cooling potential. Steer clear of Founder Edition / blower style models and go with robust 2 or 3 fan-based models. They run cooler and have generally have fewer heat related issues because of it.
Good options are GTX 1070 or above… but in a pinch 1060’s 6GB (not 3GB) are a decent choice. Just understand that processing density will become an issue later as you add more and more mining rigs. IE 2 1060s = 1 1080 (ish don’t take this as written in stone as each have different coins they work best at). We also recommend sticking with one type for your first build. You can mix and match 1060/1070/1080/ti’s but for your first build pick a model and stick with it for now. IE plan on buying say six 1070’s over X months. A good place to start, and are highly recommend is ASUS and their STRIX series, EVGA and their FTW3 series… and many others. These two companies in particular offer a good warranty, good cooling, good performance and do so at a (usually) reasonable price.
7) 8 or more PCIE risers PLUS necessary adapters.
You will want to budget in 1.3 times the number you will need. E.G. you are planning a 6 GPU rig have 8 on hand. Planning a 8 GPU rig? Have 11 on hand. They do fail. Most that fail…. fail right out of the box. Yes they are one of the largest migraine inducing part in a mining build… but they are worth it.
Do NOT use the 6-pin to SATA cable they usually come with. Throw them out. They are dangerous and should never be used. Instead plan on having either 7 Molex to 6-pin adapters, or seven 6-pin extension cables. These rarely fail, but having an extra is never a bad idea.
8) 1 Motherboard.
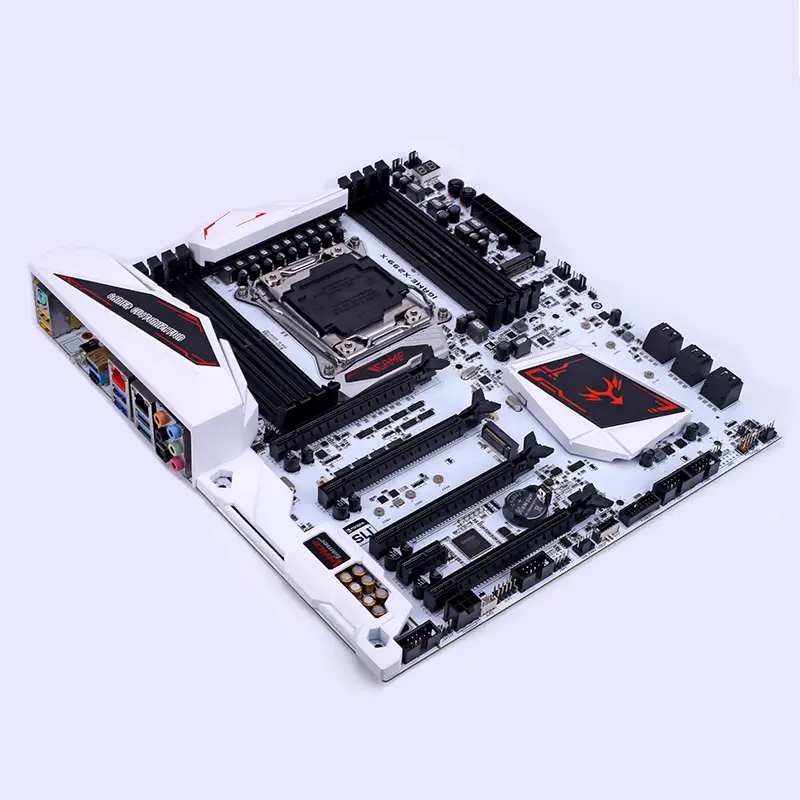
A good choice is the ASUS Z270-P it may not say ‘miner’ in its name but it is more than good enough for 6 GPU builds. IE Dedicated mining motherboards are a great choice for more advanced miners, but this is your first build. Six GPU’s is enough. If you so choose later it can actually support 8 video cards, but for a first build you do not want to complicate things with M.2 to PCIe adapters. Stick with using only the ‘actual’ PCIe slots.
9) 8-16GB of RAM.
This will be highly controversial as some recommend as little as 4GB but most issues we have run into was because of not enough RAM. The difference in price between 4GB and 8GB is NN and the difference in 8GB to 16GB is XX. This is not enough to concern you… as the cost of extra RAM is less than the cost of a larger Solid State Drive. With 16GB you can get away with a smaller SSD and not have it eat its NAND in short order. Plus if one stick (or a motherboard DIMM) dies you will still have 8GB of working RAM… not 4GB. Do not be penny wise but pound foolish. An excellent choice, and the one we highly recommend, is Ballistix Sport DDR4-2400 16GB (2×8) kit. There plug and play simplicity combined with a good heatsink and good RAM ICs make them perfect for your needs. With mining remember capacity trumps speed – as all DDR4 speeds is more than enough for mining.
As a tip, if you plan on building a second mining rig a 4 stick 32GB kit makes it even closer in price to 8GB per rig. Plan a head… and in a pinch will allow you to build and use four rigs from one kit. Thanks to Ballistix we have used a 32GB kit for these articles and would like to thank Ballistix for their support.
10) 500GB SSD.
No need for a 1TB SSD, but we would recommend against 250GB capacity versions. You can get away with 250GB’er but the MX500 500GB is bloody reasonable… and costs more like a last generation 240GB than the typical 500GB capacity model. It is our number one choice for a wide range of builds – including mining.
11) CPU.
Just about any CPU will do. Since we are using an older Z270 motherboard, older i3 and Pentium’s for it are downright cheap these days. Contrary to common wisdom, we would not go much below the Pentium level. This recommendation is based on future proofing. Yes the various Intel U models are even cheaper, and have lower TDPs, but much like the RAM we much rather spend a few extra dollars for the CPU and have it last multiple GPU generations than have to source out a newer more powerful CPU later.
Basically, the amount of central processing power for mining is not that great but when going above 6 GPUS the U models can start actually start to bottleneck things on certain algorithms. In the future this bottleneck will only get worse when dealing with even more powerful GPUs. Remember the CPU is controlling the PCIe lanes and has to send the data to the video cards for the hashing magic to happen. So if you do decide to swap out the Z270-A for a true (B250) ‘mining’ motherboard later a decent CPU will easily handle 8+ cards. Thus, a cheap i3 may indeed be the better long term investment.
12) CPU cooler.
Yes, your Intel stock cooler will work… but they are not exactly great coolers. For the sake of 10 -15 dollars having a backup is not a bad plan. Thermaltake Gravity i2 and Artic Cooling Alpine Pro are both good to great choices (Alpine is the one we usually use) for peace of mind. Since they cool better, thanks to their larger heatsinks and 92mm fans, we recommend using one of these and keeping the stock Intel as your backup. Spare parts will be a reoccurring them in these articles.
13) Windows 10 OS.
Yes, you can use a custom flavored version of Linux… but for a first build Windows 10 is fine. Hypothetically speaking you do not even need to purchase it. Instead download and install it from Microsoft’s website and live with the ‘not authenticated’ label – as once you are up and running it still will work well beyond the trial period. Do not use Windows 7. Windows 10 has no problems with 8 GPUs. Get 10. Use it. Learn to (not loathe but) ‘love’ it.
14) We have dedicated an entire article to MultiPoolMiner application.
This is the application you will be using. It works great and is actively being developed – so it gets better every revision. Considering it is ‘free’ it’s a no-brainer.
15) Zip ties.
A bag of small and a bag of large (10 inches or bigger) will be one of your secret weapons. These things are worth their weight in gold. Consider them the miners equivalent of ducktape – the handyman’s helper of choice!
16) Keyboard, mouse, monitor…. various tech related tools (screwdriver, beer, aspirin… patience).
You should already have these parts as you already have built a custom system before.
The Novice’s Guide to Mining: Quick Links
So as to make things as easy as possible we have included a table of contents that will link to each mining how to guide article. As they go live they will be added here for your convince. We recommend you read each before starting your build and following the order they are listed.
[box type=”shadow”
Article 1: Mining Pool Recommendations (aka Nice Hash Alternatives)
Article 2: Building a mining chassis
Article 3: OS and BIOS Tweaking (part 1)
Article 4: Installing Video Cards and what problems to look for during install
Article 5: OS and Bios Tweaking (Part 2)
Article 6: Setup and Configuration of MultiPoolMiner
Article 7: How to pick coins (and when to add/drop them)
[/box
Article 1: Mining Pool Recommendations (aka Nice Hash Alternatives)
We are not going to argue that NiceHash is the easiest, quickest and painless way to ‘mine’. Their application is simple, clean and works pretty darn well. It however has some major limitations. Limitations on the miner application’s it relies upon, limitations on the algorithms it supports, and most of all the fact that NiceHash takes a pretty big cut of your potential earnings. This is because you are renting your hashing power to NiceHash who in turn sell it to others. Yes, sometimes the rental fees you get are higher than market value, but NiceHash still get their cut. This is why we are going to show you a different way. A way in which you may have more freedom and more profits.
This is why the very first step is not to build your shiny new mining powerhouse but to sign up with a mining pool or two. We recommend you do this while your parts are in transit so as to not waste any time – and ‘hit the ground running’ when you do have all your parts.
The two pools we recommend – at this time – are MiningPoolHub (MiningPoolHub.com) and AHashPool (ahashpool.com). Of these two AHashPool is probably will most of your mining will happen but as they do not support Equihash ‘MPH’ is a nice second round in the magazine to have. Furthermore, of the two ahashpool requires no sign up, no jumping through hoops to log in, and ‘just works’ as your BTC wallet is your password/login/etc.

As it is the easiest, let’s start with ahashpool. Go to ahashpool.com.
Then hit the ‘wallet’ tab at the top and copy in your BTC receiving address.
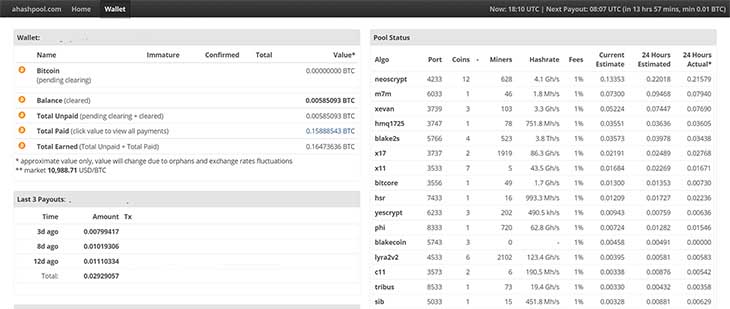
Now bookmark this new page that is just for you. Congratulations. That step is done. To be more precise you will see a list of algorithms on the right-hand side, their 24hr avg profits (mbtc per MH/s) and how many miners are active on each algorithm. On the left will be a bunch of zeros… as you are not mining to it. Once you do, these numbers will go up as the statistics are updated every 5 minutes. Not shown right (if you scroll down the page) now will also be a bunch of charts for each algorithm you mined in the past 24hrs, and at the bottom will be a list of mining rigs connected and what they are (or were 5 minutes ago) mining. Its nifty, its neat… its classic YIIMP.
YIIMP is an open source fork of the YAAMP anonymous mining pool software that was created to allow ‘pool mining’. In basic terms you will not be solo mining and install combining your hashing power with other miners in order to find, break, and sell altcoins. There are many YIIMP pools out there, they may differ in the coins the mine and minimum payouts, but they are all basically the same. At this time AHashPool is one of the more profitable ones. It is also run by very, very good people who actually respond to email questions ([email protected]). This is another reason we recommend them.
As time goes by this may change but for now it is a good, safe choice. In a later article we will go over picking algorithms… but for now you are good to go as far as ahashpool is concerned.
Article 1: Mining Pool Recommendations cont’d
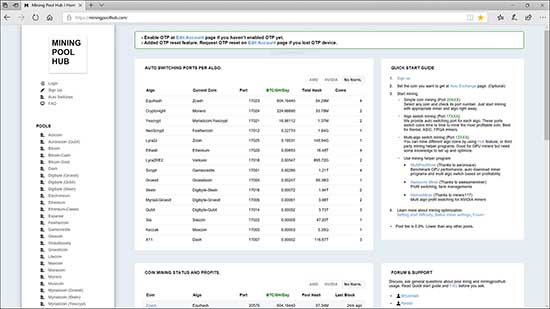
MiningPoolHub (MPH) is not as easy as one click and done. It does require a log in and jumping through some hoops. It however is worth it. Just like ahashpool it is run by good people who don’t rob your hash – and thus your profits.
The number one complain we hear about MPH is their website is bloody confusing… or at least is until you get the layout and flow that the design UI follows. Basically, the sheer volume of data it offers can be overwhelming and it is not exactly presented in a novice friendly manner – like AHP’s UI.
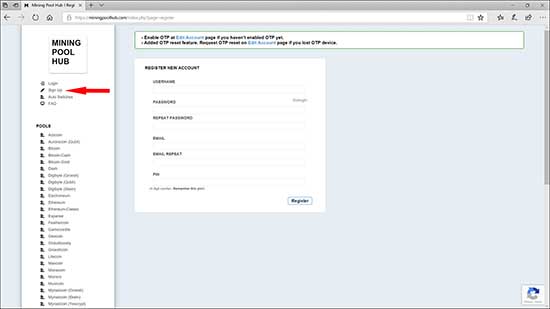
The first thing you need to do is ignore the center and right columns of data for the time being. Instead look to the left column. Here you will see ‘Login’ and ‘Sign Up’. Press sign up. Click it and then fill in the details it is asking for. Make sure you use a good strong password (and enable 2FA / OTP as soon as possible). Make sure to right down the username you register with. This ‘name’ will be very important later on – as it is your unique identifier that allows Multi Pool Hub to give you your cut of the profits. The 4 digit pin is also very important as without it you will not be able to modify any of your accounts settings later on – so store it somewhere safe!
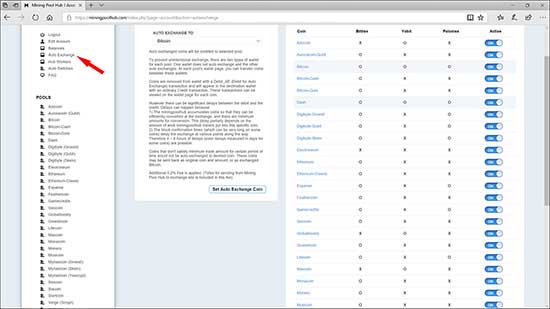
Once you jump through the hoops needed to register and then are logged in you will notice the landing page’s left column options has changed. Specifically, you will now have even more options. The first thing to do is click ‘Auto Exchange’. This will present you with a new page that has a long, long list of options in the rightmost column and an ‘auto exchange to’ center column. Since this is a novice orientated guide we are going to recommend you stick with auto exchanging to Bitcoin – or BTC for short. Click the drop-down box and select Bitcoin from the list. Next, make sure all the coins in the right-hand column are set to ‘On’ – they will have a blue looking icon in their line under ‘Active’ when they are ‘on’. When this is done click the ‘Set Auto Exchange Coin’.

With this critical step completed, look to the leftmost column and under ‘Pools’ click on ‘Bitcoin’.
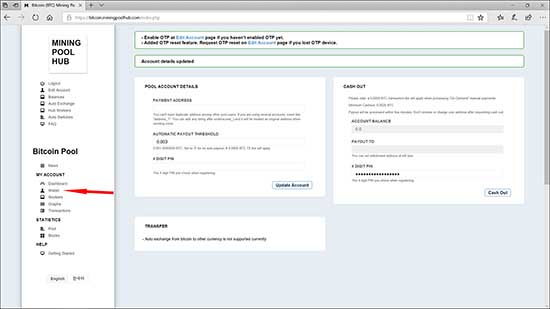
When the new page finishes loading click ‘wallet’ under the “My Account” section on the left. This is where you will enter in your BTC wallet… and where MiningPoolHub will send your earnings. In the center column paste in one of your wallet’s (e.g. Electrum) receiving addresses. Then set your automatic payout threshold. This is the amount of Bitcoin you have to accumulate by mining before Multi Pool Hub will send you a payment. The higher the number you set it to the less the fees for buying stuff later with it will be. When you have decided on how long you are willing to wait before being ‘paid’ type in the 4 digit pin you used during sing up and then press the ‘Update Account’ button.
Congratulations! You now have your MPH account setup and are that much closer to actually mining cryptocurrency.
Article 2: Building the Frame

Yes we are sure you have plenty of experience building systems and probably have a half a dozen favorite cases you have used with great success in the past. That does not matter. Most of your experience will not translate into experience with mining frames. These are entirely different beasts that have entirely different steps to completion, and radically different order to those steps.
The only thing a normal and mining chassis has in common is the first step. That being – the obvious – getting one. There are many, many mining chassis on the market. You can even build one yourself – it’s not hard… but for first time builders it is better to buy one to eliminate one level of stress and hassle from your first experience. While there are many, many options all the good ones all have one thing in common. That is they come with the ability to mount fans and the fan mounting hardware. The cheap ones do not. So spend the few dollars on a good one. You will be much happier later on.

At this time one of the best mining chassis is the Vehedda8. You can find them on amazon easy enough. Of course, as we are in Canada we order direct from bleev.in in Vancouver. Good people to deal with and just as good prices. Order one and when you have it… continue on reading. Of course, while waiting for your order you can read the rest of these articles to get a good idea of the ‘flow’ or build process we use. It is not the only way, it simply is the easiest way that results in as few possible ‘Murphy’s Law’ moments as possible. Your Mileage May Vary as the old saying goes.
The very first thing you have to do with any mining chassis… is ignore the instructions. They are OK, better than most actually, but really are too basic and miss the finer points of doing a build right. Since you want to do it right the first time and not learn the hard way we recommend following our – highly modified from the instructions – steps.
Step one is layout all the parts and then put them in little piles of each part. This way you can easily grab the right part without digging through a big pile of them. They will all be labeled and you can refer to the instructions for where they are supposed to go. Do not do anything beyond this. Do not install the vertical ‘post’ pieces that attach to each end of the very long pieces to form a 3D ‘square’ looking shape. Trust us. This comes later.
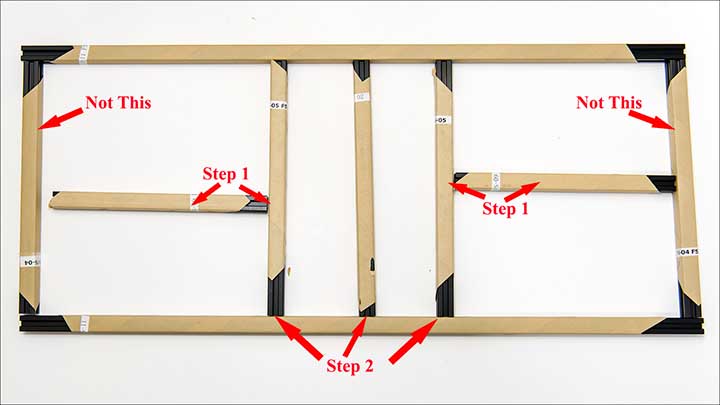
Next you want to layout the bottom level, but you do not want to put it all together – yet. Instead grab the three ‘center’ pieces that lay flat on the bottom of the chassis and the two center posts that go out from them.

If you pay careful attention you will notice the three bars has a row of three holes at one end and row of two holes at the other. All three should have 3 at one end and 2 at the other. These holes are what the brass motherboard standoffs go into. These form the front and back of the chassis… and if you have 3/2/3 + 2/3/2 orientation… you are going to have a bad day.

Next you will notice that the bars actually have a right and left orientation in that one side will allow the screws use to connect the bars to these ‘motherboard’ bars are countersunk. You will want to attach the two ‘power supply’ bars so that the heads of the screws are indeed countersunk. At this point you will have to ‘T’ looking pieces and a single ‘I’ piece. Now grab the two long ‘end pieces’ that they connect to. Put them together using the screws.
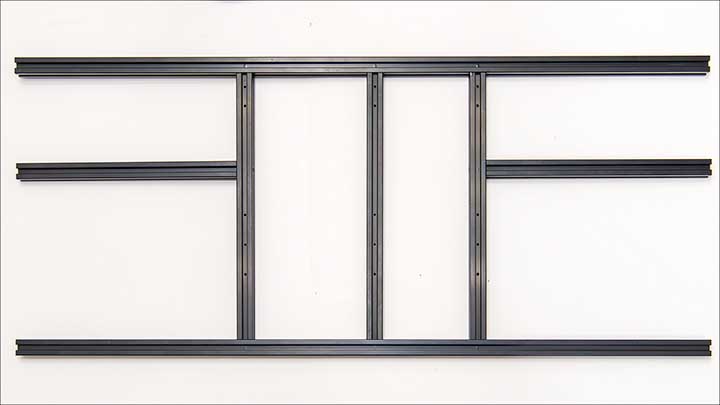
This will make up most of the sub-frame and should look like this.

Next grab your motherboard. Don’t worry you will not be installing yet, but its mounting holes will let you figure out where it should go and which brass standoffs you need to install. Don’t worry you may end up with extra brass standoffs you did not need. The chassis is designed with multiple form-factor motherboard support. You really don’t want a standoff touching the motherboard anywhere but directly under a mounting hole. Bad things happen if you do. Once you have installed the needed brass standoffs confirm they are in the right position. Count how many you can see through the motherboard mounting holes and confirm that is all you have installed. When this is done, you can put your motherboard back in its anti-static bag and its box… and put it somewhere safe for the time being.
Now you have to decide if you want the motherboard at the ‘front’ of the chassis or the ‘back’. We prefer to have it at the back – the opposite side from where the fans will be installed ‘above it’. Don’t worry you can change your mind later, but making this decision now is kind of important. The ‘back’ of the chassis is where the power supplies go and since you will be plugging in a keyboard, mouse, network cable, and HDMI cable it makes for a neater build with all the ‘wires’ kept to one side of the build.
Article 2: Building the Frame (page 2)

Next is to install the two PSU holder brackets. These are the odd shaped plastic looking pieces. To do this grab two of the short black screws thread them through an adapter and thread on the silver nuts. Do not thread the nuts on much just enough so that you can see the screw peaking up over the top of the nut. Orientate these nuts so that they are pointing ‘up’ and not along the length of the adapter. Then slid it in the end of the ‘back’ chassis frame. If you want, and it’s not necessary, slide it in a couple inches from the edge of the frame so that they are about half way between the end of the motherboard and the edge of the frame. Gently tighten them. Not so much that they can not be moved, but enough that they don’t slide all over the place. Rinse and repeat these steps for the other adapter that goes at the other end.
The next step can be tricky if you are doing this build by yourself. If you don’t have a second set of hands we recommend flipping the completed pieces over and placing it on the corner of a desk so that you can access all four corners but don’t actually have to hold it in place.

Now install the four legs / posts. The process is similar to the PSU adapters but you use the angled brackets for mounting. We recommend installing the two -per angle bracket – screws and silver nuts on to the angled bracket first.
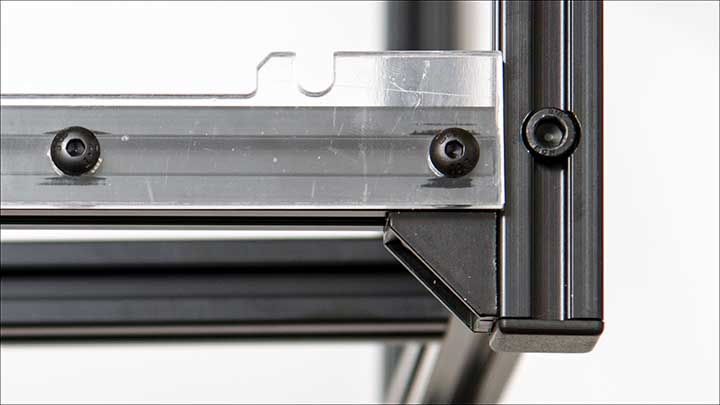
Then slide them into the end of the post, tighten down this screw and then attach the post to the chassis. When it is flush you can tighten these screw down. Make them fairly tight but loose enough you can push the post up or down as needed – later.

With this complete on all four corners you can then grab the two end pieces and attach them to the chassis. They will only be attached via the center screw. This is fine. Now slide each post one at a time up or down until the screw hole in the post and these pieces line up. Install the screw and then tighten down the angle bracket screw. Rinse and repeat for the other three posts. Then go back and make sure all the screws are tight as you can make them. With this done you are now ready to flip the entire chassis over, place on your desk so nothing is hanging off the edge and continue on with the build.
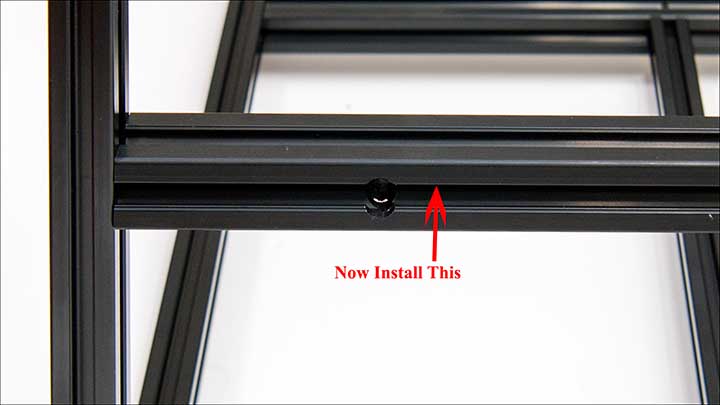
The next thing we like to do is install the two ‘top’ side brackets. These are the two lengths that go from font to back on each side and attach the front and back posts together. The only hole for these is about half way up each post and goes in via long screws.
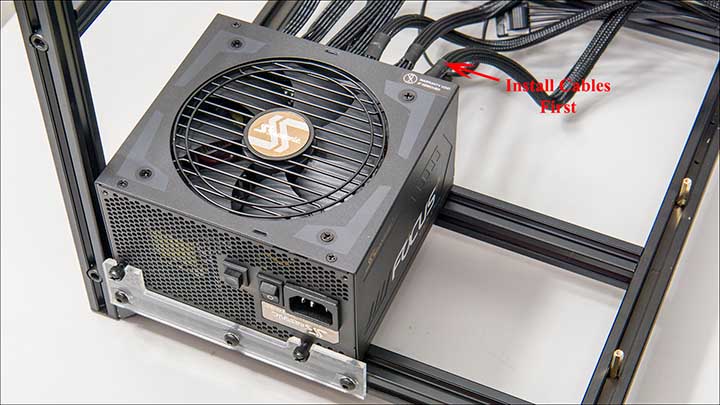
With this complete we like to stop working on the chassis as it is now fairly stable and secure and start on installing the bottom layer hardware. The first thing(s) which should be installed is the two power supplies; however, before mounting them to their two brackets we strongly recommend installing all the power supplies modular cables. Of the various cables that come with the Seasonic Focus Plus 850 we recommend installing the 24-pin motherboard cable, the three ‘video card’ PCIe cables, two Molex cables, and a SATA cable. We do this for both power supplies – yes even the ‘secondary’ power supply; however, on the ‘secondary’ PSU we also install one 8-pin motherboard cable.
The reason for this is simple. The secondary PSU may only be attached via a 24-pin dual header PSU adapter (which allows it to power on at the same time the primary does but does not power the motherboard via the 24-pin cable) but it is the one that will provide power to the CPU. This is because this helps with load balancing and is how power supplies manufactures recommend they be set-up. So much so that if you don’t and just have PCIe cables and the like installed your 10 year warranty will be void. So yes it is important to have one power the motherboard via 24-pin and the other the CPU via the 8-pin.
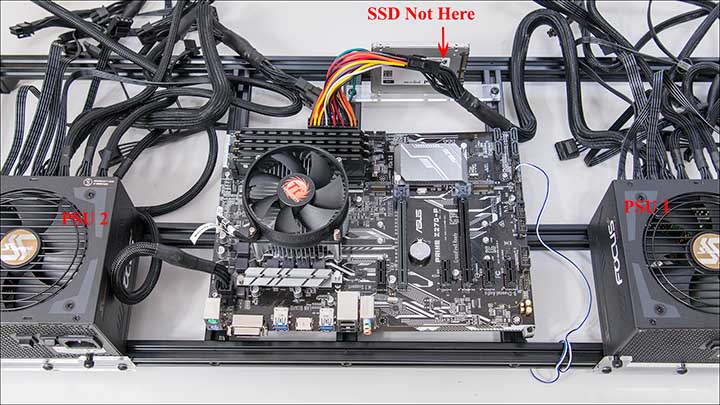
It really does not matter which power supply goes on the left or right side, but we do recommend having the secondary on the left, and the primary on the right. This allows you to bend the 24-pin adapter cable away from the motherboard PCIe slots… and having the extra room here can come in handy on some motherboards that need a video card installed in the primary x16 PCIe slot to get all six card working.
Article 2: Building the Frame (page 3)
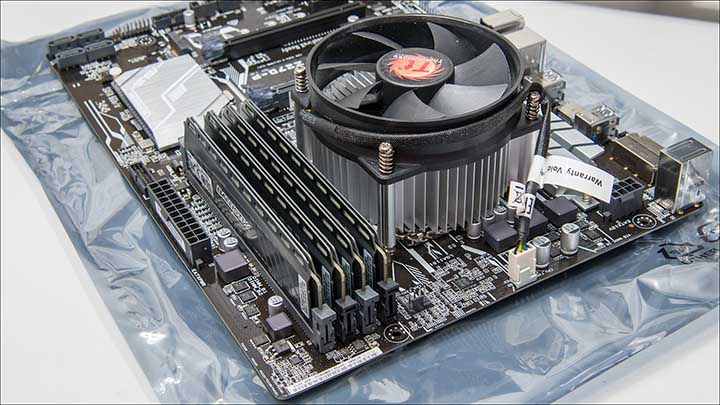
With this done we then like to prep the motherboard – just like in any system build. Install the CPU, the CPU cooler, the RAM and even the SATA data cable. Then install the ready to go motherboard, though if you do have a helping set of spare hands you can plug in the 8-pin and 24-pin adapter cable before. This will reduce bending of the motherboard when it is installed on the mining frame. If you do not have a helper, support the motherboard underneath the plugs while pushing them in. Then secure the motherboard in place. This is what -some- of those small silver screws are for. When this is done plug in the two power supplies to the dual-headed 24-pin power cable adapter.
A very nice touch, and most do not do, is the chassis comes with the necessary power on adapter. This adapter comes with a long, long cable so it can be secure anywhere with a zip-tie… or if you are not sure where you want it… just wrap it around the bottom frame like we usually do.

With all this done the next thing to do is install your ‘OS’ solid state drive. This also uses a plastic mounting adapter; however, unlike what the instructions show we would not install it in front of the motherboard… as it will block long video cards from being installed in the primary x16 PCIe slot. Once again this is a step that may save you time later if you run into problems when getting a fully loaded rig up and running… so place it on one end or the other of the frame.
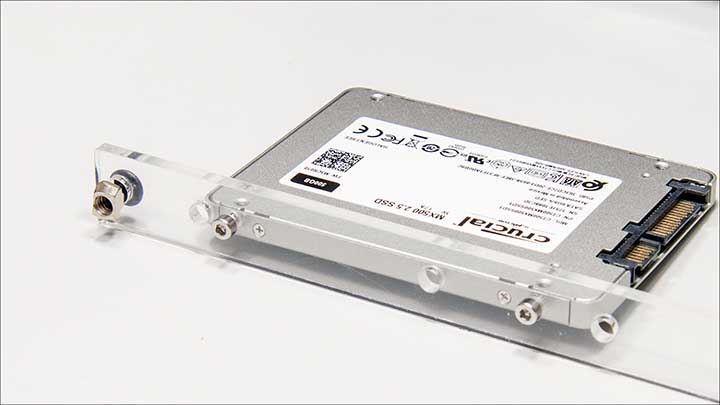
To do this you will use the same screw and silver nuts as the power supply but the process is slightly different. Instead of installing these, then the adapter, then the device you should start by securing the SSD to the adapter first. This uses more of those little screws and takes a mere moment. Then you install the two screws and silver nuts. Also different is the two nuts should be orientated so the two ‘wings’ are pointed along the length of the adapter and not perpendicular. This is so you can lay the drive + adapter in place and then secure in place. The two nuts will probably not spin perfectly and you may see they are only holding the adapter to the frame with about half of each wing. This does not matter. Its good enough. If you really, really want to make it super secure… install this before you put the bottom left or right bracket in place (and slide it into place like you did the PSU adapters). We don’t think it is worth the extra hassle, but you may feel differently.
At this point there are four things left to do: install the GPU center and rear brackets, mount the fans to the fan adapter, and then mount the fans. We like to start with the fans – but it really does not matter.

In the box the you should have a big pile of yellow plastic triangular shaped pieces. These are the fan mount adapters. You will notice that there are four that look differently than the rest. These are the end bracket adapters that mount the entire works to the frame itself. So install two of these on two fans, these will be your two ‘end’ fans. Before you do this, first make sure of the direction the fans move air. You will them sucking air from behind the chassis, over the GPUS and then out the ‘back’ of the chassis. So please mount them on the right side or you will have to start all over again.
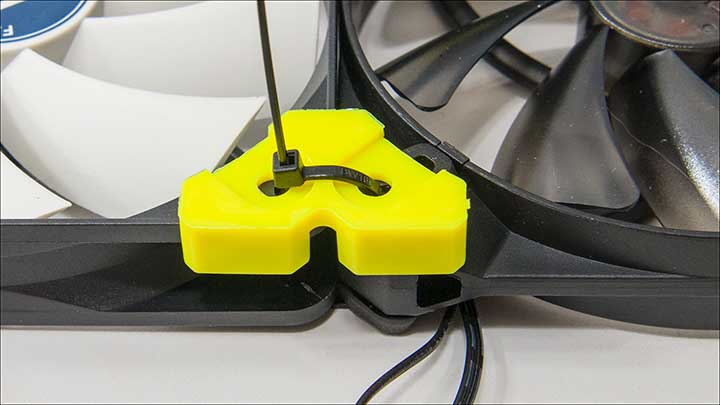
Included in the box is a big pile of screws that are used to mount the fans to these brackets. We personally don’t like them as they are way, way too long. If your fans come with four smaller silver screws – the Arctic F12s do – use them instead. If your fans do not… zip ties work just as well – just not for the end adapters! These require more of those other screws and silver nuts. We recommend installing these four adapters before tying all the fans together as it is just easier to do now rather than latter.
Once this is complete gently place the entire ‘fan assembly’ above the front of the chassis and slide the four nuts down into the two posts and tighten them down. Their final location will depend on the height of the GPUs you use so no need to crank them down yet. Just make sure the entire works does not slide down under its own weight. The end result is to have the fans just a touch above the top of the GPUs. This allows lots of air to hit the video card fans, but also pushes hot air away from the top of the video cards. Since we are using rather tall GPUs the fan assembly is higher than if all the video cards were ‘standard height’ but the idea is the same.
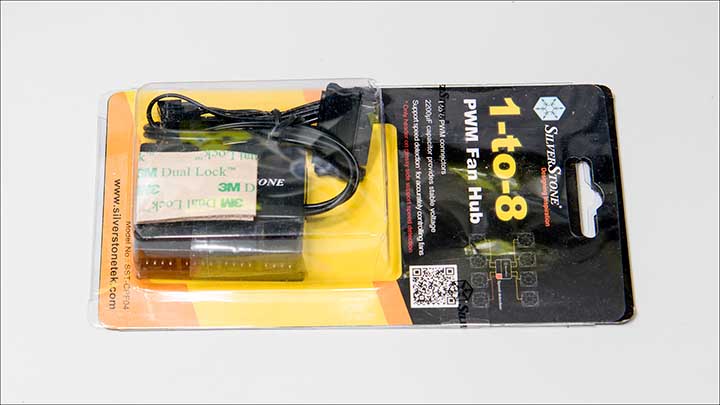
Now plug in all the fans 4-pin (or 3-pin depending on fans sued) to your 8-fan adapter. Since we are using a Silverstone it is powered via SATA cable, and has double sided tape on the back. Plug in all the cables… and then stick is somewhere on the chassis. We like to stick in on the bottom frame near middle on the ‘fan side’ of the chassis – so all fan cables can reach – but offset enough so that a GPU in the motherboard’s main PCIe x16 slot will not interfere with it.
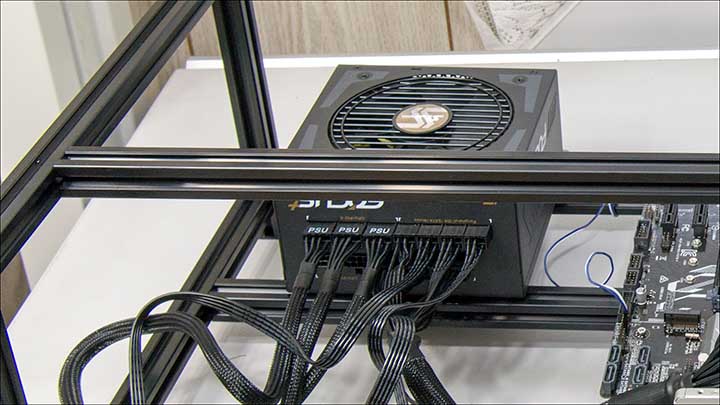
Then we install the middle GPU bracket. This is the main support for the GPUs and goes about a 1/3rd of the way in from the fans. It is held in place with two screws and a second set of hands can come in handy for this step. Tighten these two screws down tight – as they will be taking a lot of weight later!
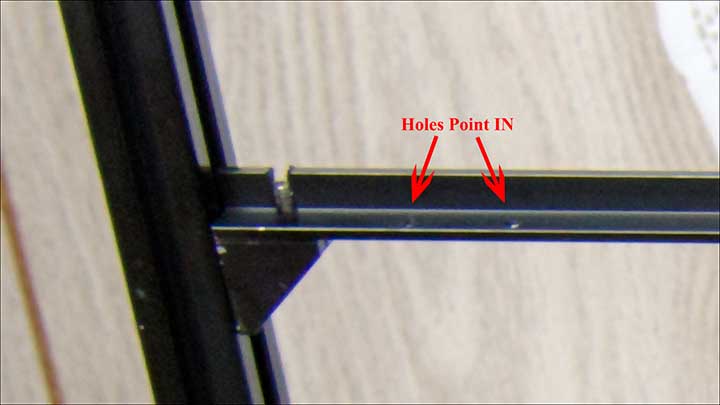
With all this taken care of the last is the GPU bracket that installs on the ‘back’ of the frame. Much like the fan assembly this is held in place via screws and nuts, but just like the four main pillars/posts of the frame you use 90-degree angle adapters to this. The only thing to remember is to make sure the holes are pointed inwards towards the fans… as those holes are used to secure the video cards in place just as if this was a ‘normal’ case. Also like the fan adapter, the final location can not be guessed at this time. Instead slide it down further than you think it should be, and tighten it just enough so that it will stay in place. This way you can slide it up once you have a video card in place and ready to go.
That however is few steps away. Instead the next thing to do is to setup the OS and tweak the BIOS… which will be covered in the next article.
Article 3: OS and BIOS Tweaking (Part 1)
So if you have been following along at this point you have a mining frame basically setup but do not have any video cards installed. Instead all you have is a working system that is relying upon Intel’s integrated video. Good. The next step is not to install any video cards. Instead plug in a HDMI cable into the motherboard’s rear I/O header, and a keyboard and mouse.

Start the system up and enter the BIOS – mash the delete key until it opens up – and then go to the Advanced BIOS via F7 key. As we are using a rather basic motherboard with few additional options included there is not a lot you have to do, but the goal is turn off as many useless things as possible. For example sound. Don’t need it. It wastes resources. Any USB 3.1 onboard controllers. Turn them off.

The nice thing about this motherboard is all the features we need to tweak in the BIOS are located in the same section of the BIOS – the ‘Advanced’ section. So first thing to do is click on this and enter the Advanced section (it is between AI Tweaker and Monitor in the top row). The Advanced section is a grab bag header with a lot of ‘subsections’ or ‘pages’. Since we used the example of sound let’s start there. Click ‘On board devices configuration’ and when this new page opens click ‘HD Audio Controller’ and in the drop down list click disabled. Bam done with sound.

Then navigate back to the main Advanced section (hit the esc key or click the arrow in the top’ish right corner of the screen). Then select ‘PCH Configuration’.

When this page opens up click ‘PCI Express Configuration’. On this new page, select ‘PCIe Speed’ and change it from ‘auto’ to Gen 2.

Now navigate back to the main Advanced page. Select ‘System Agent (SA) Configuration’. In the page click ‘Peg Port Configuration’, and make sure that the PCIEX16_1 Link Speed is also showing “Gen 2” in its drop down list. If it is not… change it to Gen 2.

Now just navigate back one level to System Agent (SA) Configuration page and this time select ‘Graphics Configuration’.

On this page change ‘Primary Display’ to “CPU”. This tells the motherboard you will be using the CPU’s integrated GPU and not a card installed into the PCIe slots. When this works, and it works until you run out of addresses – usually around the 8-9 GPU mark, it keeps all the expensive video cards humming along cracking algorithms at their full potential.

At this point you do not need change the ‘above 4G decoding’ so leave it to ‘off’ for now. That comes later. Instead with all this done, save and exit the BIOS and reboot the system. While it is POST’ing grab your USB flash-drive that already has Windows 10 installation disc already on to it and plug it in.
If you built the basic system correctly it should power on – make sure both PSU’s turn on, and load the setup and configuration window for Windows 10. Just like any system go ahead and install Windows 10 and your motherboard drivers that came on a DVD. We recommend having this already copied to another flash drive so you do not have to use an external USB DVD reader. When that is complete and the system has rebooted multiple times you are ready to begin.
The first thing we would do is make a few shortcuts on the empty desktop and the Start Bar. These include My Computer (if it does not already exist), Services MSC, Control Panel, and Device Manager. They will all be needed at some point or another. In case you do not already know how to do this click on magnifying glass on left(ish) edge of the taskbar (aka Cortona) and search for these one by one using ‘This PC’, ‘Services’, ‘Control Panel’, and finally ‘Device Manager’. For each search result right click and select ‘Pin to Start bar’. This will pin them to your start bar. Then open the start bar and drag and drop them to the desktop. Bam. Done.

Next is to modify the size of your virtual memory. To do this press your keyboards Windows Key plus the ‘X’ key at the same time. In the pop up select ‘System’. Then type in ‘performance’ in the top right(ish) hand corner. Select ‘Adjust the appearance and performance of Windows’ in the search results. In the new window click the ‘Advanced’ tab. Under virtual memory section click the ‘Change…’ button.
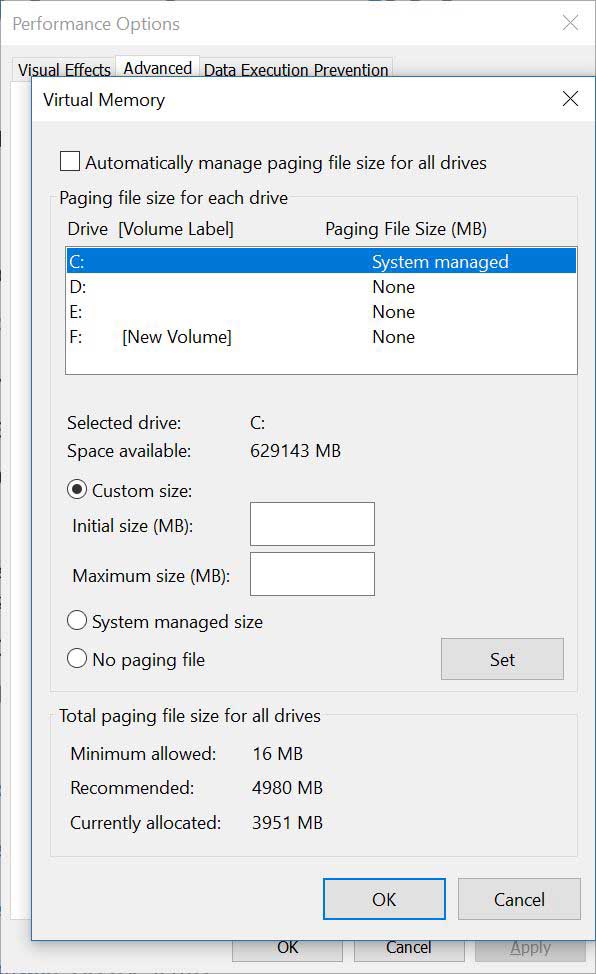
In the new window that opens hit the ‘Custom size:’ radio button. Then it is time for a little bit of math. Basically, you will want to set the initial and maximum sizes to the total combined amount of RAM thatall the video cards you will be using. For example a GTX 1070 has 8GB. So it would be 8*6 (or 8*8 if you are planning on using eight video cards). Then take this number and multiply it by 1024(as there is 1024MB in each GB). So 6 x 8 x 1024 is 49,152. If you are using six 1080Tis with 11GB it would be 67,584. Then hit the ‘set’ button. Then ‘OK’. Then reboot the system.
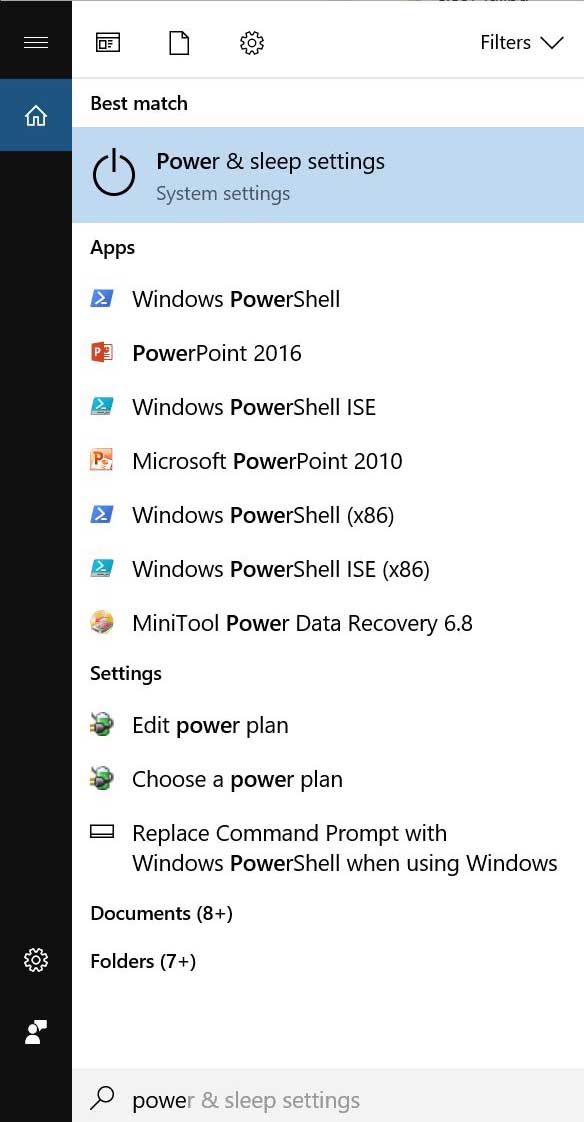
Next is to modify the power options. You will want to set the Screen turns off to ‘never’, and under the sleep section set it to ‘never’ as well. This way your system never turns off the monitor or goes into sleep when you are not ‘using’ it. Mining applications are automated and Windows 10 will mess with them if you do not do both. To do this search for ‘Power & Sleep’ in the search bar. Do the two above tweaks in the new window.
Next shut the system down and install one video card. Refer to the next article on how to do this.
Article 4: Installing Video Cards and Troubleshooting
Now that we have the OS setup and the first part of the BIOS tweaking complete we are going to actually install a video card. Wohoo! Now the fun begins as unlike a typical system build installing video cards is not a plug and play experience.

The very, very first thing you will want to do is inspect the PCIe risers. These are two-piece affairs. One part looks like a little card and plugs into the motherboard’s PCIe riser. Inspect it to make sure the USB looks good (not installed on an angle, looks like it is going to fall off, the contacts all look good, etc). If it passes a visual inspection plug in one end of the USB 3.0 cable that came with it. Since the system is off you can plug this half in. Make sure the little ‘tab’ is handing over the back of the motherboard’s PCIe slot. If it is not… DO NOT POWER THE SYSTEM ON. Bad things will happen.

The above inspection should only take a few moments as it is a pretty basic component. The other half of the adapter – the actual riser – is a bit more complicated. The first thing you will want to do is make sure all four silver caps on the riser board are all installed correctly. All should be straight and no visible bulging in the top. If you even think it looks wrong… don’t use it. Next make sure all four caps are installed the same way. There should be a little slip of paper in the anti-static bag telling you the orientation of the caps but usually it is colored stripe pointed towards the front/back edges of the riser with it on the top half of the cap towards the edge (side) of the riser. The silver half of the top should be towards the PCIe slot on the riser card. If they are not… refer to the included instructions and if this is incorrect for your risers… don’t use it. It can damage your expensive video card, the motherboard, and basically make you have a very, very bad day.

Next you want to hold the riser so that you can see each and every ‘pin’ in its x16 PCIe slot. All should look the same. If one is missing or looks… ‘odd’ do not use it. Bad things can happen. Then you will want to inspect the 1/2/3 power connector ports. The number will vary from PCIe riser model to PCIe riser model. We do not have a preference for which reference model as they are all basically the same it is just in the power connectors that differ. As long as it is a ‘006’ or later it is (probably) fine – though we do not like the new 009s as the 90-degree MOLEX is a PITA to use. Different models can be used interchangeably. Instead look for the number of capacitors that they sport. These are what are used to convert the input power from the PSU to the power the video card is demanding – eg 12v to 5v. We prefer 4 cap based models over 3, and would only use the ancient 2 cap models in a pinch – and then only as long as it takes to get a replacement 4 cap board shipped.
These are the main things you want to look for on the PCIe riser. As you can see from the above check list it is rather intensive and there are many points where a new, untested riser can fail. Do not be surprised if some even fail right out of the gate even after the visual inspection. This is why spare parts come in handy.
At this point we like to install the power cable for the riser. Do NOT use the SATA port, or SATA adapters (if your riser does not have multiple power options). Instead you will want to use either a 6-pin PCIe power cable extension (that connects to your power supplies 8-pin PCIe cable) or a MOLEX. The reason for this is simple. SATA cables are only rated for a maximum of 4.5 amps on the 12volt rail (ie 54 watts). A video card is allowed to pull up to 75 watts from its PCIe port… and it does not know you are using a riser. Most will not pull this much but even if it only pulls 54 watts (the typical max from NV cards these days) you do not want to run at 100% of the specifications. The safety standards call for 80%… or a mere 43 watts. Anything over that and the cable will heat up and could possible melt or even cause a fire. While it is true mid 40s is a more realistic number these days – and why some peeps can get away with SATA to 6-pin connectors – the question is why risk it? Especially when MOLEX cables are rated for 11 amps (i.e. 132watts). While some do split a MOLEX cable and use two risers per cable the ‘golden rule’ is one cable per riser… as that is (potentially) running a cable at a full 100% of its rated load – or even higher. This is still safer than SATA but not exactly comfort inducing… even if modern GPUs rarely pull even close to the max allowed from the PCIe slot. Either way, smart miners who like to be safe do not use SATA. Conservative miners, like ourselves, only run one riser per MOLEX. Your mileage may vary, as at the end of the day it is your rig and your responsibility to be safe.
In case you are wondering about dual headed 8-pin PCIe cables and using both headers on a single cable. It is fine. These cables are rated for 300watts total. As long as you do not try and draw more than that from one cable you are fine. So for example a stock GTX 1070 will pull upwards of 151watts total. A stock GTX 1080 will pull 180. A stock GTX 1080ti will pull 250 watts. This is all combined power from PCIe slot and cables. All of which is below 300. Now with that said we never, ever recommend using a dual 6-pin splitter on a dual headed PCIE cable. If the card requires two power connectors (eg has two 8pin, two 6-pin, or one of each) do not split the cable further. Use a second cable to power the PCIe riser. Be safe.
If all that is not confusing enough there is also one thing else you have to remember. Never, ever power the video card from one power supply and the riser card from a different power supply. Bad things will happen… including killing the power supplies, the video cards, and maybe even a house fire. This is because both cards may have slight different voltages coming from their 12v lines… and even 0.01 is enough for them to ‘fight’. So always use a MOLEX (or additional 6-pin PCIe cable) and 6/8-pin cable from ONE power supply for each card and riser.

Now back on track. Plug the USB cable into the small adapter bit and plug it into a free PCIe port on your motherboard. You want to make sure to install it correctly… as once again bad things can happen if you mess this up. Don’t worry. Its not hard to do it properly. See the little tab on the ‘back’ of the PCIe adapter? Make sure it is hanging off the back of the PCIE slot. It should looke like the above photo when installed correctly. IF it is ‘inside’ the PCIE port… yank it and stick in where it should go.

At this point you have the PCIe adapter installed in to the motherboard’s PCIe slot, and a riser that looks good. You also have the power connectors attached to the rise. Next install the video card on the riser. Do this by laying the riser flat on the edge of a table with the back of it right at the edge. Now push the card on to it just as if it was part of the motherboard. You will hear a little click as the latch on the riser snaps shut around the locking tab on the video cards x16 connector. Now visually inspect to make sure the card is seated all the way along the length of the cards slot. This is important. Bad things can happen if it is not – as power and not just data will be flowing from one to the other when powered on… and a short is not a good thing. When it is grab your bag of zip ties and zip ties the back half of the riser to the video card. This way the card can not fall off from gravity slowing pulling it down when it is installed into the mining chassis. While you can also zip the front, there is no need as the locking tab will keep the rise in place.

There is no special secrets to doing this, instead all you need to do is make sure that the zip tie does not interfere with the fans. So before you zip it tight make sure it is either between the card’s cooling fans or located in place that the video cards fascia will keep the zip tie far enough away from the fan so that bad things do not happen. Sometimes this is not possible. In which case we use multiple smaller ones so at to make a ‘peak’ around the fan. When it is tight… spin the cards fans to make sure you did it right. If it does not spin freely, cut the tie off and try again. Then trim it. Before trimming, we like to make sure that the ‘tail’ is either pointed directly up or directly down as this way there is no chance that it can interfere with another cards fans.

When this is complete we recommend having a friend help you out as you will need to lay the card in place on the mining chassis and then adjust the back ledge upwards or downwards so that the card is resting perfectly horizontal on the front ledge and the back. The easiest way to make sure all will be installed perfectly ‘straight’ is place it at one end of the mining chassis, adjust the back ledge, then place it at the other end and adjust that end. Then put it back at the other end to confirm it still will sit nice and straight. When done, plug in the PCIe power cable(s) for the GPU and tuck this thick cable so that it will not interfere with either the fans of another GPU nor hit the chassis fans. We usually tuck them to the back in-between the fans and its GPU. We usually do not spend much time on this as it does not really matter where they are just that they are out of the way. If need be zip time them to the chassis so they do not ‘wander’.

When one GPU is installed, plug in the USB cable to the riser. Then adjust the chassis fans so they are hitting the GPUs properly. When done turn on the system and wait for Widows to initialize your video card. To make sure it has, click on the device manager icon you made earlier then look under ‘Display Adapters’. It should list your NVIDIA or AMD card here. If it does not, there are a few things that could be causing the problem. First it could be the PCIe riser. It usually is a bad riser causing the problems. It could also be a bad USB cable. So shut the system down and try the easy fix first… and change the USB cable. If still not working, try changing the PCIe x1 adapter. Next try using a different PCIe slot. We like to start with the first main x16 slot and then add in another to the first PCIe slot – sometimes it really is as simple as the order you install the cards. Then and only then try a different riser. When you have found the gremlin, if there was a gremlin and hopefully there was not, install the latest Nvidia drivers (or AMD if you are using AMD cards). When complete shut down the system and add another card. Do this process – one at a time – for the first three video cards.
Before we continue we are going to assume that you will be installing 6 video cards in total. If you are not – say only 4 – make sure to cross balance the loads on each power supply. Do not have one with 3 cards and the other with only 1. Try and make it as even as possible. Of course, with odd number of cards this will not be possible but a difference of one card is not a big deal. We recommend this so that one power supply is not idling and the other is under full load. Power supplies are only their most efficient at 90% of load. At under 50% you will be wasting power – and thus costing you more in electricity than it ‘should be’.
Congratulations you are now one step closer to mining!
Article 5: OS and Bios Tweaking (Part 2)
At this point in your journey you should have a system that has three video cards up and running. Before adding in the fourth we need to do a little bit more BIOS Tweaking. So after confirming all three cards are recognized, reboot the system and enter the BIOS.
Go to Advanced, and then System Agent (SA) Configuration, and then Graphics Configuration. In this page select 4G Decoding from the short list. Change this from ‘disabled’ to enabled. The typical Z270-A user will ever run a system with four cards installed and this is why it is disabled by default… but you need to do so. Doing this allows the OS to actually recognize a fourth, fifth etc card. Thankfully this is the last BIOS tweaking you will have to do. So when done, save the changes, exit the BIOS and shut down the system. Now add the fourth. Continue doing this until all cards are installed – and working.
When complete and you have confirmed all is good in your OS world either click this link to download the tweaker.bat file (https://storage.googleapis.com/stateless-www-realhardwarerevi/2018/05/55acd99a-tweaker.txt)
or go to the next page with the entire batch file text.
Obviously, the former is easier than the later… but if you don’t trust us you can easily confirm what it is going to do. Either way, save it to the desktop but do NOT RUN IT YET. This is the last thing you will want to do before mining. You just want to have it downloaded for when you a ready for it.
Article 5: OS and Bios Tweaking (Tweaker.bat)
If you are reading this page…. You don’t trust us. That is cool. We understand. So open up notepad and paste the follow into it (please note this is not our work, all credit to ‘jsanzsp’ for his fine efforts on all miner’s behalf):
[sourcecode language=”bash”
@ECHO OFF
COLOR 1F
SET V=1.7
TITLE Windows 10 Registry tweaks for mining (x64) by: jsanzsp
ECHO #########################################################
ECHO # #
ECHO # WINDOWS 10 X64 #
ECHO # #
ECHO # #
ECHO # AUTHOR: jsanzsp Ethereum Community Forum #
ECHO # #
ECHO #########################################################
REM ======================= Registry tweaks =======================
ECHO.
:regstart
set /p registry="Apply Registry tweaks? y/n: "
if ‘%registry%’ == ‘n’ goto servstart
if /i "%registry%" neq "y" goto regstart
:reg0start
set /p reg0="Replace Utilman with CMD? y/n: "
if ‘%reg0%’ == ‘n’ goto reg1start
if /i "%reg0%" neq "y" goto reg0start
reg add "HKLM\SOFTWARE\Microsoft\Windows NT\CurrentVersion\Image File Execution Options\utilman.exe" /v "Debugger" /t REG_SZ /d "cmd.exe" /f > NUL 2>&1
:reg1start
set /p reg1="Disable Quick Access as default view in Explorer? y/n: "
if ‘%reg1%’ == ‘n’ goto reg2start
if /i "%reg1%" neq "y" goto reg1start
reg add "HKCU\SOFTWARE\Microsoft\Windows\CurrentVersion\Explorer\Advanced" /f /v "LaunchTo" /t REG_DWORD /d 0 > NUL 2>&1
:reg2start
set /p reg2="Show computer shortcut on desktop? y/n: "
if ‘%reg2%’ == ‘n’ goto reg3start
if /i "%reg2%" neq "y" goto reg2start
reg add "HKCU\Software\Microsoft\Windows\CurrentVersion\Explorer\HideDesktopIcons\NewStartPanel" /v "{20D04FE0-3AEA-1069-A2D8-08002B30309D}" /t REG_DWORD /d 0 /f > NUL 2>&1
:reg3start
set /p reg3="Show file extensions? y/n: "
if ‘%reg3%’ == ‘n’ goto reg4start
if /i "%reg3%" neq "y" goto reg3start
reg add "HKCU\SOFTWARE\Microsoft\Windows\CurrentVersion\Explorer\Advanced" /v "HideFileExt" /t REG_DWORD /d 0 /f > NUL 2>&1
:reg4start
set /p reg4="Disable lockscreen? y/n: "
if ‘%reg4%’ == ‘n’ goto reg5start
if /i "%reg4%" neq "y" goto reg4start
reg add "HKLM\SOFTWARE\Policies\Microsoft\Windows\Personalization" /v "NoLockScreen" /t REG_DWORD /d 1 /f > NUL 2>&1
:reg5start
set /p reg5="Enable classic control panel view? y/n: "
if ‘%reg5%’ == ‘n’ goto reg6start
if /i "%reg5%" neq "y" goto reg5start
reg add "HKCU\Software\Microsoft\Windows\CurrentVersion\Policies\Explorer" /v "ForceClassicControlPanel" /t REG_DWORD /d 1 /f > NUL 2>&1
:reg6start
set /p reg6="Hide indication for compressed NTFS files? y/n: "
if ‘%reg6%’ == ‘n’ goto reg7start
if /i "%reg6%" neq "y" goto reg6start
reg add "HKCU\SOFTWARE\Microsoft\Windows\CurrentVersion\Explorer\Advanced" /v "ShowCompColor" /t RED_DWORD /d 0 /f > NUL 2>&1
:reg7start
set /p reg7="Disable Windows Update sharing? y/n: "
if ‘%reg7%’ == ‘n’ goto reg8start
if /i "%reg7%" neq "y" goto reg7start
reg add "HKLM\SOFTWARE\Microsoft\Windows\CurrentVersion\DeliveryOptimization\Config" /v "DownloadMode" /t REG_DWORD /d 0 /f > NUL 2>&1
reg add "HKLM\SOFTWARE\Microsoft\Windows\CurrentVersion\DeliveryOptimization\Config" /v "DODownloadMode" /t REG_DWORD /d 0 /f > NUL 2>&1
:reg8start
set /p reg8="Remove Pin to start? y/n: "
if ‘%reg8%’ == ‘n’ goto reg9start
if /i "%reg8%" neq "y" goto reg8start
reg delete "HKEY_CLASSES_ROOT\exefile\shellex\ContextMenuHandlers\PintoStartScreen" /f > NUL 2>&1
reg delete "HKEY_CLASSES_ROOT\Folder\shellex\ContextMenuHandlers\PintoStartScreen" /f > NUL 2>&1
reg delete "HKEY_CLASSES_ROOT\mscfile\shellex\ContextMenuHandlers\PintoStartScreen" /f > NUL 2>&1
:reg9start
set /p reg9="Classic vertical icon spacing? y/n: "
if ‘%reg9%’ == ‘n’ goto reg10start
if /i "%reg9%" neq "y" goto reg9start
reg add "HKCU\Control Panel\Desktop\WindowMetrics" /v "IconVerticalSpacing" /t REG_SZ /d "-1150" /f > NUL 2>&1
:reg10start
set /p reg10="Remove versioning tab from properties? y/n: "
if ‘%reg10%’ == ‘n’ goto reg11start
if /i "%reg10%" neq "y" goto reg10start
reg add "HKLM\SOFTWARE\Microsoft\Windows\CurrentVersion\Explorer" /v NoPreviousVersionsPage /t REG_DWORD /d 1 /f > NUL 2>&1
:reg11start
set /p reg11="Disable jump lists? y/n: "
if ‘%reg11%’ == ‘n’ goto reg12start
if /i "%reg11%" neq "y" goto reg11start
reg add "HKCU\SOFTWARE\Microsoft\Windows\CurrentVersion\Explorer\Advanced" /v "Start_TrackDocs" /t REG_DWORD /d 0 /f > NUL 2>&1
:reg12start
set /p reg12="Remove telemetry and data collection? y/n: "
if ‘%reg12%’ == ‘n’ goto reg13start
if /i "%reg12%" neq "y" goto reg12start
reg add "HKLM\SOFTWARE\Microsoft\Windows\CurrentVersion\Device Metadata" /v PreventDeviceMetadataFromNetwork /t REG_DWORD /d 1 /f > NUL 2>&1
reg add "HKLM\SOFTWARE\Microsoft\Windows\CurrentVersion\Policies\DataCollection" /v "AllowTelemetry" /t REG_DWORD /d 0 /f > NUL 2>&1
reg add "HKLM\SOFTWARE\Policies\Microsoft\MRT" /v DontOfferThroughWUAU /t REG_DWORD /d 1 /f > NUL 2>&1
reg add "HKLM\SOFTWARE\Policies\Microsoft\SQMClient\Windows" /v "CEIPEnable" /t REG_DWORD /d 0 /f > NUL 2>&1
reg add "HKLM\SOFTWARE\Policies\Microsoft\Windows\AppCompat" /v "AITEnable" /t REG_DWORD /d 0 /f > NUL 2>&1
reg add "HKLM\SOFTWARE\Policies\Microsoft\Windows\AppCompat" /v "DisableUAR" /t REG_DWORD /d 1 /f > NUL 2>&1
reg add "HKLM\SOFTWARE\Policies\Microsoft\Windows\DataCollection" /v "AllowTelemetry" /t REG_DWORD /d 0 /f > NUL 2>&1
reg add "HKLM\COMPONENTS\DerivedData\Components\amd64_microsoft-windows-c..lemetry.lib.cortana_31bf3856ad364e35_10.0.10240.16384_none_40ba2ec3d03bceb0" /v "f!dss-winrt-telemetry.js" /t REG_DWORD /d 0 /f > NUL 2>&1
reg add "HKLM\COMPONENTS\DerivedData\Components\amd64_microsoft-windows-c..lemetry.lib.cortana_31bf3856ad364e35_10.0.10240.16384_none_40ba2ec3d03bceb0" /v "f!proactive-telemetry.js" /t REG_DWORD /d 0 /f > NUL 2>&1
reg add "HKLM\COMPONENTS\DerivedData\Components\amd64_microsoft-windows-c..lemetry.lib.cortana_31bf3856ad364e35_10.0.10240.16384_none_40ba2ec3d03bceb0" /v "f!proactive-telemetry-event_8ac43a41e5030538" /t REG_DWORD /d 0 /f > NUL 2>&1
reg add "HKLM\COMPONENTS\DerivedData\Components\amd64_microsoft-windows-c..lemetry.lib.cortana_31bf3856ad364e35_10.0.10240.16384_none_40ba2ec3d03bceb0" /v "f!proactive-telemetry-inter_58073761d33f144b" /t REG_DWORD /d 0 /f > NUL 2>&1
:reg13start
set /p reg13="Apply Internet Explorer 11 tweaks? y/n: "
if ‘%reg13%’ == ‘n’ goto reg14start
if /i "%reg13%" neq "y" goto reg13start
reg add "HKCU\SOFTWARE\Microsoft\Internet Explorer\Main" /v "DoNotTrack" /t REG_DWORD /d 1 /f > NUL 2>&1
reg add "HKCU\SOFTWARE\Microsoft\Internet Explorer\Main" /v "Search Page" /t REG_SZ /d "http://www.google.es" /f > NUL 2>&1
reg add "HKCU\SOFTWARE\Microsoft\Internet Explorer\Main" /v "Start Page Redirect Cache" /t REG_SZ /d "http://www.google.es" /f > NUL 2>&1
reg add "HKCU\SOFTWARE\Microsoft\Internet Explorer\Main" /v "DisableFirstRunCustomize" /t REG_DWORD /d 1 /f > NUL 2>&1
reg add "HKCU\SOFTWARE\Microsoft\Internet Explorer\Main" /v "RunOnceHasShown" /t REG_DWORD /d 1 /f > NUL 2>&1
reg add "HKCU\SOFTWARE\Microsoft\Internet Explorer\Main" /v "RunOnceComplete" /t REG_DWORD /d 1 /f > NUL 2>&1
reg add "HKLM\SOFTWARE\Microsoft\Internet Explorer\Main" /v "DisableFirstRunCustomize" /t REG_DWORD /d 1 /f > NUL 2>&1
reg add "HKLM\SOFTWARE\Microsoft\Internet Explorer\Main" /v "RunOnceHasShown" /t REG_DWORD /d 1 /f > NUL 2>&1
reg add "HKLM\SOFTWARE\Microsoft\Internet Explorer\Main" /v "RunOnceComplete" /t REG_DWORD /d 1 /f > NUL 2>&1
reg add "HKCU\Software\Policies\Microsoft\Internet Explorer\Main" /v "DisableFirstRunCustomize" /t REG_DWORD /d 1 /f > NUL 2>&1
reg add "HKCU\Software\Policies\Microsoft\Internet Explorer\Main" /v "RunOnceHasShown" /t REG_DWORD /d 1 /f > NUL 2>&1
reg add "HKCU\Software\Policies\Microsoft\Internet Explorer\Main" /v "RunOnceComplete" /t REG_DWORD /d 1 /f > NUL 2>&1
:reg14start
set /p reg14="Disable Cortana, Bing Search and Searchbar? y/n: "
if ‘%reg14%’ == ‘n’ goto reg15start
if /i "%reg14%" neq "y" goto reg14start
reg add "HKLM\SOFTWARE\Policies\Microsoft\Windows\Windows Search" /v "AllowCortana" /t REG_DWORD /d 0 /f > NUL 2>&1
reg add "HKCU\SOFTWARE\Microsoft\Windows\CurrentVersion\Search" /v "CortanaEnabled" /t REG_DWORD /d 0 /f > NUL 2>&1
reg add "HKCU\SOFTWARE\Microsoft\Windows\CurrentVersion\Search" /v "SearchboxTaskbarMode" /t REG_DWORD /d 0 /f > NUL 2>&1
reg add "HKCU\SOFTWARE\Microsoft\Windows\CurrentVersion\Search" /v "BingSearchEnabled" /t REG_DWORD /d 0 /f > NUL 2>&1
:reg15start
set /p reg15="Change Logon screen background with accent color? y/n: "
if ‘%reg15%’ == ‘n’ goto reg16start
if /i "%reg15%" neq "y" goto reg15start
reg add "HKLM\SOFTWARE\Policies\Microsoft\Windows\System" /v "DisableLogonBackgroundImage" /t REG_DWORD /d 1 /f > NUL 2>&1
:reg16start
set /p reg16="Disable Windows Error Reporting? y/n: "
if ‘%reg16%’ == ‘n’ goto reg17start
if /i "%reg16%" neq "y" goto reg16start
reg add "HKLM\SOFTWARE\Policies\Microsoft\Windows\Windows Error Reporting" /v "Disabled" /t REG_DWORD /d 1 /f > NUL 2>&1
:reg17start
set /p reg17="Disable automatic Windows Updates? y/n: "
if ‘%reg17%’ == ‘n’ goto reg18start
if /i "%reg17%" neq "y" goto reg17start
reg add "HKLM\SOFTWARE\Microsoft\Windows\CurrentVersion\WindowsUpdate\Auto Update" /v "AUOptions" /t REG_DWORD /d 2 /f > NUL 2>&1
:reg18start
set /p reg18="Disable Hibernation? y/n: "
if ‘%reg18%’ == ‘n’ goto servstart
if /i "%reg18%" neq "y" goto reg18start
reg add "HKLM\SYSTEM\CurrentControlSet\Control\Session Manager\Power" /v "HiberbootEnabled" /t REG_DWORD /d 0 /f > NUL 2>&1
ECHO Done…
REM ======================= Removing services =======================
ECHO.
:servstart
set /p services="Apply Registry tweaks? y/n: "
if ‘%services%’ == ‘n’ goto schedstart
if /i "%services%" neq "n" if /i "%services%" neq "y" goto servstart
:serv0start
set /p serv0="Disable tracking services? y/n: "
if ‘%serv0%’ == ‘n’ goto serv1start
if /i "%serv0%" neq "y" goto serv0start
sc config DiagTrack start= disabled > NUL 2>&1
sc config diagnosticshub.standardcollector.service start= disabled > NUL 2>&1
sc config TrkWks start= disabled > NUL 2>&1
sc config WMPNetworkSvc start= disabled > NUL 2>&1
:serv1start
set /p serv1="Disable WAP Push Message Routing Service? y/n: "
if ‘%serv1%’ == ‘n’ goto serv2start
if /i "%serv1%" neq "y" goto serv1start
sc config dmwappushservice start= disabled > NUL 2>&1
:serv2start
set /p serv2="Disable Windows Search? y/n: "
if ‘%serv2%’ == ‘n’ goto serv3start
if /i "%serv2%" neq "y" goto serv2start
sc config WSearch start= disabled > NUL 2>&1
del "C:\ProgramData\Microsoft\Search\Data\Applications\Windows\Windows.edb" /s > NUL 2>&1
:serv3start
set /p serv3="Disable Superfetch? y/n: "
if ‘%serv3%’ == ‘n’ goto serv4start
if /i "%serv3%" neq "y" goto serv3start
sc config SysMain start= disabled > NUL 2>&1
:serv4start
set /p serv4="Disable Windows Defender? y/n: "
if ‘%serv4%’ == ‘n’ goto schedstart
if /i "%serv4%" neq "y" goto serv4start
sc config WinDefend start= disabled > NUL 2>&1
sc config WdNisSvc start= disabled > NUL 2>&1
reg add "HKLM\SOFTWARE\Policies\Microsoft\Windows Defender" /v "DisableAntiSpyware" /t REG_DWORD /d 1 /f > NUL 2>&1
schtasks /Change /TN "Microsoft\Windows\Windows Defender\Windows Defender Cache Maintenance" /Disable > NUL 2>&1
schtasks /Change /TN "Microsoft\Windows\Windows Defender\Windows Defender Cleanup" /Disable > NUL 2>&1
schtasks /Change /TN "Microsoft\Windows\Windows Defender\Windows Defender Scheduled Scan" /Disable > NUL 2>&1
schtasks /Change /TN "Microsoft\Windows\Windows Defender\Windows Defender Verification" /Disable > NUL 2>&1
del "C:\ProgramData\Microsoft\Windows Defender\Scans\mpcache*" /s > NUL 2>&1
ECHO Done…
REM ======================= Removing scheduled tasks =======================
ECHO.
:schedstart
set /p schedules="Removing scheduled tasks? y/n: "
if ‘%schedules%’ == ‘n’ goto winappstart
if /i "%schedules%" neq "n" if /i "%schedules%" neq "y" goto schedstart
schtasks /Change /TN "Microsoft\Windows\AppID\SmartScreenSpecific" /Disable > NUL 2>&1
schtasks /Change /TN "Microsoft\Windows\Application Experience\Microsoft Compatibility Appraiser" /Disable > NUL 2>&1
schtasks /Change /TN "Microsoft\Windows\Customer Experience Improvement Program\Consolidator" /Disable > NUL 2>&1
schtasks /Change /TN "Microsoft\Windows\Customer Experience Improvement Program\KernelCeipTask" /Disable > NUL 2>&1
schtasks /Change /TN "Microsoft\Windows\Customer Experience Improvement Program\UsbCeip" /Disable > NUL 2>&1
schtasks /Change /TN "Microsoft\Windows\DiskDiagnostic\Microsoft-Windows-DiskDiagnosticDataCollector" /Disable > NUL 2>&1
schtasks /Change /TN "Microsoft\Windows\NetTrace\GatherNetworkInfo" /Disable > NUL 2>&1
schtasks /Change /TN "Microsoft\Windows\Windows Error Reporting\QueueReporting" /Disable > NUL 2>&1
ECHO Done…
REM ======================= Removing Windows default apps =======================
ECHO.
:winappstart
set /p winapps="Removing Windows default apps? y/n: "
if ‘%winapps%’ == ‘n’ goto odrivestart
if /i "%winapps%" neq "n" if /i "%winapps%" neq "y" goto winappstart
powershell "Get-AppxPackage *3d* | Remove-AppxPackage" > NUL 2>&1
powershell "Get-AppxPackage *bing* | Remove-AppxPackage" > NUL 2>&1
powershell "Get-AppxPackage *zune* | Remove-AppxPackage" > NUL 2>&1
powershell "Get-AppxPackage *photo* | Remove-AppxPackage" > NUL 2>&1
powershell "Get-AppxPackage *communi* | Remove-AppxPackage" > NUL 2>&1
powershell "Get-AppxPackage *solit* | Remove-AppxPackage" > NUL 2>&1
powershell "Get-AppxPackage *phone* | Remove-AppxPackage" > NUL 2>&1
powershell "Get-AppxPackage *soundrec* | Remove-AppxPackage" > NUL 2>&1
powershell "Get-AppxPackage *camera* | Remove-AppxPackage" > NUL 2>&1
powershell "Get-AppxPackage *people* | Remove-AppxPackage" > NUL 2>&1
powershell "Get-AppxPackage *office* | Remove-AppxPackage" > NUL 2>&1
powershell "Get-AppxPackage *xbox* | Remove-AppxPackage" > NUL 2>&1
ECHO Done…
REM ======================= Disable / Remove OneDrive =======================
ECHO.
:odrivestart
set /p onedrive="Disable OneDrive? y/n: "
if ‘%onedrive%’ == ‘n’ goto hoststart
if /i "%onedrive%" neq "y" goto odrivestart
reg add "HKLM\Software\Policies\Microsoft\Windows\OneDrive" /v DisableFileSyncNGSC /t REG_DWORD /d 1 /f > NUL 2>&1
ECHO Done…
REM ======================= Blocking Telemetry Servers =======================
ECHO.
:hoststart
set /p hostsblock="Blocking Telemetry Servers? y/n: "
if ‘%hostsblock%’ == ‘n’ goto finish
if /i "%hostsblock%" neq "n" if /i "%hostsblock%" neq "y" goto hoststart
copy "%WINDIR%\system32\drivers\etc\hosts" "%WINDIR%\system32\drivers\etc\hosts.bak" > NUL 2>&1
attrib -r "%WINDIR%\system32\drivers\etc\hosts" > NUL 2>&1
FIND /C /I "vortex.data.microsoft.com" %WINDIR%\system32\drivers\etc\hosts
IF %ERRORLEVEL% NEQ 0 ECHO ^0.0.0.0 vortex.data.microsoft.com>>%WINDIR%\system32\drivers\etc\hosts
FIND /C /I "vortex-win.data.microsoft.com" %WINDIR%\system32\drivers\etc\hosts
IF %ERRORLEVEL% NEQ 0 ECHO ^0.0.0.0 vortex-win.data.microsoft.com>>%WINDIR%\system32\drivers\etc\hosts
FIND /C /I "telecommand.telemetry.microsoft.com" %WINDIR%\system32\drivers\etc\hosts
IF %ERRORLEVEL% NEQ 0 ECHO ^0.0.0.0 telecommand.telemetry.microsoft.com>>%WINDIR%\system32\drivers\etc\hosts
FIND /C /I "telecommand.telemetry.microsoft.com.nsatc.net" %WINDIR%\system32\drivers\etc\hosts
IF %ERRORLEVEL% NEQ 0 ECHO ^0.0.0.0 telecommand.telemetry.microsoft.com.nsatc.net>>%WINDIR%\system32\drivers\etc\hosts
FIND /C /I "oca.telemetry.microsoft.com" %WINDIR%\system32\drivers\etc\hosts
IF %ERRORLEVEL% NEQ 0 ECHO ^0.0.0.0 oca.telemetry.microsoft.com>>%WINDIR%\system32\drivers\etc\hosts
FIND /C /I "oca.telemetry.microsoft.com.nsatc.net" %WINDIR%\system32\drivers\etc\hosts
IF %ERRORLEVEL% NEQ 0 ECHO ^0.0.0.0 oca.telemetry.microsoft.com.nsatc.net>>%WINDIR%\system32\drivers\etc\hosts
FIND /C /I "sqm.telemetry.microsoft.com" %WINDIR%\system32\drivers\etc\hosts
IF %ERRORLEVEL% NEQ 0 ECHO ^0.0.0.0 sqm.telemetry.microsoft.com>>%WINDIR%\system32\drivers\etc\hosts
FIND /C /I "sqm.telemetry.microsoft.com.nsatc.net" %WINDIR%\system32\drivers\etc\hosts
IF %ERRORLEVEL% NEQ 0 ECHO ^0.0.0.0 sqm.telemetry.microsoft.com.nsatc.net>>%WINDIR%\system32\drivers\etc\hosts
FIND /C /I "watson.telemetry.microsoft.com" %WINDIR%\system32\drivers\etc\hosts
IF %ERRORLEVEL% NEQ 0 ECHO ^0.0.0.0 watson.telemetry.microsoft.com>>%WINDIR%\system32\drivers\etc\hosts
FIND /C /I "watson.telemetry.microsoft.com.nsatc.net" %WINDIR%\system32\drivers\etc\hosts
IF %ERRORLEVEL% NEQ 0 ECHO ^0.0.0.0 watson.telemetry.microsoft.com.nsatc.net>>%WINDIR%\system32\drivers\etc\hosts
FIND /C /I "redir.metaservices.microsoft.com" %WINDIR%\system32\drivers\etc\hosts
IF %ERRORLEVEL% NEQ 0 ECHO ^0.0.0.0 redir.metaservices.microsoft.com>>%WINDIR%\system32\drivers\etc\hosts
FIND /C /I "choice.microsoft.com" %WINDIR%\system32\drivers\etc\hosts
IF %ERRORLEVEL% NEQ 0 ECHO ^0.0.0.0 choice.microsoft.com>>%WINDIR%\system32\drivers\etc\hosts
FIND /C /I "choice.microsoft.com.nsatc.net" %WINDIR%\system32\drivers\etc\hosts
IF %ERRORLEVEL% NEQ 0 ECHO ^0.0.0.0 choice.microsoft.com.nsatc.net>>%WINDIR%\system32\drivers\etc\hosts
FIND /C /I "df.telemetry.microsoft.com" %WINDIR%\system32\drivers\etc\hosts
IF %ERRORLEVEL% NEQ 0 ECHO ^0.0.0.0 df.telemetry.microsoft.com>>%WINDIR%\system32\drivers\etc\hosts
FIND /C /I "reports.wes.df.telemetry.microsoft.com" %WINDIR%\system32\drivers\etc\hosts
IF %ERRORLEVEL% NEQ 0 ECHO ^0.0.0.0 reports.wes.df.telemetry.microsoft.com>>%WINDIR%\system32\drivers\etc\hosts
FIND /C /I "services.wes.df.telemetry.microsoft.com" %WINDIR%\system32\drivers\etc\hosts
IF %ERRORLEVEL% NEQ 0 ECHO ^0.0.0.0 services.wes.df.telemetry.microsoft.com>>%WINDIR%\system32\drivers\etc\hosts
FIND /C /I "sqm.df.telemetry.microsoft.com" %WINDIR%\system32\drivers\etc\hosts
IF %ERRORLEVEL% NEQ 0 ECHO ^0.0.0.0 sqm.df.telemetry.microsoft.com>>%WINDIR%\system32\drivers\etc\hosts
FIND /C /I "telemetry.microsoft.com" %WINDIR%\system32\drivers\etc\hosts
IF %ERRORLEVEL% NEQ 0 ECHO ^0.0.0.0 telemetry.microsoft.com>>%WINDIR%\system32\drivers\etc\hosts
FIND /C /I "watson.ppe.telemetry.microsoft.com" %WINDIR%\system32\drivers\etc\hosts
IF %ERRORLEVEL% NEQ 0 ECHO ^0.0.0.0 watson.ppe.telemetry.microsoft.com>>%WINDIR%\system32\drivers\etc\hosts
FIND /C /I "telemetry.appex.bing.net" %WINDIR%\system32\drivers\etc\hosts
IF %ERRORLEVEL% NEQ 0 ECHO ^0.0.0.0 telemetry.appex.bing.net>>%WINDIR%\system32\drivers\etc\hosts
FIND /C /I "telemetry.urs.microsoft.com" %WINDIR%\system32\drivers\etc\hosts
IF %ERRORLEVEL% NEQ 0 ECHO ^0.0.0.0 telemetry.urs.microsoft.com>>%WINDIR%\system32\drivers\etc\hosts
FIND /C /I "telemetry.appex.bing.net:443" %WINDIR%\system32\drivers\etc\hosts
IF %ERRORLEVEL% NEQ 0 ECHO ^0.0.0.0 telemetry.appex.bing.net:443>>%WINDIR%\system32\drivers\etc\hosts
FIND /C /I "settings-sandbox.data.microsoft.com" %WINDIR%\system32\drivers\etc\hosts
IF %ERRORLEVEL% NEQ 0 ECHO ^0.0.0.0 settings-sandbox.data.microsoft.com>>%WINDIR%\system32\drivers\etc\hosts
FIND /C /I "vortex-sandbox.data.microsoft.com" %WINDIR%\system32\drivers\etc\hosts
IF %ERRORLEVEL% NEQ 0 ECHO ^0.0.0.0 vortex-sandbox.data.microsoft.com>>%WINDIR%\system32\drivers\etc\hosts
attrib +r "%WINDIR%\system32\drivers\etc\hosts" > NUL 2>&1
:finish
CLS
ECHO #########################################################
ECHO # #
ECHO # WINDOWS 10 X64 #
ECHO # #
ECHO # #
ECHO # AUTHOR: jsanzsp #
ECHO # #
ECHO #########################################################
ECHO.
ECHO Finish nice mining!!
ECHO Press a key to exit.
PAUSE > NUL
[/sourcecode
Now save this is a .bat file. We usually call it Tweaker.bat. The name does not matter. Save it to the desktop but do NOT RUN IT YET. This is the last thing you will want to do before mining.
Article 6: Setup and Configuration of MultiPoolMiner (aka your Mining Application… that runs the other mining applications)
As with most things in PC related there are numerous options to choose from when picking a mining application. One option that offers a good combination of reliability and performance is Aaron Saces’s MultiPoolMiner (MPM). It is not the only option and other good choices include MegaMiner (https://github.com/tutulino/Megaminer/releases), and NemosMiner (https://github.com/nemosminer/NemosMiner-v2.3/releases). In this article we are going to focus solely on MultiPoolMiner (aka ‘MPM’) as it has proven to be very valuable and very stable for our systems. You may find that it is not the right one for you and as such we recommend trying multiple mining applications before making a final decision.
We do find that the default configuration of MPM does leave a bit to be desired and as such have modified it for our own rigs. These modifications do improve our profitability but may not for you. As such we are going to deal solely with the default MPM set up and walk you through its unique configuration. If you are interested in the modifications you can simply download this https://storage.googleapis.com/stateless-www-realhardwarerevi/rhr-storage/images/images/mining/intro_articles/MultiPoolMinerV2.7.1.4.zip. It already has the below tweaks done for you and is 100% virus free. However, lets assume you don’t trust us.

The very first thing you will want to do is navigate to https://github.com/MultiPoolMiner/MultiPoolMiner and download MPM. This however is where some confusion will occur – and just one of the quirks of open source software. You do not want to ‘clone’ the ‘master’ version. This version is the latest beta software that has not been officially released. Instead you will want to select ‘releases’ and download the latest official release – not any pre-releases. At the time of this writing it is 2.7.1.4. This is the last version before MPM went a configuration text file. Right now we recommend holding off on this new way of doing things for a while as it is basically a major rewrite of the application. When we feel it is stable enough to use we will do another article on it.
Once you have download the .zip file extract it to your C drive. We recommend C:\MultiPoolMiner as this location is not administrator locked and can be accessed easily by the OS without asking permissions every time.
Since we have not yet modified Windows 10 to become a much more efficient miner a few steps have to be done before opening MPH up. The first is to add this entire folder to your Anti-Virus software exceptions list. Do not worry there is no virus or malware included, rather some AV software simply considers mining applications to be suspect and blocks their running. This is a bad thing as you need to use a miner in order to make coins to sell for profit. Please do this for each and every Anti-Malware and Antivirus program you use (including Windows Defender). The exact method of doing this will vary from AV to AV.
In this folder you will see numerous ‘.bat’ files. Right Click on the one labeled start.bat and select ‘edit’ from the drop down list of options. Then select the entirety of this small file (cntrl+A) and paste in the following:
[sourcecode language=”bash”
cd /d %~dp0
setx GPU_FORCE_64BIT_PTR 1
setx GPU_MAX_HEAP_SIZE 100
setx GPU_USE_SYNC_OBJECTS 1
setx GPU_MAX_ALLOC_PERCENT 100
setx GPU_SINGLE_ALLOC_PERCENT 100
set "command=& .\multipoolminer.ps1
-wallet STEP_ONE_HERE -username Step_Two_Here -workername Step_Three_Here -region Step_Four_Here -currency Step_Five_Here -type Step_Six_Here -poolname miningpoolhub,miningpoolhubcoins,ahashpool -algorithm cryptonight,ethash,equihash,blake2s,lyra2re2,lyra2z,neoscrypt,x17,phi,xevan,skein,nist5 -donate 24 -watchdog – interval 300 -switchingprevention 2"
pwsh -noexit -executionpolicy bypass -windowstyle maximized -command "%command%"
powershell -version 5.0 -noexit -executionpolicy bypass -windowstyle maximized -command "%command%"
msiexec -i https://github.com/PowerShell/PowerShell/releases/download/v6.0.0-rc.2/PowerShell-6.0.0-rc.2-win-x64.msi -qb!
pwsh -noexit -executionpolicy bypass -windowstyle maximized -command "%command%"
pause
[/sourcecode
As you will see it does modified the default options slightly in that it allows use to give you step by step instructions that you need to do. It also removes the algorithms that are less than optimal. As time goes by you can play with which algorithms you wish to use in your setup (see the next article on how to do this) but this shorter list is a good place to start. To add new algorithms simply open up the ‘Alogrithms.txt’ file in the MPH folder and find the name for the one you wish to add. The first part of the each line is the command option followed by a ‘:’ and then the ‘name’ of the algorithm. Remember we do not care about coins, we are mining algorithms that the pools consider to be the most profitable at that time.
You will want to pace a comma and then the first part of the proper line at the end of the ‘-coins’ section of the start.bat file. This will add that algorithm to your list. For example if you wish to add polytimos the line is as follows is “myriadcoingroestl”: “MyriadGroestl”,. So the new section in the start.bat file will look like this:
-algorithm cryptonight,ethash,equihash,blake2s,lyra2re2,lyra2z,neoscrypt,x17,phi,xevan,skein,nist5,myriadcoingroestl
However, we recommend starting with the default algorithms we have chosen for you and only add as time goes by.
Now with that explanation taken care of let’s start modifying the Start.bat file. You will now see Step 1/2/3/4/etc. included. These are the parts you will need to modify. For each one remove the Step_X_Here and insert the following changes.
For step one you will need to change this to your BTC wallet. This can be found in Electrum application, then ‘receive’. Press the little icon to the in the right corner of the the first line, this will copy your unique BTC address to your clipboard. This BTC wallet will begin with ‘1’ and be very long. Do not try and manually type it in. One error and you will have problems when you add other pools besides Mining Pool Hub. Instead, select ‘Step_One_Here’ in the bat file and paste it in via cntrl+V.
For step two change ‘Step_Two_Here’ to the name you use to login into Mining Pool Hub – and just recently created. For example if your username is ‘I_am_A_Miner_Now’ insert this username here (without the ‘ ‘ included). This is your unique username and must be done correctly or the mining pool will not assign the profits to your BTC wallet. I.E. Mining Pool Hub uses this to known who is mining what and who to credit the profits to.
Step three requires you to change ‘Step_Three_Here’ to a unique worker name. It can be anything you wish but should be different for each system you are using for mining. For example, on our first system we would use ‘Rig1’ (sans ”) and on a second system we would use ‘Rig2’. It does not matter what you use, just as long as you use something. This is your ‘worker name’ that the pools uses to track each systems performance.
Next your insert ‘us’, ‘asia’, or “europe” depending on your location where it says Step_Four_Here. This tells the miner application which servers to connect to. There is no ‘Canada’ or ‘France’ option. It must be one of these three locations. Once again do not include ” just the bit between them.
Next change ‘Step_Five_Here’ to the currency you wish to see displayed. We recommend ‘btc,usd’ and then eur or cad (depending on where you are located). E.G. for US readers just use ‘btc,usd’ for this step, for Canadians use ‘btc,usd,cad’. For EU readers use ‘btc,usd,eur’. If you wish you can simply use ‘btc,usd’ as not all country’s currencies are supported and this is just for information purposes only, it really does not matter what you use besides ‘btc’ which should be the first currency.
For Step six change Step_Six_Here to what type of video cards you are using. For AMD owners change this to ‘amd’ (sans ”), for NVIDIA owners change this to ‘nvidia’. You can include both but we do not recommend mixing NVIDIA and AMD.
With these simple steps completed you should have a file that looks like this:
[sourcecode language=”bash”
cd /d %~dp0
setx GPU_FORCE_64BIT_PTR 1
setx GPU_MAX_HEAP_SIZE 100
setx GPU_USE_SYNC_OBJECTS 1
setx GPU_MAX_ALLOC_PERCENT 100
setx GPU_SINGLE_ALLOC_PERCENT 100
set "command=& .\multipoolminer.ps1
-wallet 1Q24z7gHPDbedkaWDTFqhMF8g7iHMehsCb -username secret_sauce -workername Rig1 -region us -currency btc,us -type nvidia -poolname miningpoolhub,miningpoolhubcoins,ahashpool -algorithm cryptonight,ethash,equihash,blake2s,lyra2re2,lyra2z,neoscrypt,x17,phi,xevan,skein,nist5 -donate 24 -watchdog – interval 300 -switchingprevention 2"
pwsh -noexit -executionpolicy bypass -windowstyle maximized -command "%command%"
powershell -version 5.0 -noexit -executionpolicy bypass -windowstyle maximized -command "%command%"
msiexec -i https://github.com/PowerShell/PowerShell/releases/download/v6.0.0-rc.2/PowerShell-6.0.0-rc.2-win-x64.msi -qb!
pwsh -noexit -executionpolicy bypass -windowstyle maximized -command "%command%"
pause
[/sourcecode
If your file looks something like this are good to go. Save it but do not double click it yet. First we need to install a few applications that are needed for the miners to work. These are all Microsoft updates that should only be downloaded from Microsoft and include Visual C and PowerShell updates. They are needed so please navigate to the following Github and Microsoft URLS, download them and install them one by one.
PowerShell 6: https://github.com/PowerShell/PowerShell/releases/download/v6.0.1/PowerShell-6.0.1-win-x64.msi
Microsoft .NET Framework 4.5.1: https://www.microsoft.com/en-us/download/details.aspx?id=40773
MSVCR120.dll: https://www.microsoft.com/en-gb/download/details.aspx?id=40784
VCRUNTIME140.DLL: https://www.microsoft.com/en-us/download/details.aspx?id=48145
The last step is to manually download Nice Hash’s Excavator application here (https://github.com/nicehash/excavator/releases). Even though you will not be mining to Nice Hash its custom mining application can actually be faster for some coins that the usual open source ones. As such it will be needed in a moment. Sadly, since Nice Hash developers have not fully embraced the open source movement, this is the one miner application MultiPoolMiner cannot download for you. You have to manually download it. Once it is downloaded, just remember where it was downloaded to – as you will need it.
When all are downloaded and all but Excavator is installed and there is one last thing to do before double clicking that start.bat file you just modified. That is run the ‘Tweaker.bat’ file you made in the previous article. This turns off a bunch of useless ‘features’ in Windows as allows your system to run more optimally. It still will not be as optimal, or stable, as Linux but it is much better than stock configuration.
At this point your lean, mean, mining machine is ready to be unleashed. Let it. Start the MultiPoolMiner app and let it first download, then install, and finally benchmark all the various applications it has at its disposal. Don’t worry if this takes hours. You will be paid for your time. We recommend letting it run for 48hrs before reading the final article.
Before moving to that article there is a few last things we need to cover. Upon opening and running this program for the first time do not be surprised when it starts to download MS PowerShell. Yes, it is already installed but MPM will download it to a folder it just created called ‘downloads’. Do not try and circumvent this process. Let it. Every time you run this program it will check its downloaded version versus the one on online. This takes a moment or two, so do not worry when you see it ‘downloading’ it again. It will only download it again if the versions changes. At which point it will install it for you.
When this is completed do not worry if you get an error that says ‘no miners found’. This too is expected and normal. Just as with the PowerShell installation file, MPM will download the miners to the download folder and then automatically install them for you. Do not stop this process. If you do, delete the newly created ‘Bin’ folder and start over. Once it has downloaded the first miner, and installed it, the application will start the benchmarking process even while it is downloading the other miners. Do not worry as you see the list of algorithms and ‘benchmarking’ grow. This too is expected and normal.
While it is doing all this we recommend minimizing this PowerShell command line window and doing two things. First, drag and drop the excavator.zip file you recently downloaded into the newly created ‘Downloads’ folder (e.g. C:\MultiPoolMiner-master\Downloads). If such a folder does not exist, do not worry, MPM will create it in a moment. Wait a few moments and refresh your screen. It will appear.
Then open the zip and navigate down until the folder says ‘excavator’. Now drag and drop this to the newly created ‘Bin’ folder. Yes Nice Hash does not make things easy for the open source community, but is what it is. In a moment you will notice that now you have Ecavator options in the list of miners and it has been added to the benchmarking process. When the benchmarking is completed you will have a long list of algorithms and how much profit is estimated from them. These are going to change, sometimes everytime the window refreshes. Don’t worry. This is normal. This is a very rough guideline based on 24 hour projections of that exact moments profits for all the various coins. It is always wrong.
You may also notice the application is not mining the ‘most profitable’ alogrithm at any time. This too is fine. This application takes into account the long term earnings of an alogrithm and picks the most stable. This is where ‘-switchingprevention 2’ comes into play. It will eventually switch to the most profitable but it ignores sudden, and short lived, peaks in profits. Instead it will mine what it feels will actually be the most profitable… not what a sudden spike in one alogrithm promises to do. Remember it takes 24hours or more for any shares to make it into your account. So stability is key to long term profits… not blips that come and go like mayflies.
You may also see a yellow line with ‘MultiPoolMiner is XYZ more profitable…’ in it. Ignore it. It will slowly dial in its estimates over a period of time and then let you see if you are making what you ‘should be’ in a perfect world – or if there has been a major change in the market. There is not much you can do about it as the market fluctuates all the time. Basically, it is for informational purposes only and may become useful in the future if the markets stabilize and stay there.
Now you are ready to for the last article.
Article 7: How to pick algorithms & pools (and when to add/drop them)
At this point you are basically up and running and it is time to start thinking about optimizations. This is when the continuing work begins. Before we do go over the process we use, please understand that it can take 24hrs (and maybe even longer sometimes) for your earnings to show up in any pools balance. This is normal. Depending on the coin not only does the pool have to mine an entire block to win it, but then it has to gather anywhere from 30 (Tribus variants) to 250 (Xevan variants) confirmations with that coins ‘governing authority’ before the pool can send it to an exchange. On average it is 100 confirmations. Only when it hits this magic number will it show up as ‘immature’ in your wallet page. After they have confirmed the block then they send it to the exchange (and it becomes ‘pending’ or ‘on exchange’ in your wallet page)… at which point it takes time to ‘sell’ for BTC and then more time to for the BTC to show up in the pools wallet. Only after all this is done will it become ‘confirmed’ in your wallet page’s balance.
So what we like to do is expect the first day, and the second day’s mining results to be less than optimal. Then we expect things to level out to what they ‘should be’. So after three full days is the time to start thinking about algorithms and the like.
The key to dropping or adding alogs is patience. Any changes will need 24hours at the minimum to show up… and really should be given 72hrs. So do one thing at a time, and be patient. See what impact it has, then do another. In order to accurately track your progress we recommend picking a time that you know you will be free to check your stats. We use 10pm. This is the only time we check our results. Do not overthink it. This is supposed to be as hands off an experience as possible… so don’t check every 10 minutes. You will drive yourself insane.
This is how we track things. First create text file and call it something easy to remember.
Next we do this for each day:
First line looks like this:
10pm -> XXXBTC EARNED GOES HEREXXX (BTC was X, XX notes for the day go here – like alog added or dropped) XXWhat DAY it was goes hereXX. Satoshi fee (as shown in Electrum for 5block transfer) goes here.
Second line looks like this
XXXMPH balance hereXXX + XXXAHP Total Earned goes hereXXX + XX other pool hereXX
Then we simply add the two numbers for the day and the subtract the previous days final BTC number from it. Now we have a fairly accurate idea of what went on over the past 24hrs.
So now you have an idea on what you are making with the default settings. Now it is time to start tweaking and optimizing. For the past little while the altcoin markets have bounced around like a ping-pong ball. This makes eking out every last mBTC rather difficult if you only have two or three algorithms in your MultiPoolMiner start.bat file. We personally like to run with the top 5 or 6 alogs… and swap out as necessary.
To figure out which are actually ‘the best’ for your mining rig is not that difficult. All it takes is a little bit of effort… and a bit of math. First start by making another text file with your hashing power for each algorithm and the 24hr avg for said alogirthm. If you really want to be fancy an excel spreadsheet can help automate this process. Here is an example of ours:

As you can see each algorithm has a different rate. You will need to change these hash rates based on what MultiPoolMiner shows – only include the best miner for each alog. We have set it up for MegaHashes for most algorithms… but as Blake2S is reported in GigaHashes… we use Gigahashes for this line. If you have not already benchmarked an alog you can add it in and get your results… or use our numbers to get a ‘feel’ for what it should be before becoming potentially profitable. You will also notice a column in the excel spreadsheet to the left. This is the previous 24avg for each alog. This way you can get an idea on which are becoming ‘hot’ and which are cooling off. This too may help in what to add and what to not add.
For the most part the only three on MPH that you need to check are Equihash, ETHash, and Lyra2z. The rest are rarely going to be used… as AHashPool is consistently better – and thus the MultiPoolMiner picks AHP for these algorithms over MultiPoolHub. So navigate to MPH and copy the 24hr average for these three. Plunk them into the appropriate line. You will see the BTC profit change. This is ‘in a perfect world where there is no fees and tomorrow will be the exact same as today’ results. Basically it is a Scientific Wild Ass Guess… but will get you into the right ballpark – and is the best option right now.
Next navigate to Ahashpool.com and copy the ’24 hours Actual*’ column for each algorithm – the one furthest on the right. This is what the pool actually did in the past 24hrs on that algorithm. The two columns in from it… are not entirely accurate and instead show what the next 24hours is estimated at and what it is currently reporting. These change all the time. Don’t use them. 24 average also changes but is based on a longer period of time (the last 24 hours – obviously).
When done you will see what 5 alogs are most profitable right now. If two give the same results… add both in and count them both as one not two – this is why we sometimes have six algorithms and not 5. Stick them into your start.bat file, restart MultiPoolMiner and walk away. Wait at least 24 hours to see if this improved things. Sometimes it won’t as an algorithm you mined on… suddenly cooled off before the pool could get your (and everyone else’s) profits off the exchange. It happens.
Rinse and repeat every couple days… and you will be mining a good assortment of altcoins that should bring you in the most profits. It will never reach the actual numbers in your spreadsheet but it should improve your earnings. Over time you will get a feel for which alogs give you the best, most consistent results. Just remember alogs that are hot this month may not be the next – and vice versa. So even if you do not decide to check everyday you may want to check at least once a week.
When you have a feel for how to dial in which algorithms to use. It may also be time to think about different pools and their potential profits. We would only do this just before a payout on the pool you are mining on – remember until you get a payout it really is not your BTC. The process is exactly the same but now you are comparing pool 1 vs pool 2 earnings. At this time Ahashpool is very good, but because they have a lot of miners… a smaller pool called Blazepool.com actually pays better, and does so consistently. They are a smaller pool so it is riskier – as pool luck is actually better for bigger pools with more miners ‘looking’, but they do seem to be on the up and up. They pay on time and are worth investigating further. We know we are. Your Mileage May Vary as they have only recently appeared on our radar. We have included a custom pool file for them called blazepool.ps1 in the zip folder, and to use them simply use ‘blazepool’ in the .bat file instead of ‘ahashpool’ or ‘miningpoolhub’. For small miners we recommend sticking to one pool… so do your own research and choose wisely.
We hoped you enjoyed this series of articles and have learned a few things. Feel free comment, or ask questions in our forum!
