A sea-change for enthusiasts
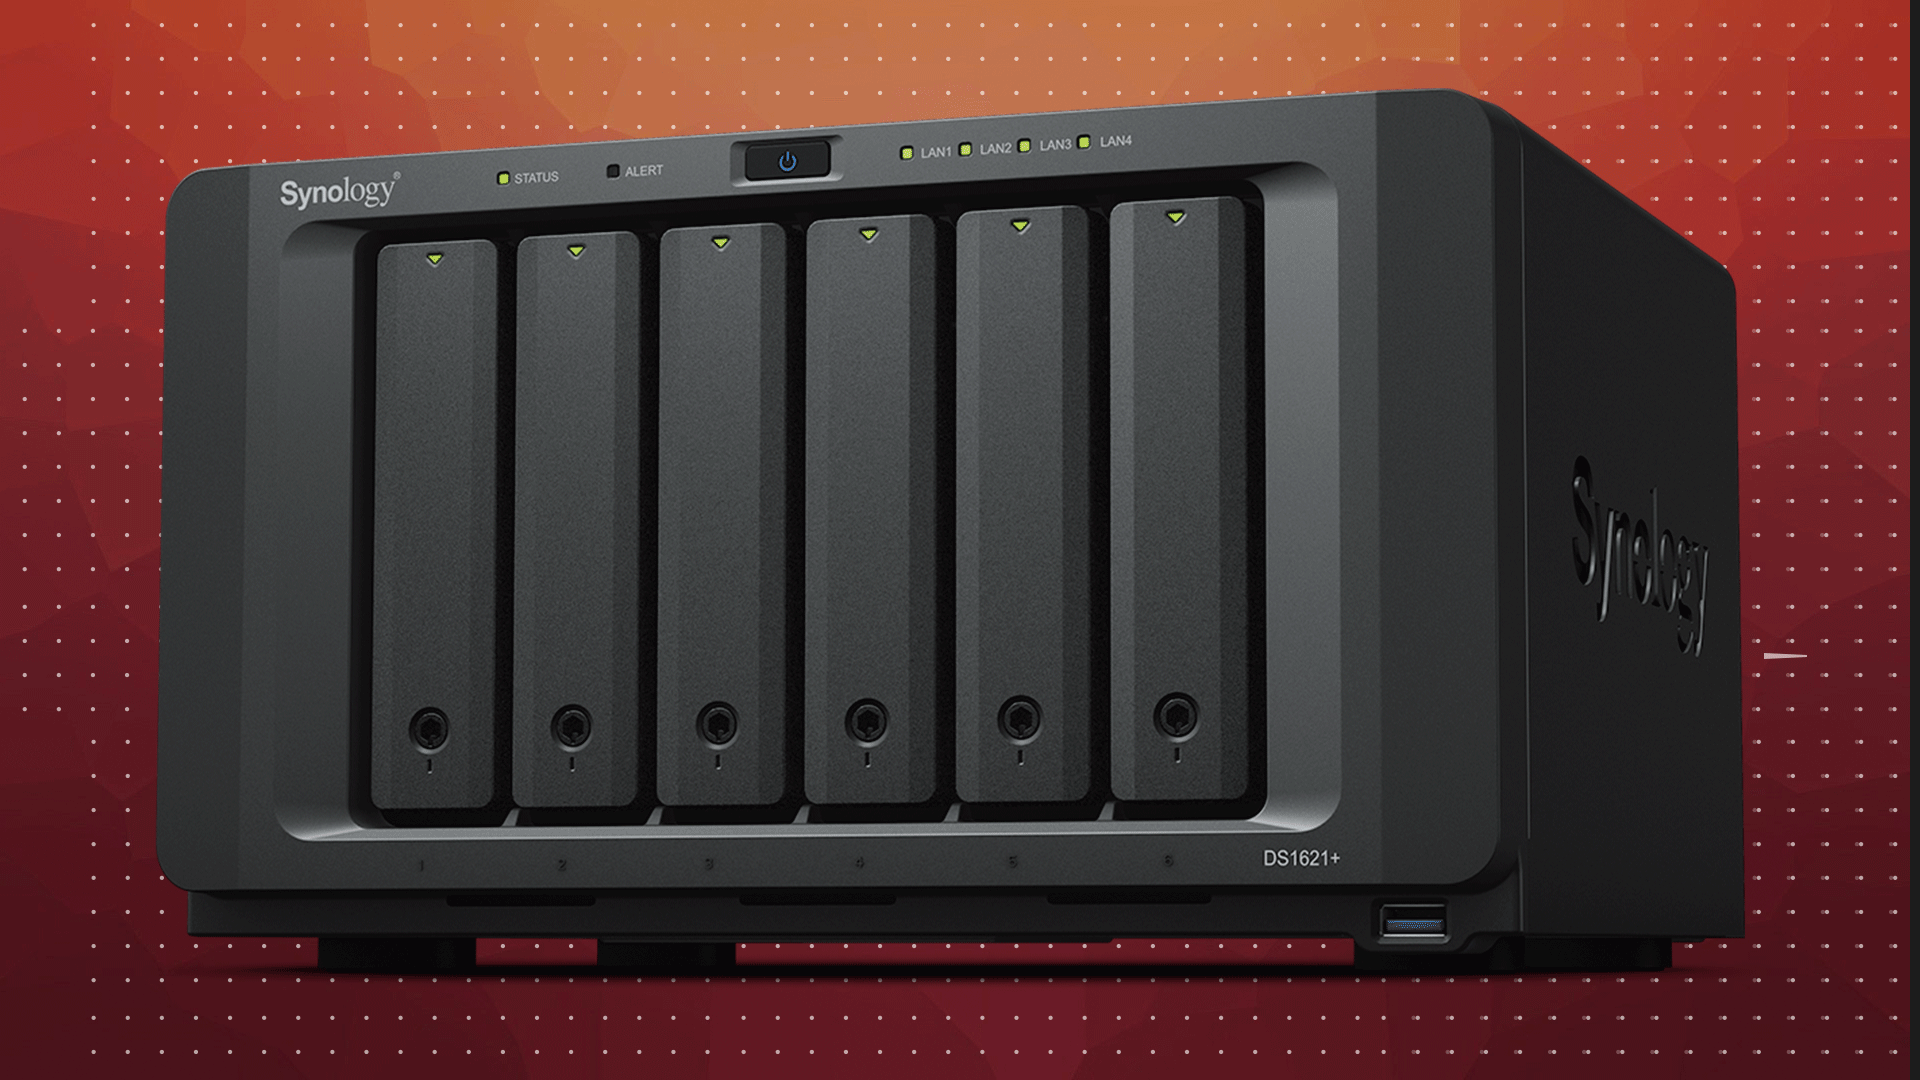
Last year we took an in-depth ‘deep dive’ into the Synology ecosystem via the rather good DiskStation DS1520+ and walked away very impressed with the state of the NAS appliance industry. Today we will be putting another Synology under the microscope to further see precisely what Synology’s “IT Enthusiast and S/MB” Grade NAS models have to offer. To be precise we will be looking at the recently released, $800 DiskStation DS1621+.
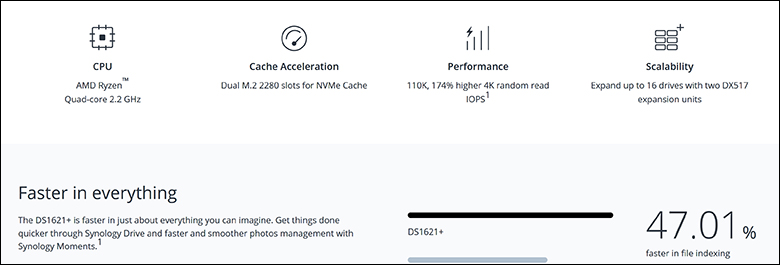
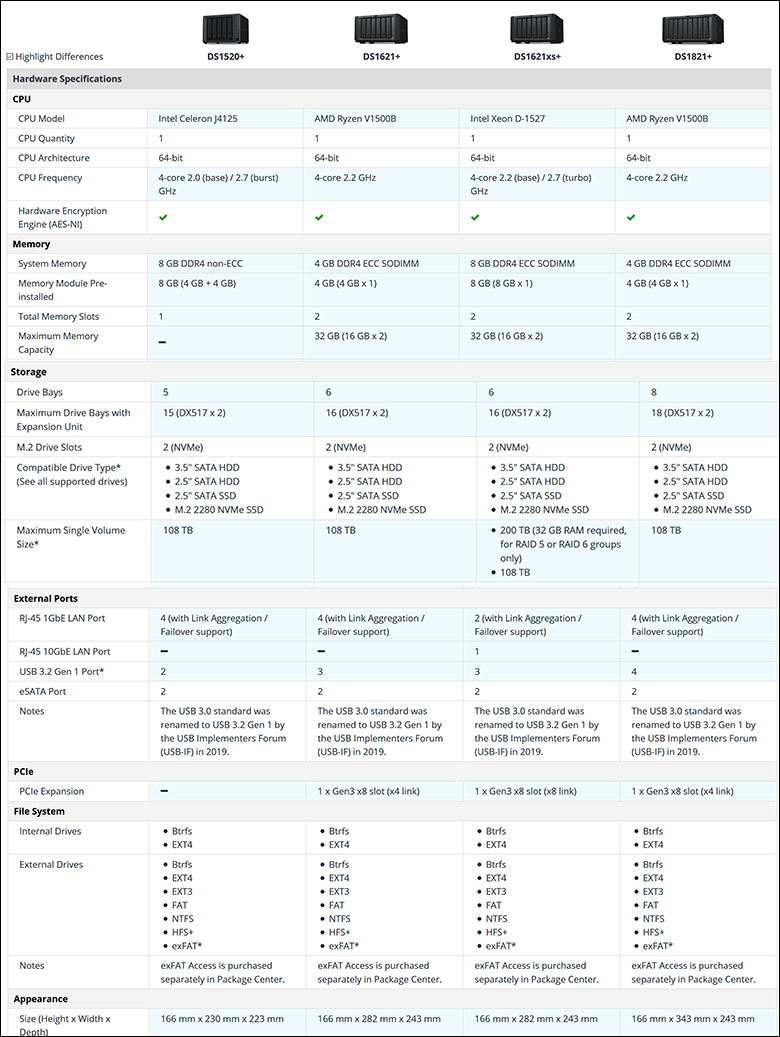
Make no mistake the DS1621+ is not “just a DS1520+ with an extra bay attached”, nor is it “just a refreshed DS1618+”. Instead, many things have changed under the hood. The most notable is not the improved chassis. No, the most obvious to enthusiasts, and the most exciting, is this is not an Intel CPU based model (the previous DS1618+ used the Intel Atom c3538, and 20+ models use the Intel Celeron j4125). Rather than Intel, Synology has opted for AMD’s (Zen 1 based) 4core/8thread Ryzen V1500B. This change is more than just going from ‘Ford’ to a ‘Chevy’ and represents a massive leap forward in processing horsepower. Think better than 47 percent improvement over its predecessor (or about 25-40 percent improvement over the J4125… depending on benchmark used). This improvement, should (in theory) translate to even better RAID 5/6/SHR1/SHR2/etc. performance… as it is the creation of the parity stripe(s) that slow things down. Mix in support for ECC RAM, and plenty of it, the V1000-series may indeed represent a great leap forward for the entire NAS appliance industry.
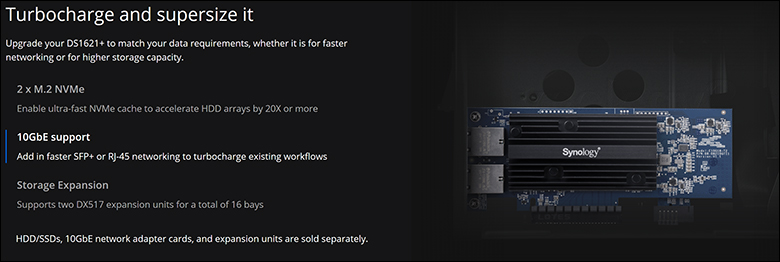
Of course, this change is not all roses and not without controversy. Needless to say, we will be investigating the pros and cons of what the changes actually mean to real-world usage and see what else may be different – in both good and bad meaning of the word. To this end we will be testing it in its “out of the box” configuration and with upgraded RAM (32GB Micron MTA18ASF2G72HZ-2G6E1), and upgraded NIC (E10G21-F2 add in card). We will then go over the various upgrade options and the pros and cons of such upgrades. This way, by the end of this review you should have a very good handle on what the new DS1621+ brings to the table and if it is the optimal NAS appliance for your needs.
Specifications and Features
First Impressions

For all intents and purposes, the DS1621Plus’ shipping container can be considered as a larger variation on the one Synology uses for their DS1520Plus model. This is to be expected. Synology are almost aggressive in carrying out their conservative, understated, aesthetic philosophy across all their lines of non-rackmountable NAS appliances. They have done so for many years and their approach to shipping boxes is refreshing… as we do not want, need, or even desire a shipping container that caters to our inner child. Remember, their “Plus” line of NAS devices are their professional and enthusiast orientated models.
Professionals in a work environment would consider an over-the-top box a major negative… and make things that much harder to ‘sell’ it to their bosses. Most NAS enthusiasts are also professionals. Professionals who are purchasing a model for their homes… and the same line of reasoning applies in to them. Most importantly, it may lack pictures or a glossy surface, but the box has been liberally covered in information. So, it may be a bit confusing in which box is which but if you take the time to read the label you will be fine.
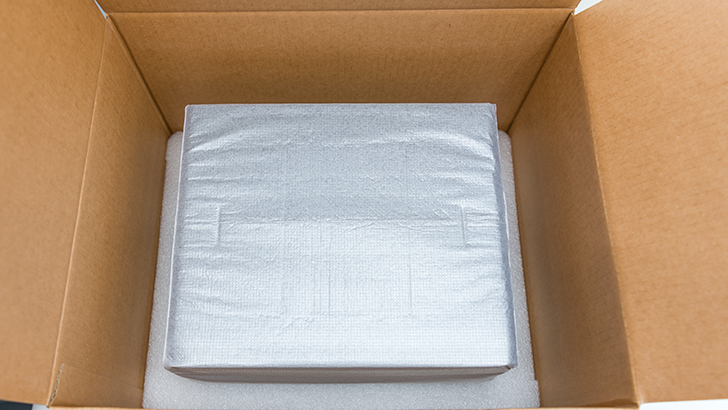
Internally, the shipping container uses a combination of form-fitting low density foam packaging as well as a carboard ‘sacrifice’ box (which in turn houses the included accessories). This combination means that you can rest assured that no matter what happens during in-transit that the DS1621+ will arrive safe and sound. Be it shipped across town, across country, or across the ocean.

The accessory list is rather decent, but not perfect. In grand total you will get a proper plug for your country. You will get a short infographic setup users guide. You will get a pair of 1GbE Ethernet cables. You will even get a pair of locks for the drive caddies as well as a small bag of screws (to properly mount and secure the HDDs to their hot-swap caddies).
For the most part this accessory list ticks all the necessary boxes nicely. What Synology does not include, and will be disappointing to professionals used to such things, is a manual. The startup guide will indeed get you up and running but as it is just a few pages it will not, cannot, go over the finer points of the device’s OS. Also a bit on the disappointing side is the inclusion of only two cables. Yes they are shielded 1GbE Cat5E cables… but there is only two of them. This is a four 10/100/1000 port equipped device meant for professionals… and using shielded cables on an unshielded network is a recipe for EMI degrading performance. We much rather have seen four non-shielded CAT 6 cables that two shielded Cat5E cables. Especially on a $800 NAS marketed towards professionals who can make use of all 4 ports of the DS1621Plus. So overall, the accessory list is decent but there is room for improvement.
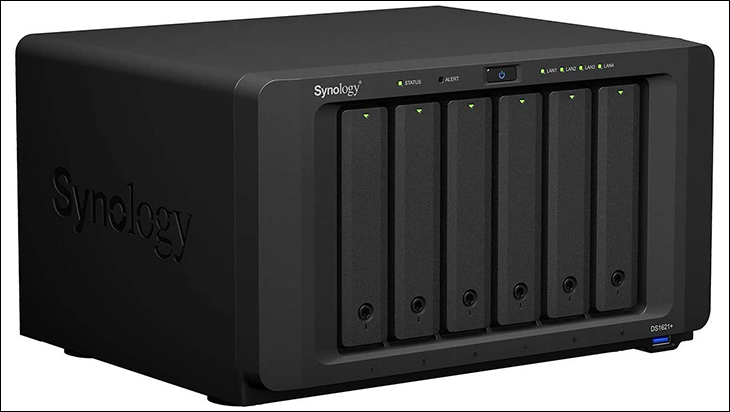
Whether this is your first Synology NAS appliance or your hundred and first, the DS1621Plus is sure to make a great first impression. For first timers, the combination of beveled corners and nicely ‘hefty’ weight to the unit will give buyers a peace of mind that they did indeed buy a reliable NAS appliance. For long time Synology owners the upgrade from polymer to moderately thick metal exterior will do the same… and prove to them that Synology actually listens to their feedback. Listened to their feedback and improved their chassis without sacrificing either the stylish good looks or ease of use that made a Synology famous in the first place.
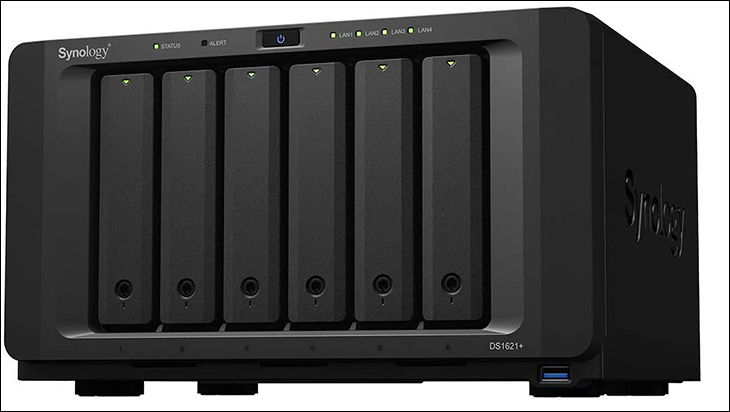
While we personally have no major issues with the previous generation’s polymer skin, the change to metal is indeed an upgrade. One that exudes longevity and robustness. One where you know you will not have to upgrade your NAS just because you dropped a screwdriver on to it and crack its case (though you may have to hammer out a dent if you do so).
The change from ‘plastic’ to metal also means the overall footprint has been improved and at 166 x 282 x 243 mm it actually is not all that much bigger than the DS1520+ (166 mm x 230 mm x 223mm). Of course, as it is made from metal it is much heftier and tips the scales (empty) nearly twice the that of the DS1520+ (5.1KG vs 2.63KG).

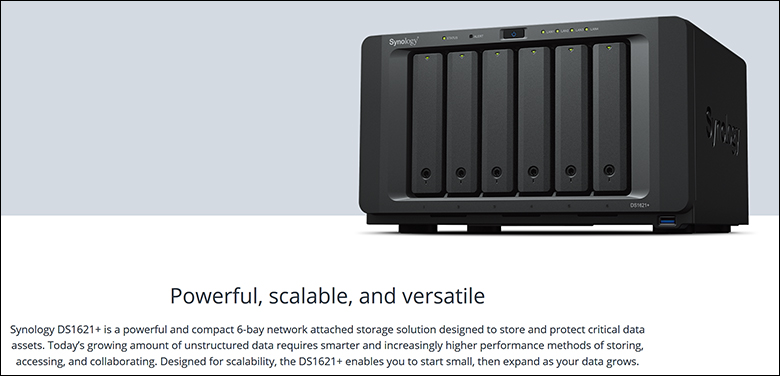
Moving on. Unlike some of the coemption the DS1621Plus has not placed form over function. Instead, and as the ‘6’ in the name suggests, the DS1621Plus offers six hot swap hard drive trays located on the front… and without the need to first pull off a hunk of plastic fascia before being able to access them. A hunk of plastic that needlessly hides the drives from sight while at the same time increasing either noise or internal temperatures.
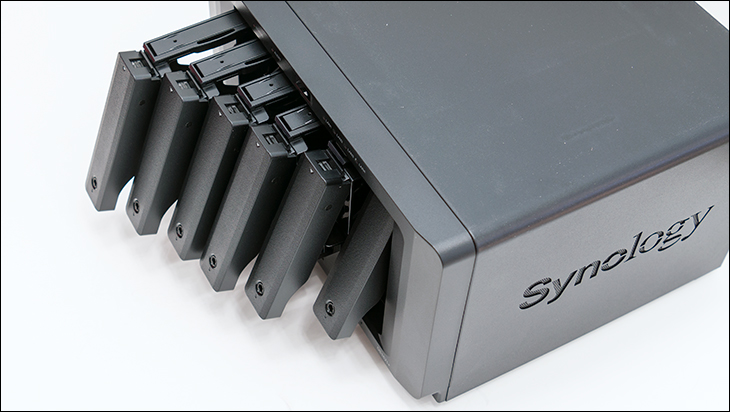
Furthermore, each drive bay is individually lockable. This is both a good and bad thing. We much prefer a method for locking/unlocking all at once vs. individually as that makes it a more time consuming to accomplish task and you are more likely to forget one. For home environments it does not matter. In an office environment… it might.
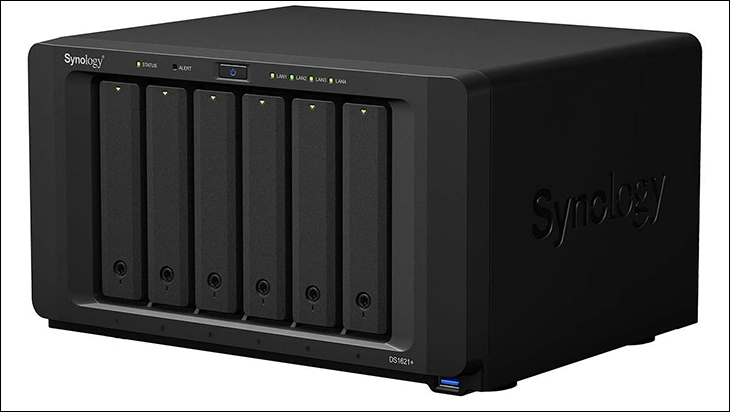
Also on the positive side, and unlike the DSf1520Plus, the DS1621Plus not only comes with both a good assortment of activity/status LEDs the location LEDs (aka ‘finder LEDs’) are baked right into each drive bay caddy. The lack of this basic, for professional environments, abilities was one of our pet peeves with the DS1520Plus… and once again shows that Synology does listen to feeback and then implements them (when appropriate).

Also located on the front is a single Type-A USB 3.2 gen 1 (aka USB 5Gbps) port (lower right corner) and a nicely shaped, and slightly recessed, power button (located in the center top). Both are easy to access, easy to use, and yet difficult to accidently bump.
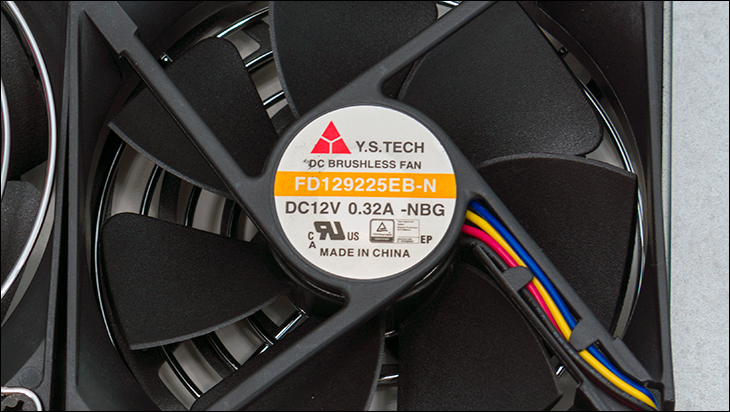
Around the back is where the two internal 92mm fans are located (Yuanshan Technology / “Y.S. Tech” FD129225EB-N). Much like the chassis these are upgraded fan compared to the DS1520Plus. While they are still 25mm thick these fans are double ball bearing fans that can ramp up to higher speeds (2.8K vs 1.9K) with more static pressure (3.0mm vs 1.028mm H20). Needless to say they will last longer, can cool better and can handle higher temperatures more optimally.
With that said, and just like the DS1520Plus’ fan profile, the default low noise fan profile curve is a bit on the low ‘n’ slow side. Temperatures are going to be much, much better under typical operating parameters will the medium ‘cool’ setting. This setting ramps the RPM’s up much more aggressively, but allows the NAS to be silent when the extra cooling power is not needed. Make no mistake, they can get noticeably louder than the fans in the DS1520Plus, but they also do a better of cooling and can be just as low noise when the extra cooling is not needed. Put simply, Synology included two good fans with a good RPM range so both noise and even worst-case scenarios are nicely covered. Synology engineers just prioritized low noise over performance with their default setting.

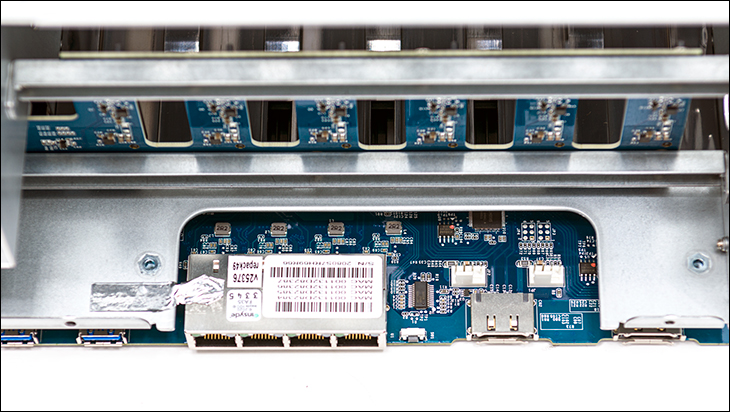
The back of the DS1621Plus is very reminiscent of the DS1618Plus with only minor changes in layout. From left to right on the back of the DS1621+ you will also find a Kensington lock port, the 3-pin power cable port for the internal (and not external / wall wart) power supply, a pair of USB 3.1 gen 2 ports (for a total of 3 USB 3.1 gen 2 ports vs the 2 USB 3.1 gen 2 ports of the DS1520Plus), the four RJ45 1GbE ports, two eSATA ports, the recessed reset button, and the PCIe slot cover.

To be blunt this is an odd and somewhat puzzling assortment of options. On the one hand the inclusion of two eSATA ports more than makes up for the loss of the fourth USB port the AMD V1500B can handle… as eSATA is far, far superior for backing up Terabytes of data and will not share bandwidth across attached expansion units. On the other, yes they include four 1GbE ports that can be Link Aggregation Grouped to make one ‘super port’ but… for enthusiasts QNAP’s use of dual 2.5GbE ports is superior. Two faster ports can still offer fail over redundancy (and if you have more than two ports fail at the same time… you have bigger concerns to worry about) while also better overall performance. Outside of deep queue depths L.A.G. / ‘NIC teaming’ just does not deliver on the promise of super speeds in the home environment.
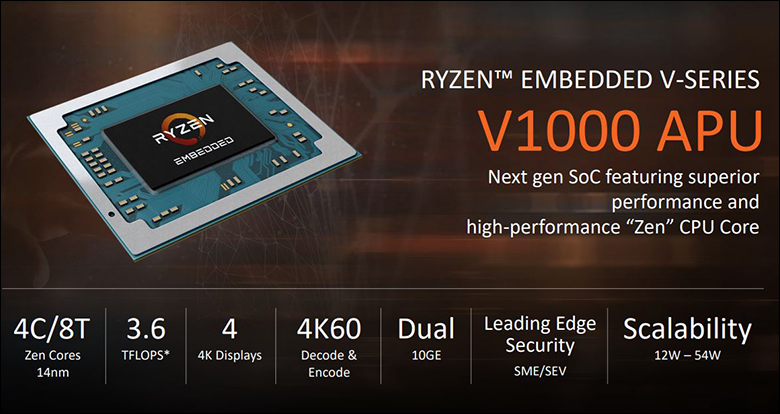
More troubling still… the AMD V1500B comes with a dual port 10/5/2.5/1GbE controller baked right into its silicon. Yes, Synology actively had to ignore this great selling feature of the AMD V1000-series to go for their older Realtek based 4x1GbE solution. Needless to say actively ignoring native support means that Synology really, really need to rethink their ‘Plus’ networking configuration. It is our opinion that swapping out two of these 1GbE ports for a pair of 10GBase-T “RJ45 10GbE” (or even 5GBase-T “RJ45 5GbE”) ports would be the most optimal use of budget, space and components. A combination that would cost less to build (2 Realtek NICs+AMD V1000 vs. 4 Realtek NICs), offer the same great redundancy, more flexibility, and best in class performance. They have not. It is the largest potential negative to this model. One that is self-inflicted. A cynical person could argue that it was self-inflicted in order to sell 10GbE Add In Cards and help keep the higher priced DS1621xsPlus sales safe… which does come with 10GbE ‘out of the box’ networking capabilities (and older Intel D-1500 series processor).

Moving on. Just like the DS1618Plus, the DS1621Plus’s two DIMMS are located on the bottom of the device for easy access. Simply remove to screws, pop off the metal cover and bobs your uncle. This is a much more sensible layout than the DS1520+ internal DIMM location… where you have to first remove all the drive caddies before being able to access the DIMMS.
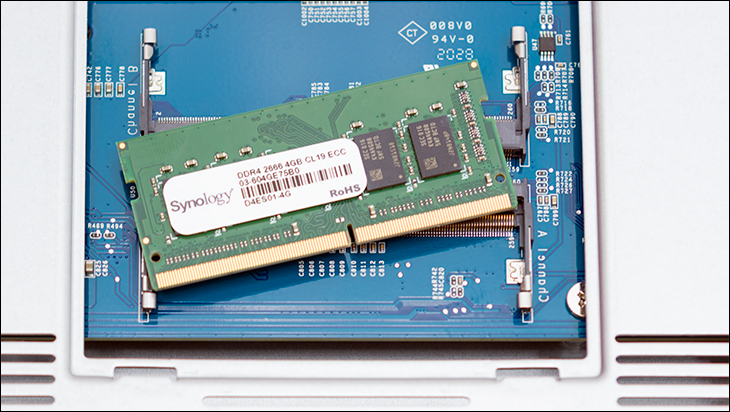
As you can see only one DIMM is populated with RAM. To be specific, it is a Samsung 4GB DDR4-2666 CL19 ECC SODIMM stick of ram… aka Synology “D4ES01-4G”. We will go over upgrade options later in the review, but honestly you will want to install a second stick of RAM just to get better memory performance. As it stands, and just like QNAP’s offerings, having only one of the two memory channels populated can potentially cause bottleneck.

The downside to having the DIMMS located on the bottom of the DS1621+ is that it unfortunately means that the two M.2 ports are not externally accessible. Instead, you have to first pull the HDD drive caddies to access the two M.2 ports located inside on the left side. There are pros and cons to this as while they are more difficult to access, they are going to be actively cooled by internal air flow, even better protected and are not all that hard to reach… even if you still can not use heatsink equipped M.2 drives (as there will not be enough room between the 1st drive tray and the M.2 drives’ heatsinks).
Also firmly in the negative column, and before you rush out and buy one or two M.2 drives, there are a few other things to consider first. In this device the unique locking mechanism is easy to use, but means the DS152… err… DS1621Plus only works with 80mm drives. Higher capacity, but longer, 110mm drives need not apply, and the same only goes for shorter than 80mm M.2 drives. Both ports also only support NVMe drives. If you stick a SATA M.2 drive in to either, it will not be recognized (yes we tried it). They however will work with newer PCIE 4.0 x4 M.2 drives. Obviously no where close to full speed, and thus not worth the extra cost, but it is a nice undocumented bonus.
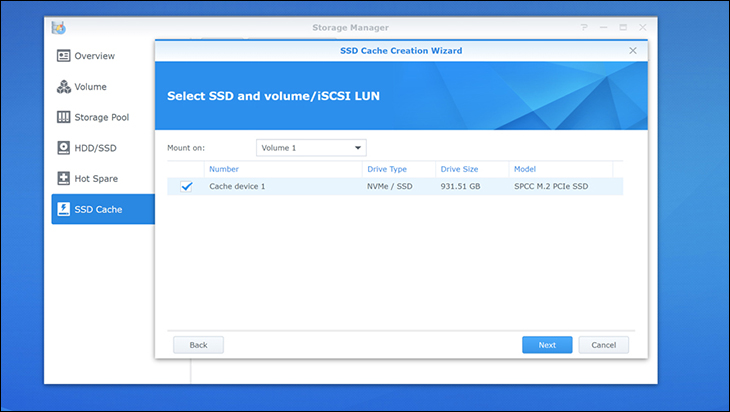
It just is unfortunate that Synology are still resistant to the idea of letting their users use the integrated M.2 ports for more than just caching duties. Especially on a NAS appliance that is focused towards the enthusiast and entry level business markets. They did not. This is not a 6+2 “8 bay” NAS device. It is a 6 bay with two additional dedicated M.2 ports for caching duties. This is unfortunate as such a configuration would have allowed owners the luxury of creating a small, but ultra-fast NAS array for say databases, or VMs and the like, and a larger array for long term storage. When you mix in auto-daily backups to the ‘main array’ into the equation the end result would have added a lot to the DS1621Plus’ appeal. This really is a missed opportunity. One that could have been easily avoidable if Synology just listened to what their customers have been asking for generations of “Plus” models now.
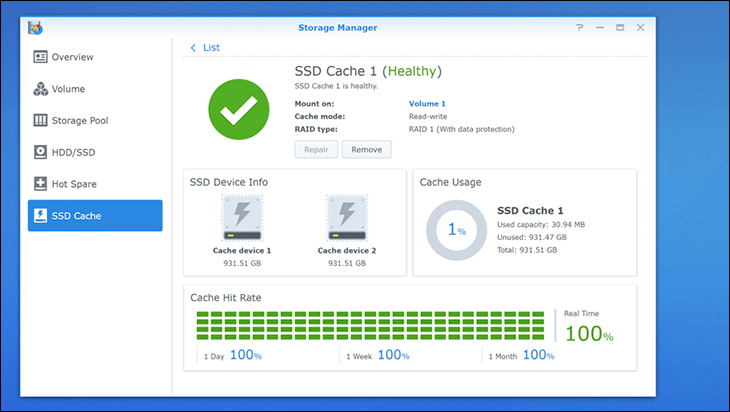
On the positive side this NAS does allow for more than just read caching. As long as you install two NVMe drives you can turn on read and write cache. During the configuration the wizard will guide you through the process but one of the highlights is that both are converted into their own RAID 1 array (please note that if the specific Synology NAS appliances has more than 2 NVMe ports, or 2.5-inch SSD drives installed you get the option of Raid 5 or even Raid 6). It is our humble opinion that even on one 1GbE connections read-write cache may be worth the cost. Especially when dealing with SHR-2 or RAID 6 arrays. While many home users probably will not see a difference, r/w caching can nicely boost performance when dealing with a lot of random r/w operations and the overhead dual parity brings to the table. It just will diddly squat for the home user who wants to stream movies or music or other sequential, low queue depth, tasks. We are also of the firm opinion that, outside of heavily worked NAS scenarios, read-only caching is not worth the expense for the majority of buyers interested in this level of Networking Attached Storage.
The last cavate is simple. You are going to eat your NAND alive if you don’t untick the ‘skip sequential’ I/O option. If you do leave the default settings, expect to see monthly NAND life percentages ‘disappear’ as a lot more read/writes will directly hit the RAM cache. It will however nicely boost performance and allow more scenarios to noticeably benefit from caching. If you further want to help extend the lifespan of your drive, do not pick the maximum capacity during the creation stage. Make it smaller. With ‘1TB’ drives we would opt for 750GB as the largest we would go. Also, please do not use QLC NAND drives. Optimal choices are enterprise grade drives actually meant for such environments. Those tweaks will reduce the amount it will cache (and how much you can afford), but will extend the life of the drives. IE for the loss of probably not noticeable improvements you M.2 drives may actually last their full warranty period.
As such, our recommendation is if you are thinking about SSD cache and your new NAS appliance think in terms of the cost of two M.2 drives… two enterprise grade M.2 NVMe drives. Then think about it some more. Then start with none and see if the performance is acceptable or not. Just understand that r/w cache is not a magic bullet. It will not improve overall performance in all scenarios. Just in certain scenarios. Scenarios that may not be part of what your NAS will encounter often enough to justify the added expense.
Internals and Teardown
Over the years we have dealt with countless Network Attached Storage appliances (to date ourselves, when we started our professional career they did not have the fancy title of NAS. They were just ‘servers’. Big Iron Servers. That we had to walk up hill both ways in a snow storm to service.). In that time, we have worked on easy, and difficult NAS devices. The Synology DiskStation DS1621Plus falls firmly into the former and not the latter category. Novices complaining about the number of screws they have to remove to service it aside, the reality is this is one of the better designed and laid out NAS appliances we have seen in recent memory. With the exception of the drive backplane board, even a novice should have little issue with tearing down and replacing the various internal components. It will not even be all that time consuming. It is that well thought out.

Let’s go in order of likelihood. The most likely reason the typical owner will want to crack open their NAS is to increase RAM capacity. The DS1621+ only comes with one memory channel populated and only 4GB total. That is a bit on the thin side, to say the least, by modern standards. Thankfully one does not even need to crack open the case to upgrade the ram. Power it down, and if you are OCD remove the HDDS (after waiting a moment to make sure the HDDs are indeed no longer spinning). If not… (also after waiting a moment to make sure the HDDs are indeed no longer spinning) gently tip the unit on its side. Grab ye olde electric screwdrive and remove the two screws covering the DIMM access panel. Pull off. Install the new DIMM (or pull old and then install the two new ones). Reverse the order and you are done. Less than difficult a task to say the least.
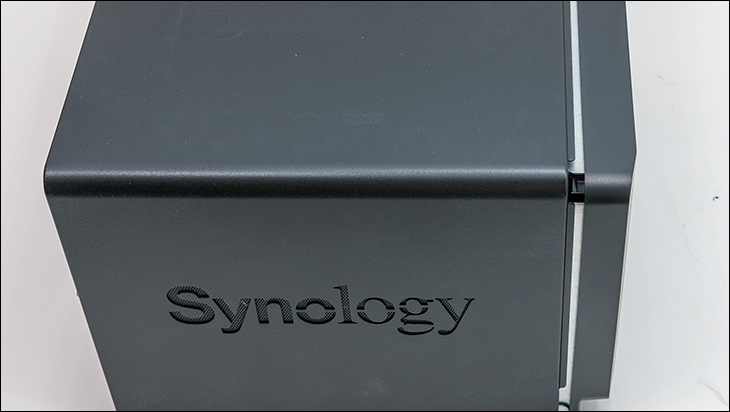
Swapping out a fan is also rather easy. One that uses a well thought out and thus pain-free experience. First remove the exterior metal covering from the chassis. This is accomplished by removing a couple screws at the back and then gently – but firmly- tugging the metal covering forward / away from the rear IO ports. Then lift it up and off.
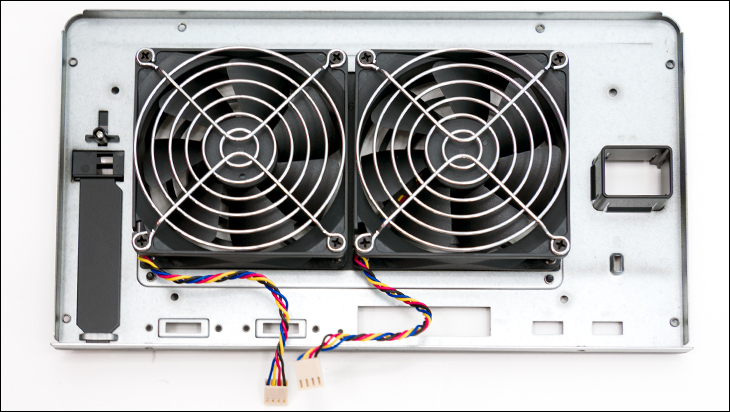
Next unscrew the four screws holding the entire back of the DS1621Plus’ chassis to the sub-frame. These are not the ones that hold the fans in place… nor are they the four holding the metal cutout to the back of the DS1621Plus. They are the four outside the ‘cutout’ / System Fan assembly area (above power plug, above USB ports, above eSATA ports, above PCIe slot). Do not try and pull the back of yet. Gently place the unit on its side and remove the back two screws.
Now you can remove it. It will tilt outwards at the top and then bottom. Do not yank the bottom out too far… as the fans are still attached to the motherboard and the back covers the various IO ports. If you look inside the back… you will see the two fan headers on the motherboard. Unplug them both. Now you need to wiggle it so that the IO ports are not covered by the panel and when done can move the back as much as you want. Unscrew the four fan screws, unscrew the four screws holding the wire mesh on the other side of the fan… and reverse the process with the new fan. Bam. Done. No need to be a contortionist or worry about finger cramps.

Arguably the next likely change that will require ‘end user engagement’ will be to install (or replace as NAS appliances eat NAND for breakfast, lunch, and dinner… with FOUR snacks in-between) a M.2 drive (or two). Simply pull all the hot-swap drive caddies from the unit, look inside and you will see the two M.2 ports. M.2’s in the DS1621Plus are installed port side down, and are meant to be inserted at an angle (bottom in, top out). Then when in their port push at the top until the other end is secured by the plastic clip at the top (think proper laptop memory insertion for a frame of reference). Have at it. Unfortunately, the M.2 to PCIe adapter card is a PCIe 3.0 single lane card. What this means is total speed is limited to 1GB/s (technically 985MB/s)… or less than SATA speeds per drive. No wonder Synology only allows them to be used as cache drives.
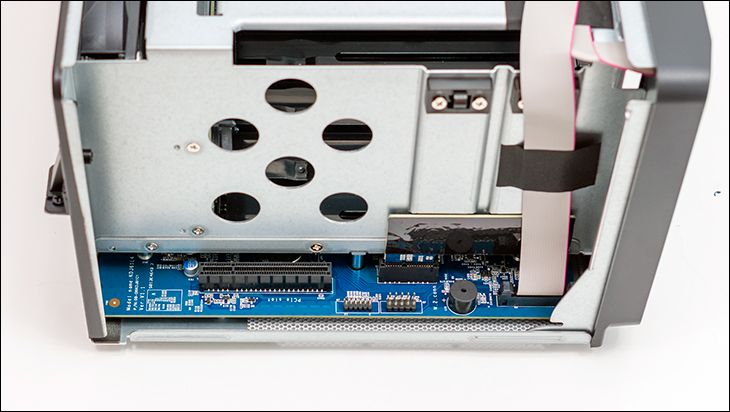
Installation of a PCIe Add In Card follows the same basic starting procedure as in nearly Synology NAS. Pull the metal cover off the unit, remove the blanking panel (and its screw) from the back… and have at it. Just be aware that you are not going to have tons of room for large AICs. Length yes. Width and height? No. Single slot, half height devices only.
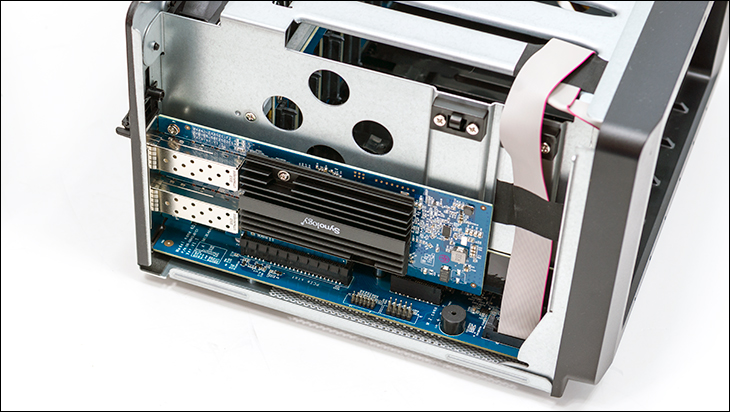
Also please be aware that while it is a x8 form-factor PCIe 3.0 slot… it is limited to 4 lanes (or 3.938GB/s) for anything and all attached to it. Thus, if you do use this PCIe slot for a M.2 adapter… only one M.2 will run at full speed (assuming you are not using PCIe 4.0 based NVMe drives). Two will run at 1.97GB/s per drive, and if you do use a dual M.2 w/ 10GbE NIC (1.25GB/s) all three devices will be sharing this 3.938GB/s bandwidth. It also should go without saying that a 40GbE Network Add In Card… will not run at full 5GB/s speeds (but 25GbE’ers will). On the positive side, the PCIe and M.2 slots are directly attached to the AMD V1500B controller. A controller that offers 16 lanes of PCIe 3.0 goodness. Which is a vast improvement over Intel Celeron J4000-series which only have 6 lanes, but is noticeably less than the 32 the Xeon D-1500 series offers (as an aside the AMD V2000 series will have 20 lanes of PCIe on tap).

On the positive side, if you do find a slot actively cooled PCIe card that will work in this device, it will suck fresh air in through the ventilation slits on the side panel. That nice ‘Synology’ stamping in the side is more than a pretty face. Instead, it is mesh covered venting for the internals and somewhat aligns with where a PCIe’s cooling fan will be. This attention to detail really shows that Synology actually takes the time to get the little things right. With that said the mesh is not removable… so over time you are going to have to clean it with compressed air. Not precisely a hardship, but certainly room for improvement with this “Gen 1.0” metal covering.
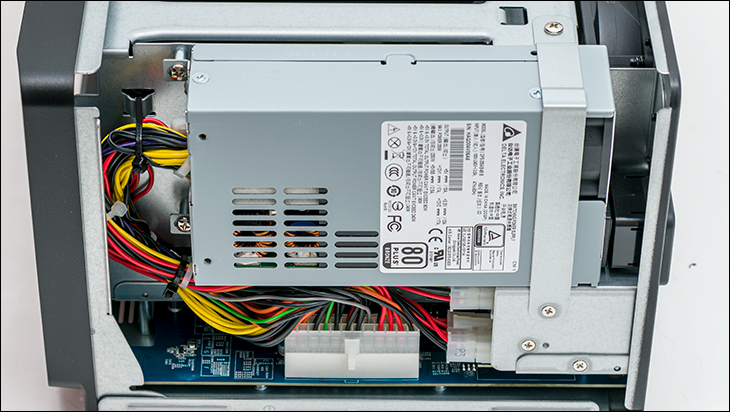
Moving on. The next likely culprit to die in a NAS appliance is the Power Supply. In this regards the DS1621Plus shows its S/MB roots nicely… as it is a real, legit internal PSU. Specifically, it is a Delta DPS-250AB-89B… which is based on an older design (and why it is ‘only’ 80Plus Bronze) but is a widely used, widely respected PSU series from a company that knows how to do server grade PSUs ‘right’. So it should last a long, long time. If perchance it does die… it is an easy swap. Pull the metal top cover, unplug the three PSU cables (24 mobo, oddball 12pin and 8pin), unscrew some screws, remove a bracket, clip a few cable ties, yank PSU, replace and then reverse the procedure. Just understand that not every Flex PSU will have the proper cables (and pinout configuration) as Synology PSUs can be… quirky in their pinouts and power cable requirements.
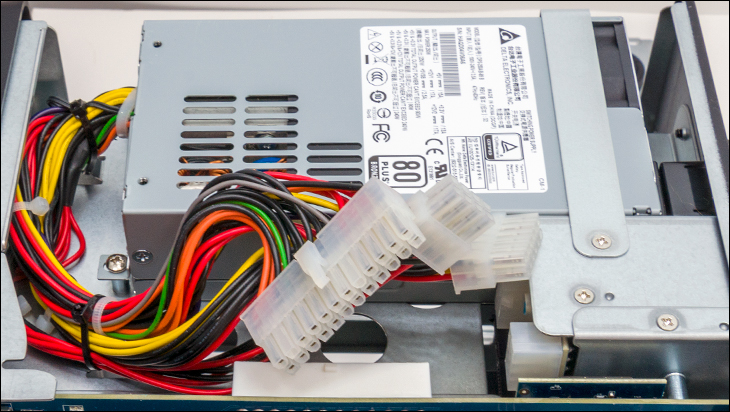
The other fly in the ointment is the included 40x20mm Delta fan is loud when running full tilt boogie. At typical loads… not so much as to be terrible. It is internally controlled and in fact it’s pretty decent at staying mild(ish) mannered (by 1U FLEX PSU standards) under typical load – hiding it inside the chassis really does cut down on its noise compared to it being outside the case. Just understand that by their very nature Flex PSUs are typically louder than larger PSUs… as their desing shows their server roots more than they ‘should’. As such, it is going to be audible over the two 92mm fans and will get louder if the PSU needs the cooling.
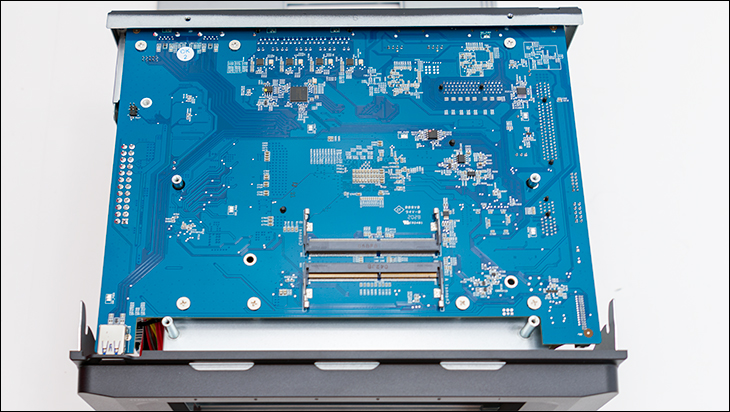
If you are A) unlucky enough to have the motherboard die and B) lucky enough to find a replacement (we typically buy used off fleaBay to salvage them), the motherboard replacement will not be a difficult task. A bit more tricky that the above options, but doable with a bit of patience. First though, we love the setup and design of this moderately large motherboard. It is extremely easy to get to… as the entire bottom of the DS1621+ is its cover panel. Mix in well thought out ventilation that uses the two rear fans to suck air up and over the mobo (and its moderately large heatsink for the V1500B) and it is well above average.
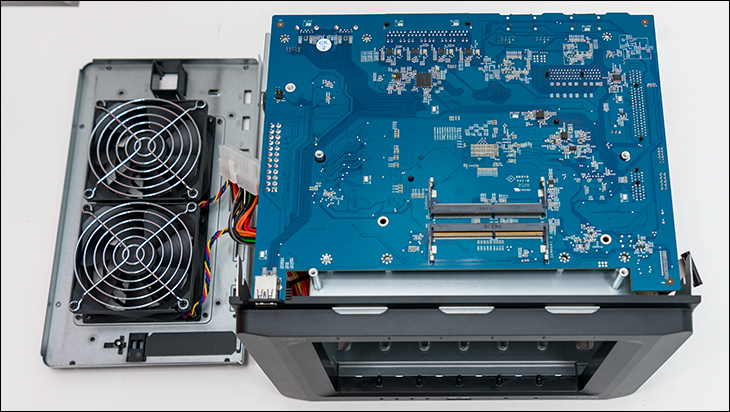
With that said… novices may think it is as easy and removing the bottom panel and then yanking the mobo out. The reality is… that is a recipe for disaster. We personally would start by removing the drives, and top panel. Then the back panel / fan assembly (and removing the two fan cables). With all that done we then would turn the NAS so that the PCIe ‘side’ is facing us. See the ribbon cable in the front corner? The one covering/ hiding the M.2 daughter card? That cable is not just held in place with friction. Instead, it has two clips that you need to release before gently lifting the cable up and off the motherboard. If you miss the ‘hidden’ clip… you are going to have a bad day. The same is true if you forget to unplug the 24pin Power cable on the other side of the NAS. So do both before moving on.
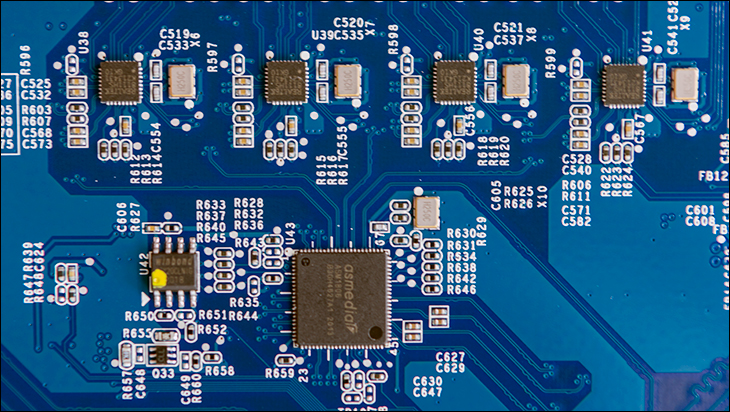
With both the ribbon cable and the power cable uninstalled, we would then gently flip the unit over, unscrew the bottom full-size metal covering and get down to actually removing the motherboard. First though, as you can see the ‘bottom’ of this motherboard is rather clean it its layout. All you will find is the two DIMMS at the front… and the Network Interface controller subsystem. Paying careful attention, you will find the exact same configuration Synology has been using on their 4-way NIC enabled NAS appliances for quite some time now. To be precise you will find four Realtek RTL8111H 1GbE Network Interface Controllers all tied to a ASMedia ASM1806 two lane downstream, four lane upstream PCIe 2.0 controller. This combination is a direct carry over / legacy of when Synology were using lower powered Celeron processors… which had at best only 6 PCIe lanes of bandwidth. Furthermore, it is a downright odd combination and choice of components for this next gen NAS. The AMD Ryzen Embedded V1000-series of SoC’s come with native support for not one, but two 10GbE NICs. Synology literally had to go out of there way, and spend more money, on not including two 10/5/2.5/1/0.1 GbE connections.
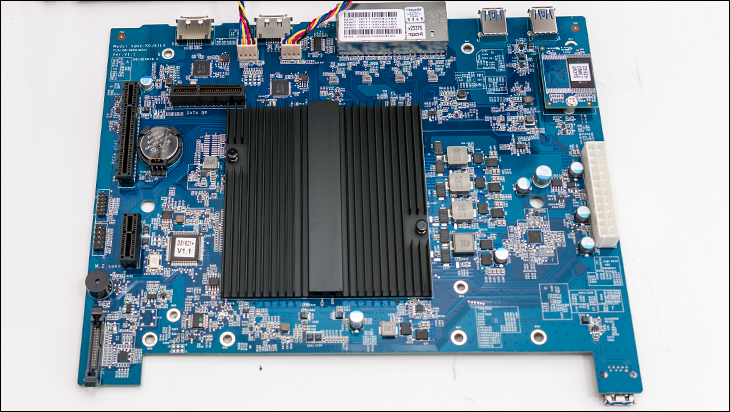
Moving on. At this point of the removal process, one should remove the remaining screws and then gently lift the motherboard up from the sub-chassis. Directly up is best. You will be disconnecting three PCIe connectors as you remove the motherboard so go gentle and go slow. Bam. Done. Now reverse the steps with the replacement motherboard.
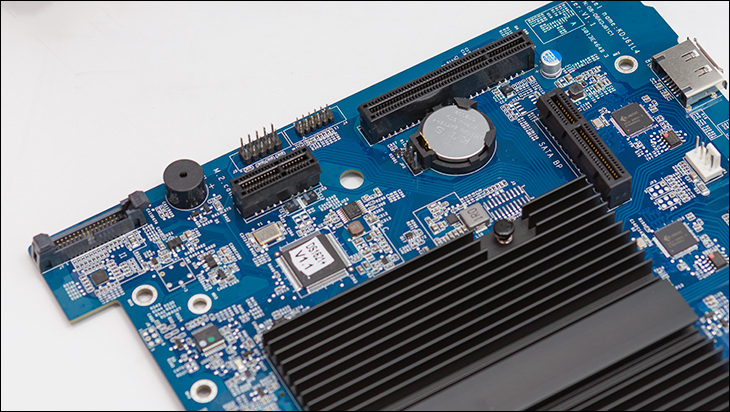
Taking a close look at the ‘top’ side of the motherboard we were instantly impressed with the clean and well thought out layout of this board. We have already gone over the PCIe x8 (which is really a x4) and PCIe x1 slots, the third is for the drive backplane. It is a true PCIe 3.0 x4 slot. It is not directly attached to the V1500B. Instead, the backplane is a ‘dumb’ powered backplane. One that feeds power to the hard drives and the motherboard via the PCIe slot (which in turn is fed via the 12 and 8 pin power connectors- as an aside the backplane uses a NXP PCA9555A controller for i2c / system management bus communications and control of the HDD).
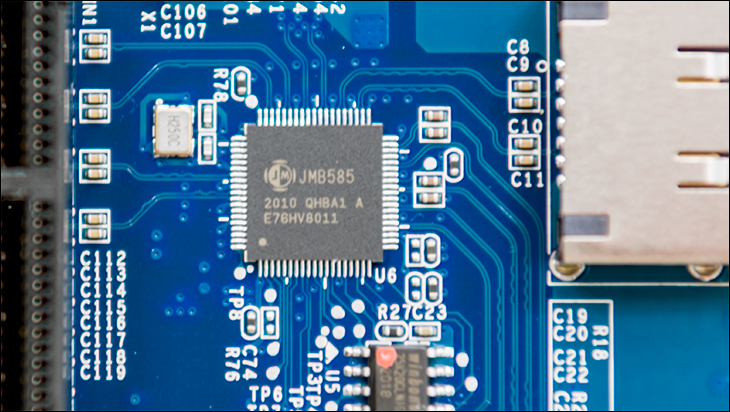
Acting as a ‘man in the middle’ between the V1500B and the PCIe subsystem is a pair of JMicron JMB585 PCIe (3.0 x2) to (5) SATA controllers. Synology likes using this particular IC on their six and eight bay NAS appliances. This is because it gives a total of 10 SATA ports, and while the DS1621Plus only needs eight (6 bays + 2 eSATA)… it is cheaper to reuse this IC on both rather than source another controller just for their 6bays units. Which is a bit of a shame. Not because of latency differences between one and two controllers; rather simply because if they had opted for a single 8 port controller… they could have opted for one with SAS. For example, the Marvell 88SE9485 would have fit the bill perfectly and in conjunction with the SFF-8482 internal single channel connectors they use on the backplane (which unlike typical SATA power and data connectors these are compatible with both SATA and SAS 6Gb/s drives) would really made this an “IT Enthusiast” and “Business” grade NAS device. We understand why they did not. A pair of JMB585’s cost a lot less than a single Marvell 88SE9485… especially when buying in bulk for multiple models. They even cost less than a single Marvell 88SE9172 (16) SATA controller goes for in bulk. We just think it might be time to upgrade their design choices for the next generation of actually powerful SoCs like the Ryzen Embedded Vx000 series.
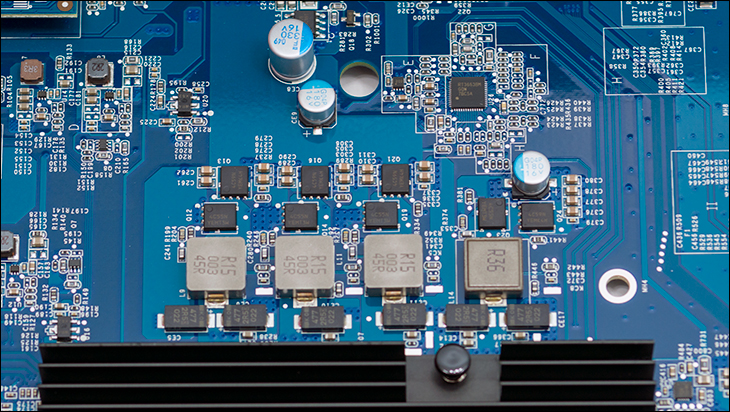
Moving on. As you can see this motherboard uses a 3+1 power delivery subsystem for the CPU (3 channels) and the memory (1 channel). The VRM controller is a Richtek RT3663BM 3+2 digital controller that is starting to become popular with AMD based mobile devices. Considering the fact that no one in their right mind will be doing any ‘memory overclocking’ the lack of a secondary phase for the memory falls firmly into the ‘meh’ category. The same is true of the use of Kemet KO-Cap polymer capacitors and ON Semiconductor Mosfets. Good enough for a piddly little 16watt TDP processor… and we certainly take zero issue with the use of Nippon / United Chemi-con poly caps.
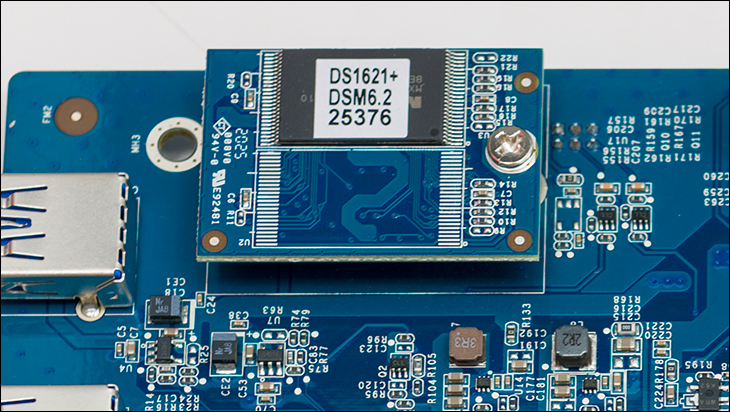
The last thing worth pointing out about the DS1621Plus’ motherboard is the use of SLC NAND. The included MacroNIX (MX30LF1G18AC-TI), 1Gbit (128MB) is old school cool and we have zero issues with its use. Yes, it is ONFI 1 not 2 or 3 or 4 rated, but what it lacks in shear performance it makes up for in durability. With 100K erase cycle rating and 4-bit ECC (per 512+16 Bytes) it is rated for 10 years of data retention. Good luck finding that outside of the handful of SLC NAND options available… and let’s face it. This is a NAS appliance. Startup performance is way, way down the list of priorities. We just wish they had used two of these NAND IC’s to double theoretical performance on tap.
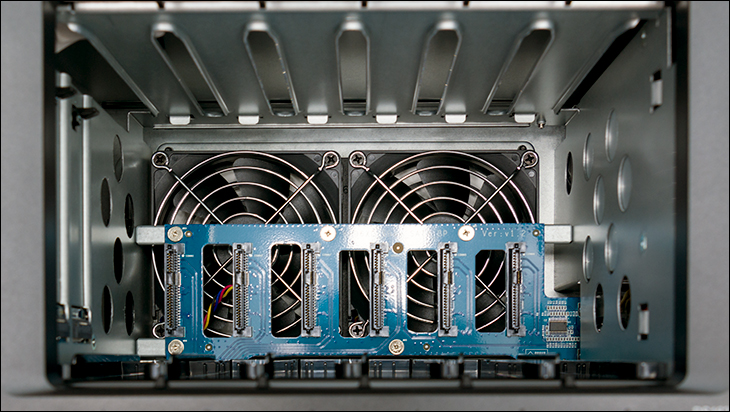
For those interested in replacement of the backplane. We would recommend it only for the experienced user. You will basically will be doing a full tear down of the NAS to get to it, and there is a very good reason this is always considered a repair depot job.
Overall, the DS1521Plus is a very decent offering from a hardware perspective. It does make a few interesting design choices, and certainly has a couple ‘legacy issues’ that are carried over from previous Intel based designs, but it is not more than just a pretty face. Not perfect, but very good for its class.
Synology DS1621Plus: Hardware Setup and Installation
Like any Network Attached Storage appliance, the Synology DS1621+ is rather easy to get up and running. There really are only a few hardware steps needed, as these are as close to ‘plug and play’ devices you can get with any ‘Bring Your Own Drive’ models. This means the first few steps are simple. Take the Synology DS1621+ out of its shipping container, place it wherever it is going to (probably) spend the rest of its life, plug in 1 to 4 Ethernet ports, prepare the external power brick but do not plug it in yet.
Of these four steps we only have a few observations / comments. The first is we much prefer integrated PSU’s to external. Yes, they make the device bigger. Yes, they are harder to swap out if the PSU dies. Yes, the reliance on Flex ATX PSU will mean that it will jet engine loud on startup (until it finishes its self-check and calms down). In return for a bit of dimensional chunkiness buyers, and a couple second of noise, you net a more robust, potentially more reliable, and certainly actively cooled power supply unit. One with potentially a higher efficiency rating… and certainly one you will not (easily) accidentally unplug and cause an unexpected / ungraceful shutdown of your running and possibly in use NAS. This alone makes the DS1621Plus leaps and bounds above the DS1520+ reviewed last year.
Moving on. Like most, this model has a back to front air flow pattern so you do want there to be plenty of room behind the unit. Next. The AMD Ryzen V1000-series comes with dual 10GbE abilities baked right in. Synology does not use these native NICs. So if you want 10GbE (or 5 or even 2.5GbE) you need to purchase an Add In Card. That is suboptimal to say the least.
Lastly, Synology only includes two RJ45 ethernet cables and they are shielded cables. So if you want to make full use of this device’s redundancy and/or L.A.G abilities you need to spend a couple dollars and buy 2 to 4 more cables (2 if you are using a fully shielded network, 4 if you are running unshielded. If you do not know what this means… buy four). That too is a touch suboptimal. NAS appliances are all about ease of use and having to spend more money is not good.
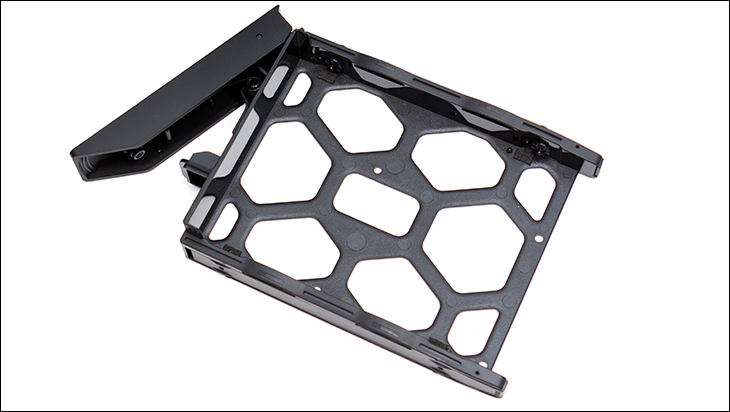
The next step is to prepare the hard drives and the caddies. Start by unlocking each caddy one by one and sliding it out of its hot swap bay. As made mention previously, these are plastic caddies so be gentle. They are not business grade caddies. These are home user grade caddies. So be gentle. On the positive side, they do a good job at securing the drive in place and are fully compatible with 2.5-inch and 3.5inch HDDs.
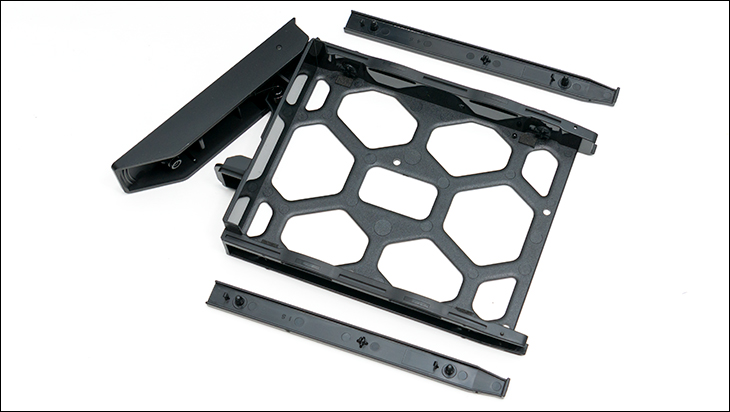
They are also incredibly easy to work with. On each side of the caddy are two ‘strips’ of plastic.
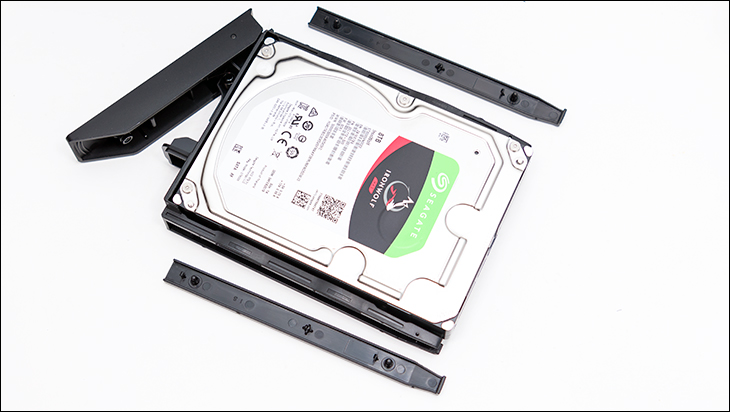
Pull them off, gently place the HDD into the caddy with the drive’s label orientated up and the power and data ports sticking out the ‘back’.
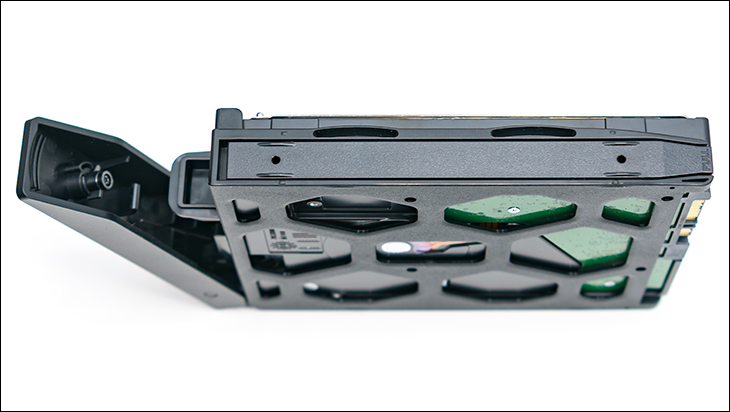
Then push the two clips back in place. This locks the drive into the caddy and on their own are ‘good enough’ for home users. If you so choose, Synology does include enough screws to securely lock all drives to their caddies. Just be careful you do not overtighten the screws… as the plastic may break from the pressure.

On the hardware side of things… all that is left is to slide the drives back in, plug in your new Synology DS1621+ and hit the power button. When that is done you are ready to actually configure your shiny new NAS appliance.
Software Installation and Configuration (p.1)

No matter if you have built and managed ten, hundreds, thousands… or zero Network Attached Storage devices. One thing will be the same: Synology has taken great pains and gone that extra mile to make your life easier. We say this as the setup and configuration process of the Synology DS1621Plus is extremely easy. So easy that you need zero experience with Network Attached Storage, it will hold your hand and do all the heavy lifting for you. With that said, and like any manufacturer, ‘The Synology Way’ has a few quirks that are unique to their process and expected workflow. That however is getting a bit ahead of ourselves.
The very first step is to either log into your router and find the IP address and then open up your web-browser of choice, enter it and then add “:5000” to the end. That is the old school way of doing things. For novices… all you really need do is type in “http://find.synology.com” and let it do all the work for you. Of course, if you have a secured network with good opsec… you will have to do it old school as the DS1621Plus’ broadcasting will/should be blocked.
Either way will work and bring you to a nice, calming blue themed startup screen once it finds (and loads) the NAS gateway’s built-in setup wizard. Hit the big blue ‘connect’ button and dig in. Don’t panic. It is one of the easiest, pain-free processes we have seen.
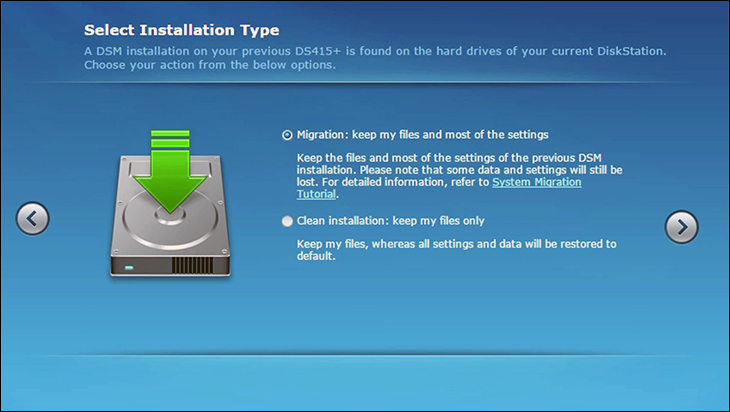
This is where things can take one of two paths. If you are upgrading your older Synology NAS to a new model and want to be up and running in no time flat with all your data saved you can. This is called migrating. To migrate your old to new, all you need is install all the fully working and verified drives from the old unit into the new… before turning it on for the first time. We recommend keeping Drive 1 in Drive Bay 1, Drive 2 in Drive Bay 2… etc. etc. Basically, as long as you new NAS has the same or more drive bays and is running same generation of DSM you can easily power down your old sinology. Yank the drives. Plug them into the new unit and be good to go. This is a lot riskier than doing a new setup and then manually copying the data from a backup (or your old NAS)… but if your old NAS is dead and you don’t want to start from scratch it works.
If this is what you are doing, the next screen will have a big ‘Migrate’ button on it. Hit it. You will then be greeted with a screen asking what you want to do with the data it found on the drives. Migration or Clean Installation. Don’t worry, both options will save your data… but if you had your old NAS customized, the “clean install” option will not transfer your old settings over to the new. How much of your old settings get transferred depends on old vs new NAS. Same model? Everything (with the possible exception of licenses which may or may not – e.g. surveillance licenses can be transferred once and then you are SOL). Moderately different? A lot less. Extremely different (e.g. ARM to Intel or one bay ‘NAS’ to a 2/4/5/6/8/etc. bay NAS)? It probably will fail the test it does before it starts and tell you that it will not do a migration… and you need to choose clean install option (which protects your data). At which point you are better off starting fresh, and adding the drives’ data later via the DSM built in migration feature. The last caveat is that no matter what the two models are… do not expect miracles. Regardless of how much, it will then try and do a modified DSM install and try to carry over as much of the customized settings as possible.
Where this is an AMD based, and not Intel, we are sure a lot of people are very interested if this works. Short answer. Yes. Transferring a 5 drive RAID 6 array from a DS1520Plus to DS1621Plus resulted in basically no major quirks with nearly everything carried over. A few minor niggles here and there, like static IP address and fan profile, but overall just as easy as migrating via the wizard as going from one gen of Intel to a new gen Intel Synology NAS. Most importantly… no data was harmed in the move.
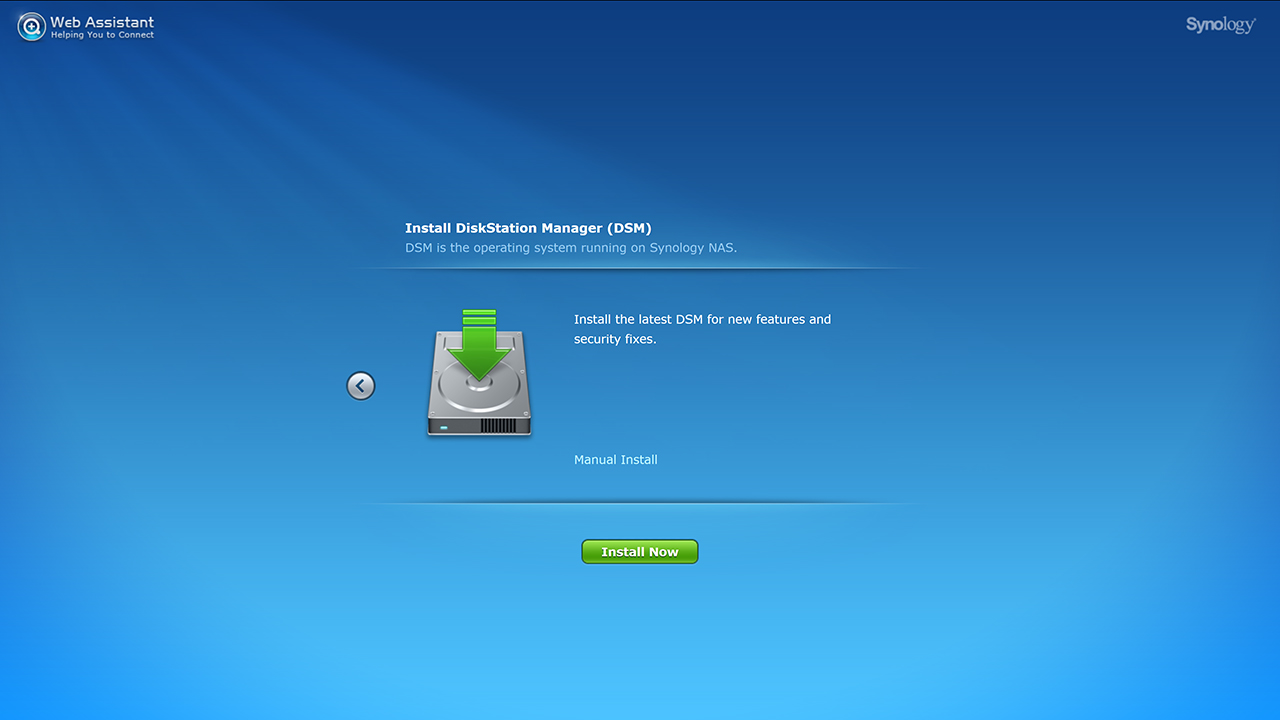
For truly fresh installs, the page you will be greeted with does not have a ‘migrate’ button, it will have a ‘Install Now’ button. When this easy button is pressed the wizard will auto-connect to the interwebs and download the latest version of DiskStation Manger (DSM) for you. Depending on your internet connection that is about a ten-minute wait.
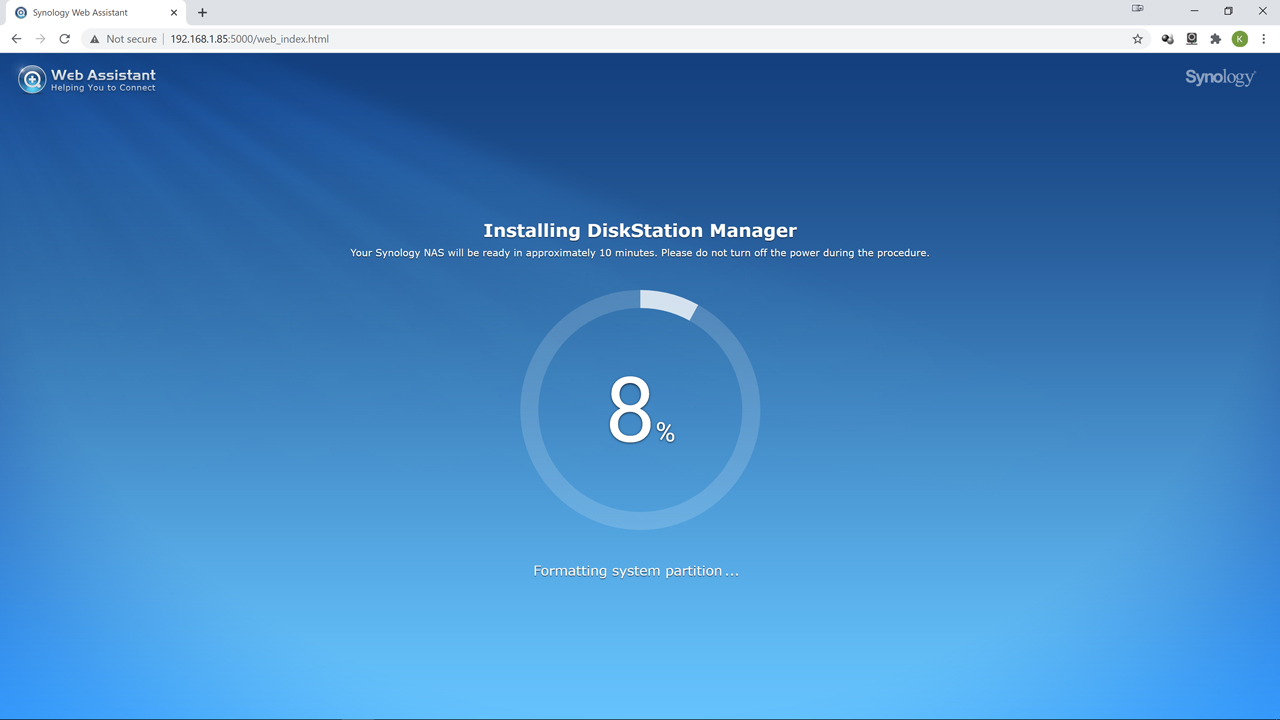
It will give you an ETA on the download and auto-installation process. Don’t worry. If you walk away and forget about it… all you need do is log back in and it will remember where you left off.

Next give the system a unique name, a unique administrator name and a secure password. Please do not use some variant of ‘admin’ and easy to guess password. Instead, combine three words into one, with the occasional number. For example, we have used things such 2Days1Night0Patience. It will tell you how good your password is via the strength meter below the password text boxes. Use it. It will help make your system more secure.
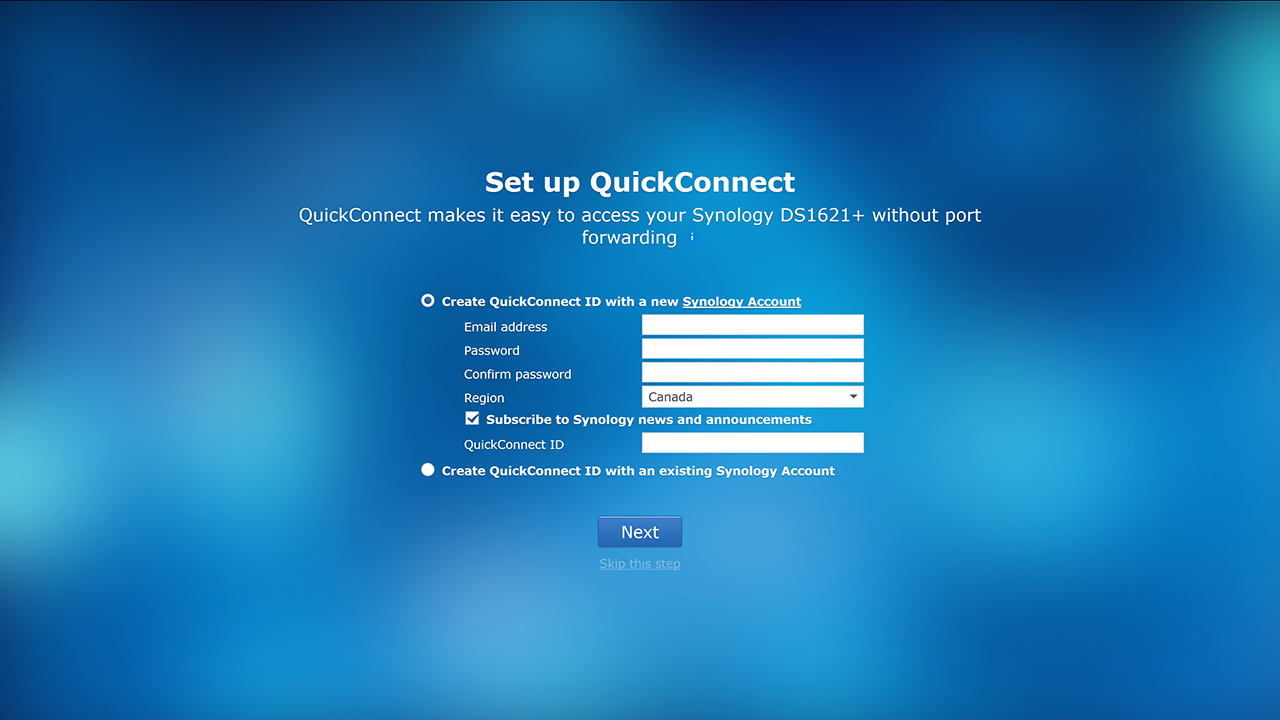
At the next step, we personally hit the little bitty, pale blue, ‘skip this step’ text option below the ‘Next’ button… as we don’t want to create another account with ‘quick’ anything holes in our security. You may feel differently.
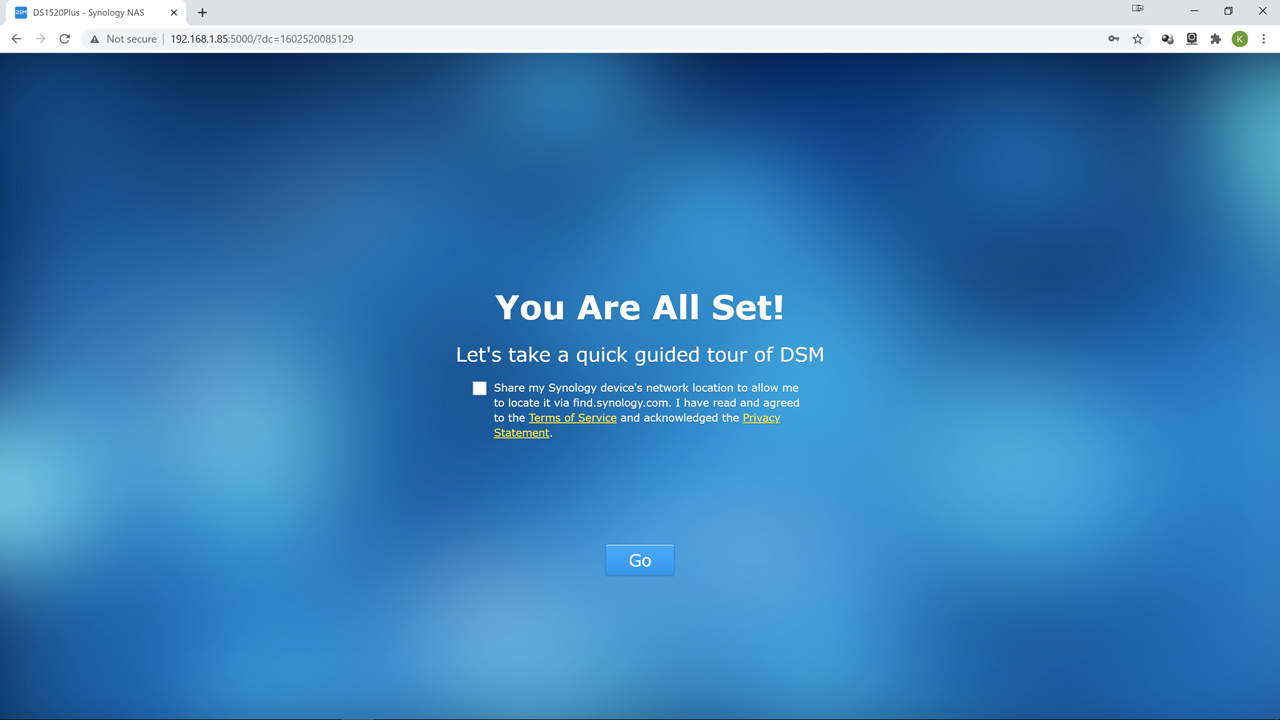
Bam. The DSM software is up and running. Now you can hit the go button and start making the NAS work for you. For those who ever used DSM 6.x and are worried the change from Intel to AMD has caused DSM 6.x UI changes… don’t worry nothing has changed (and why we are recycling the hundred plus screenshots we made and edited during the DS1520Plus review).
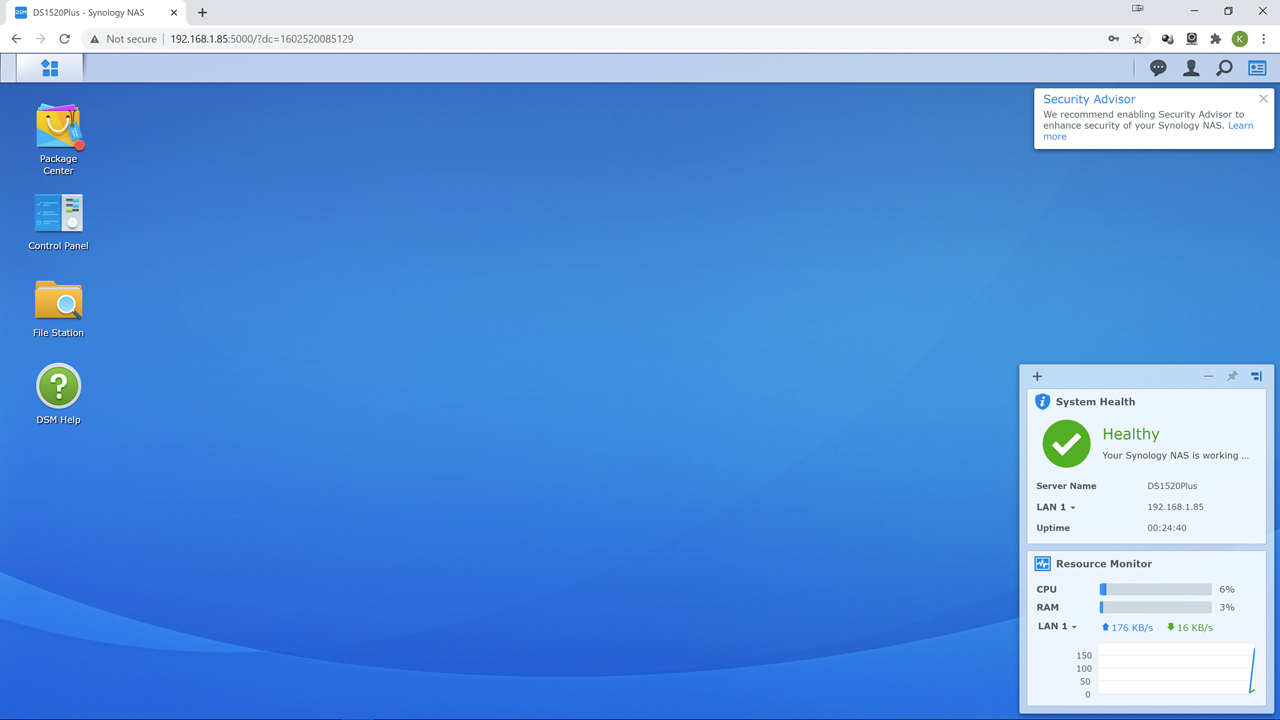
On even just a quick glance one can tell that Synology’s DiskStation Manager is based on Linux… as its ‘desktop’ GUI makes that pretty clear. It is clear, it is clean, but it is a bit quirky. This is probably where the majority of problems with first time users will come from… as ‘what do I do now?!’ will be screaming in their minds inner voice. Honestly, there is really no single ‘right answer’. There multiple ways of doing some of the necessary steps. For example, some will want to configure the various options such as email alerts, SSH, and the like. Others will want to configure their Raid array and pool first. We usually start with the latter and use this critical step as our starting point.
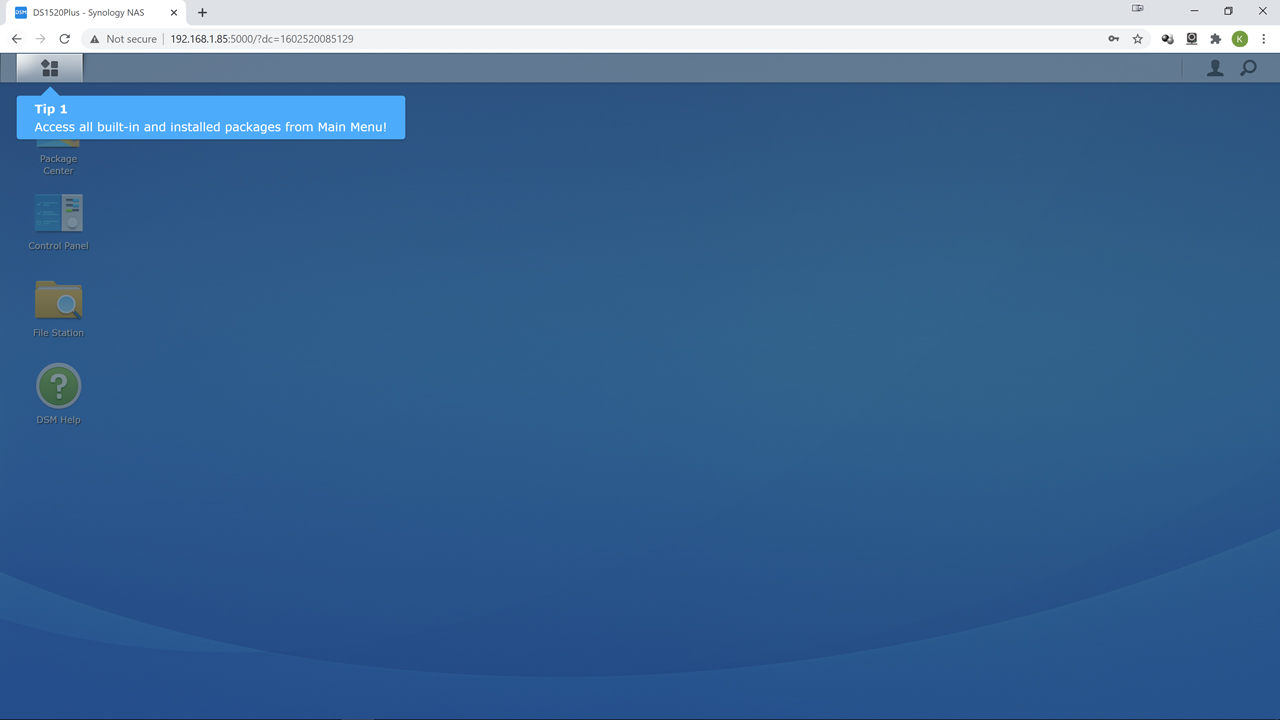
To start this step, you click on the funky ‘four stacked boxes’ icon in the left-hand corner.
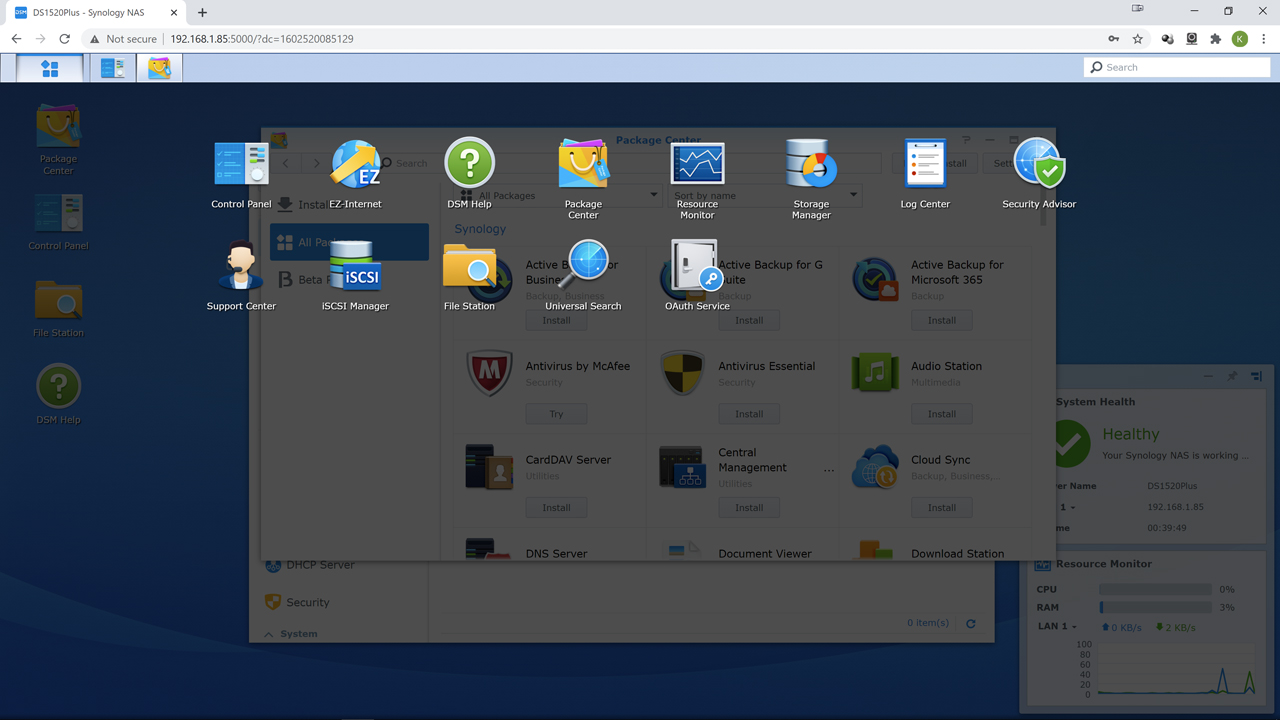
Then within the semi-opaque overlay popup hit ‘Storage Manger’… as that is the header for everything storage related.
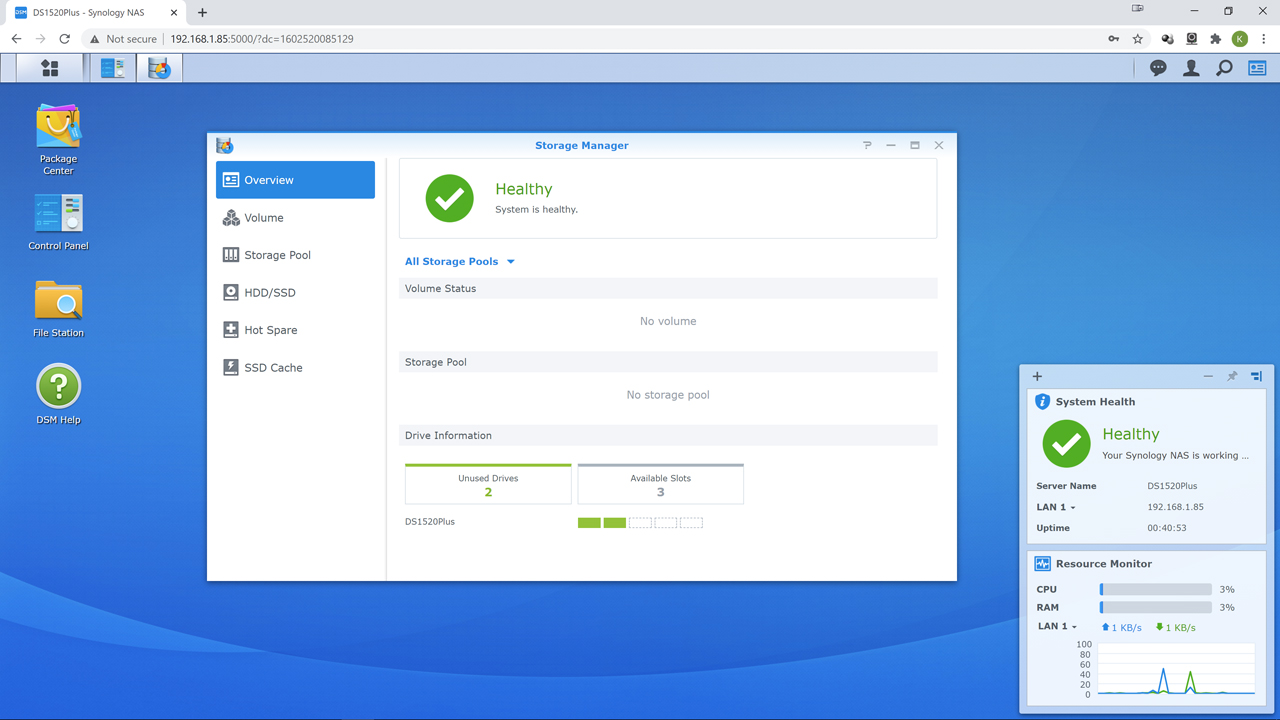
This new page will have a column of options: Overview, Volume, Storage Pool, HDD/SSD, Hot Spare, and SSD Cheche. All are pretty self-evident in what they do and what they offer. For example, HDD/SSD gives you a detailed break down on the drives attached. Hot spare allows you to add a hot spare drive that is online but idle, just waiting for a drive to die in an array so that it can be instantly take over and start the rebuild process with zero delay.
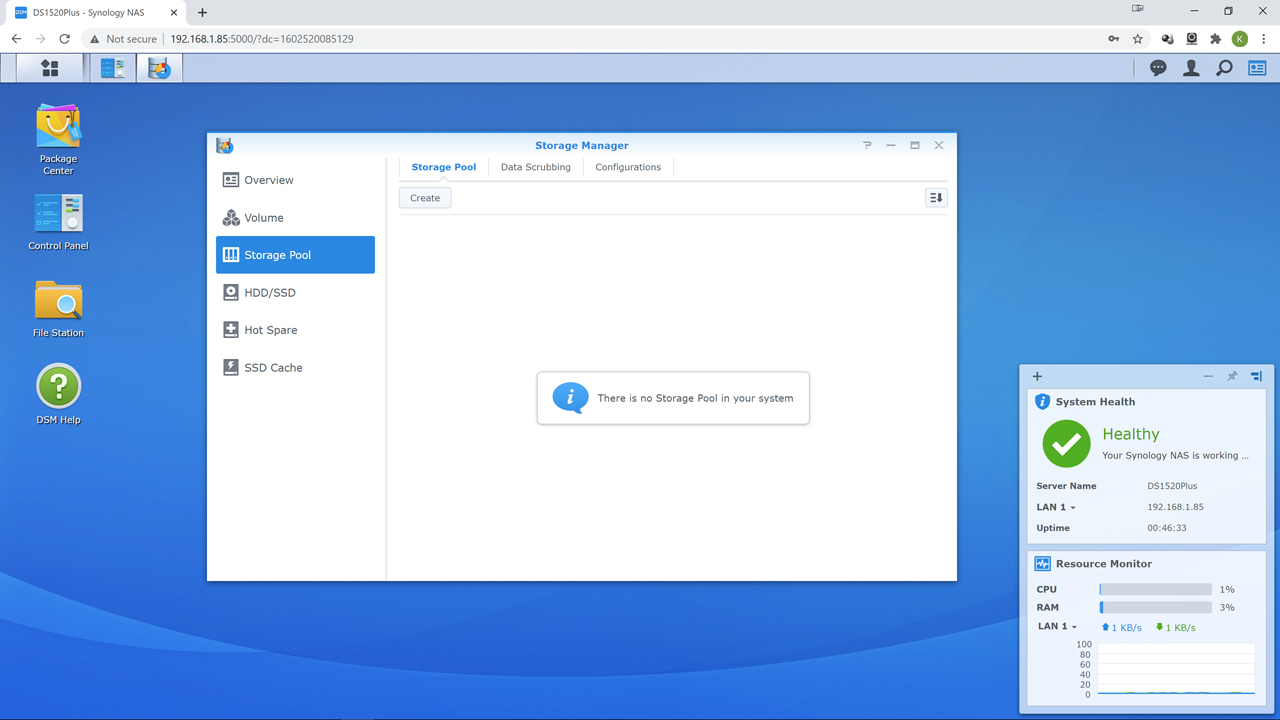
With all that said, for novices a bit of an explanation in the ‘proper flow’ is in order. With Network Attached Storage (or any storage array for that matter) your drives need to be placed into at least one RAID array, and this/these RAID array(s) are then configured into a pool. Then that pool is used to create a ‘volume’ or your actual ‘Z drive’ that users access across the network. Advanced users will create multiple smaller RAID arrays and place them all in the pool… as that improves performance and redundancy at the expense of capacity. Others will make two pools so that pool 1 can backup to pool 2 and have complete redundancy in case an array dies. Most home users will only do a ‘one array to one pool’ configuration. That is why you actually do not need to go to the storage pool option first. Instead, you can just click “Volume” and then ‘create’. DSM is smart enough to know that you do not have a pool ready to go so it will step you through the entire process first.
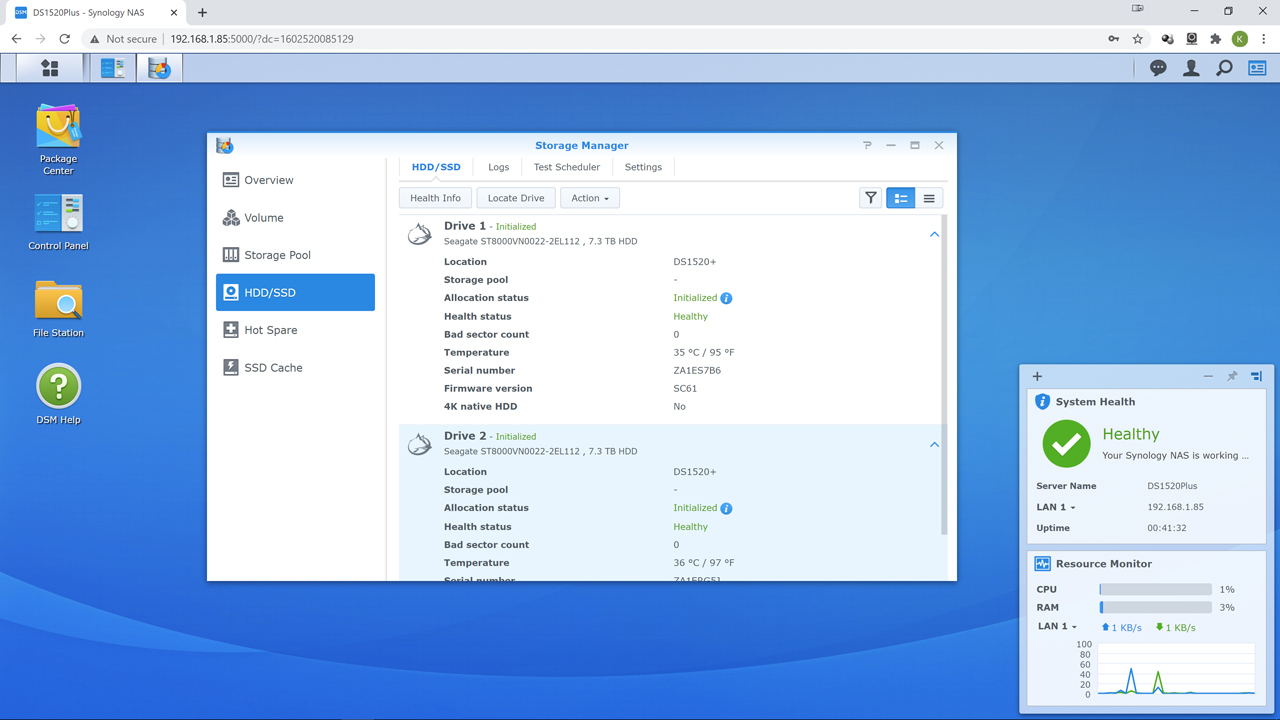
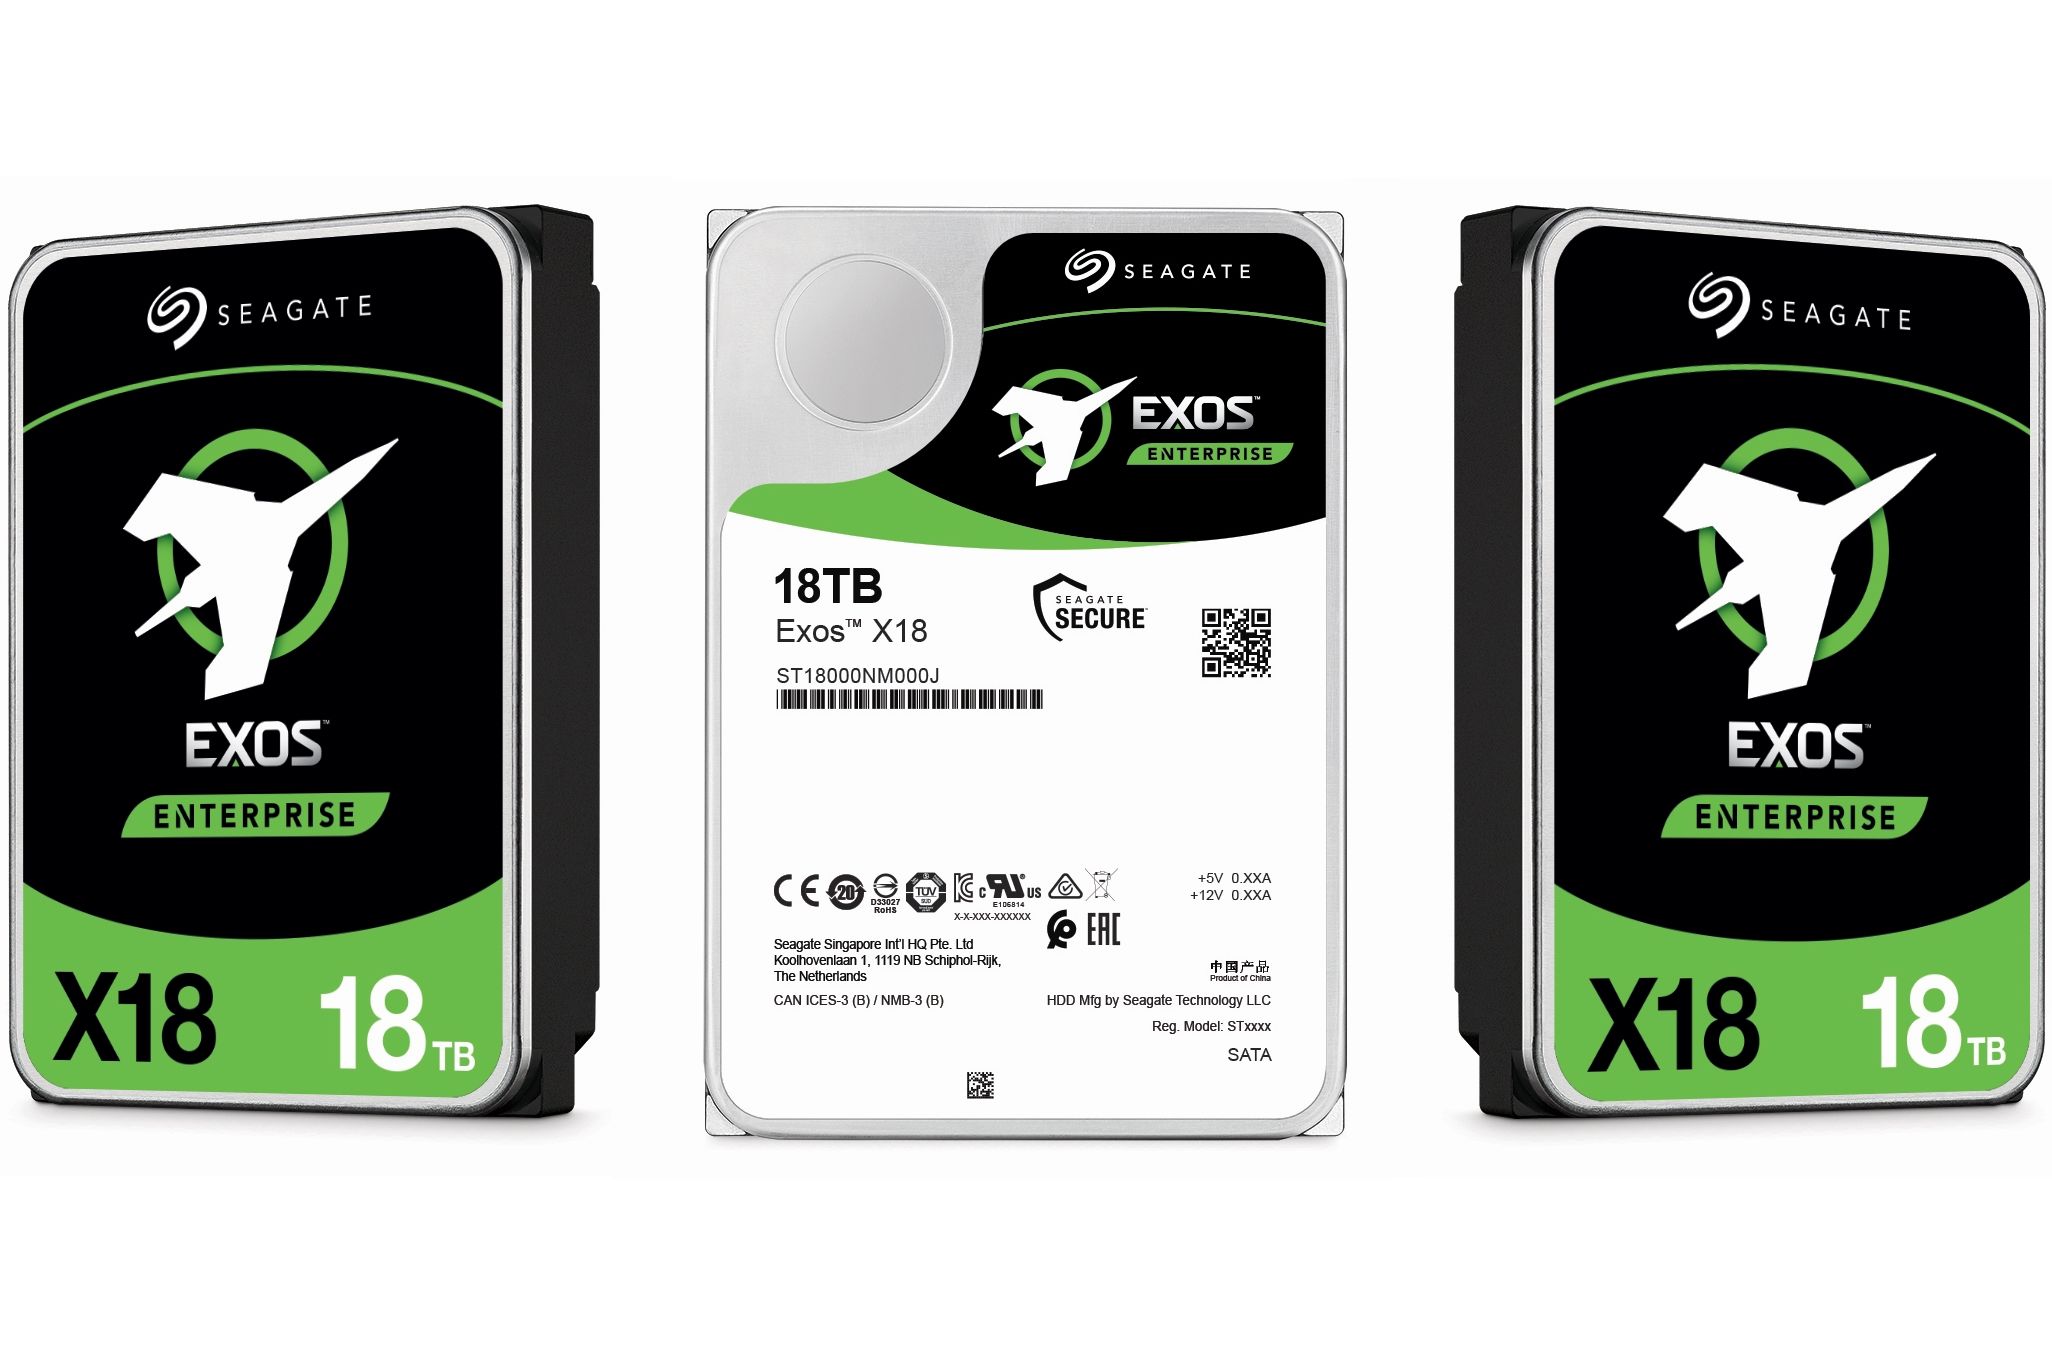
Personally, before doing either the pool or volume we like to make sure all our drives are actually being seen by DSM and then their options are configured to our liking. Thus, we start with ‘HDD/SSD’ subsection. Here you will see a list of your drives. During testing we did try out the shiny new Seagate IronWolf Pro 18TB and a EXOS X18. Both worked perfectly, on the compatible list or not. In other words, the compatible list is not necessarily up to date and if it is a NAS drive it should work with DSM.
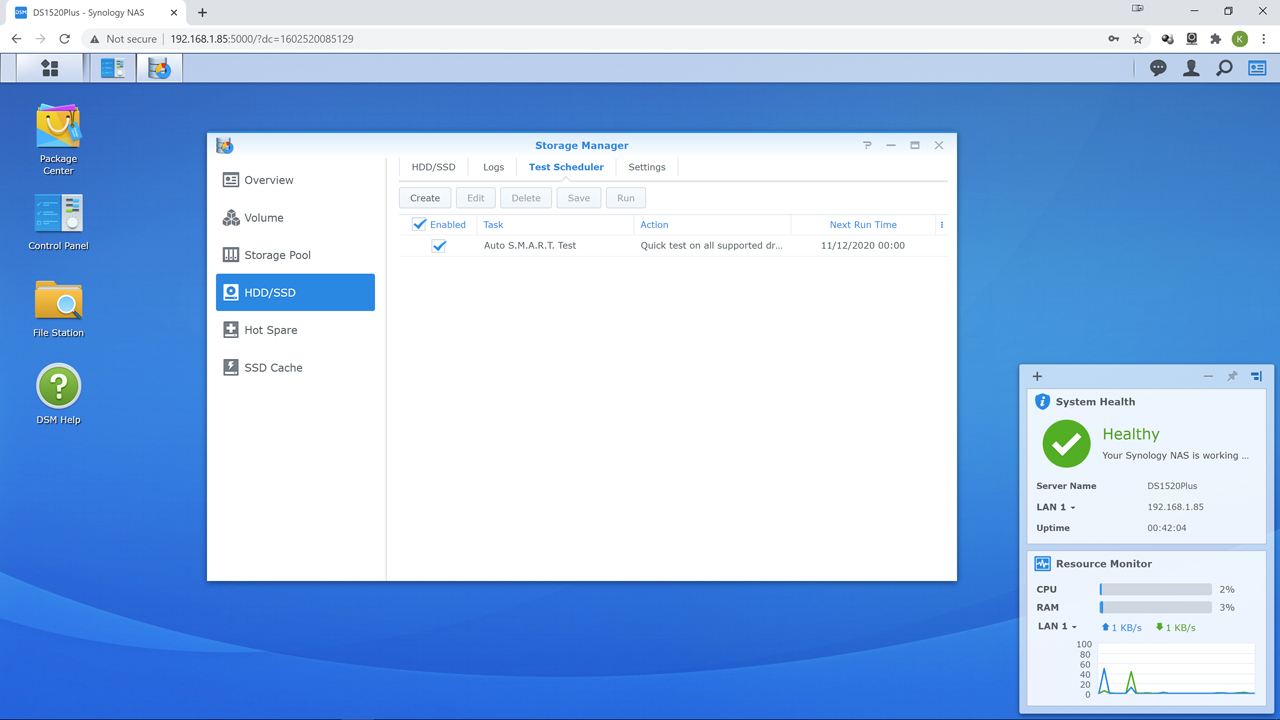
In either case we then hit “Test Scheduler” in the row of options and make sure Auto SMART test is setup to run on a schedule. We typically have it run the SMART test once a week on all the drives.
Software Installation and Configuration (p.2)

With SMART setup the next step we like to do is hit ‘Storage Pool’ column option and configure our soon to be RAID array. As mentioned on the previous page it is optional… but it is just an ingrained habit to do things in the ‘proper’ order. So hit ‘create’ as the first step.
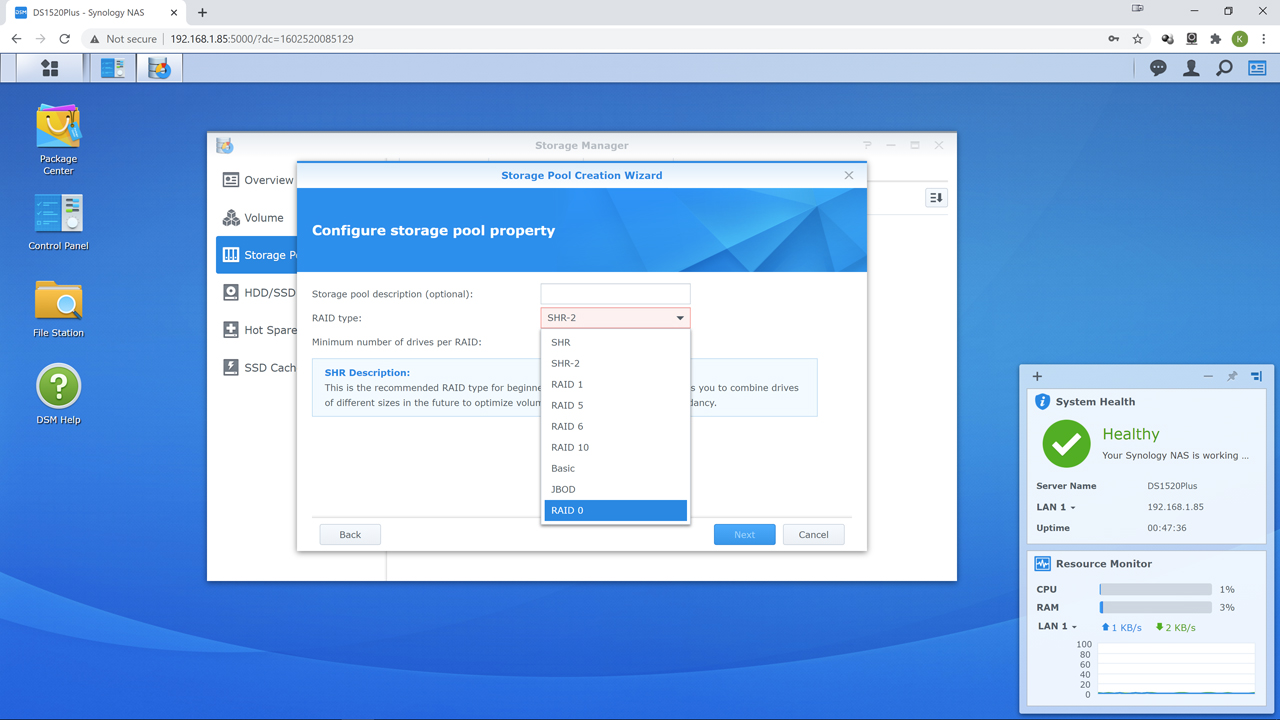
When you get to picking your RAID level first time and/or novice users may get a wee bit lost in the weeds as Synology does cover all the bases – and then some. This is both a strength and a weakness of the DiskStation Manager (DSM) OS. More options are always better than few, but if you have zero background experience… picking the right one can be confusing.
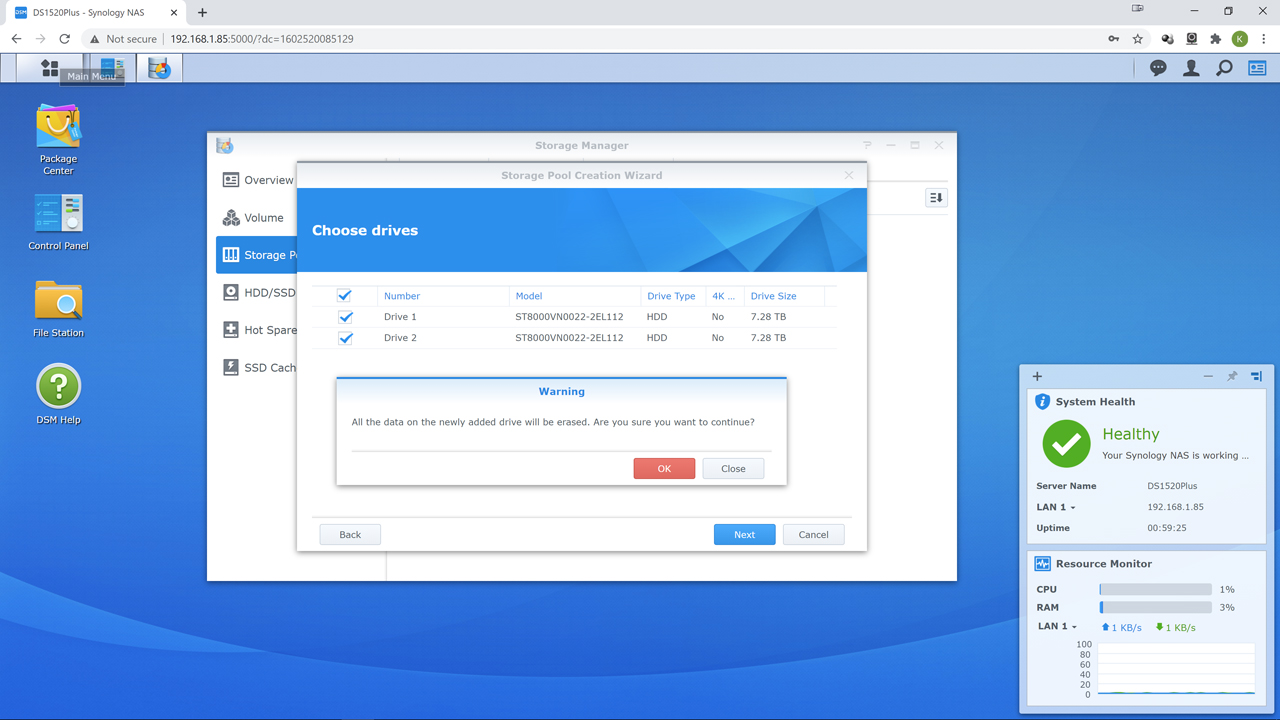
We cannot tell you what would be ‘best’ as it will depend too much on what you want the DiskStation DS1621Plus to be and do. For example, you could create a four drive based mirrored + striped drive array (aka Raid 10) for high read performance goodness and use the fifth and sixth bay for a pair of 2.5-inch SSDs for r/w cache duties to further boost performance… at the expense of only having two drives worth of storage capacity. You could fill all six bays with same capacity, and preferably model, drives and create a very nice Raid 6 array, and have 4 drives worth of capacity with even more consistent redundancy (but at expense of performance). If you have a traumatic brain injury you could even create a 5 drive RAID 5 array with five bays worth of capacity. You could even create 6 JBODs, or worse still (from a resiliency perspective) create an ultra-fast RAID 0 array with 6 bays worth of capacity and zero redundancy.
Those are (mostly) all viable choices. Just for vastly different scenarios and situations. For most, Synology Hybrid RAID level 1 (SHR-1) or Synology Hybrid RAID level 2 (SHR-2) are probably the best ‘all rounder’ choices. With, of the two, SHR2 being our recommendation. In simplistic terms SHR-1 is similar to RAID 5 but can work with only two drives in a SHR-1 array. SHR-2 requires four drives and is somewhat similar to RAID 6.
We say ‘similar’ and not ‘exact’ as SHR1 can survive one drive failure and SHR2 can survive 2 drive failures without data loss as the former uses a single parity stripe and the latter uses two parity stripes. That is where the similarities end as SHR does have some extra things going for it. First if you plan on adding an external expansion unit to the DiskStation DS1621+ SHR is what is what makes it so seamless an upgrade experience. If you do not care about future external expansion opportunities, SHR also allows for a much easier internal expansion upgrade path. With either SHR1 or SHR2 you can use dissimilar capacity drives and not pay nearly as much of a capacity penalty for doing so.
For example, if you have one 8TB and four 12TB drives installed in a RAID 6 array, the array would be setup as if they were all 8TB drives (i.e. the smallest capacity drive is the deciding factor) with 24TB useable space (with 16TB for parity and 16TB ignored/wasted). SHR1/SHR2 would not do that. Instead, it would look at what the largest partitions that can fit equally on each drive (in this example 4TB) and then just use more of these partitions on the bigger capacity models… and consider each partition as its own ‘drive’ in the SHR2 array. In this example, that would be 4TB partitions (2 on 8’s and 3 of them on the 12s). The end result is SHR2 would give 50% more useable space (36TB) and 24TB set aside for redundancy… and none ignored. It will not always be this perfect as the calculations get a bit wonky when dealing with drives of radically different capacities. So while the end result will not always be perfect… it usually better than classical RAID.
If you are interested in knowing what the precise pros and cons of your drives in SHR1/2 vs RAID are Synology includes a nice GUI RAID calculator that works with basically every model they make:
https://www.synology.com/en-ca/support/RAID_calculator
Equally important is unlike OpenMediaVault where performance is basically limited to one drive, SHR does not have that limitation. Depending on how many partitions there are per drive in the array (and thus how many parity calculations have to be done) you can get ‘up to’ nearly the same performance as if you used ‘classical’ RAID 5 or 6. Needless to say, most home users will be happy with SHR1/2, but SMB’s and enthusiasts may notice the loss in performance when the NAS is hit hard with deep, and overlapping, IO requests. As such, for home use we would opt for SHR 2 as two drives have to die before your data is at risk, and a third has to die before the rebuild completes for you to lose all your data (i.e. 40% drive loss before data is at risk and 60% catastrophic loss of the drives are required before your data is gone). Conversely, if the NAS appliance was going into a higher demand environment, we probably would opt for RAID 6 over SHR-2… especially if there were no future plans for adding expansion units to it.
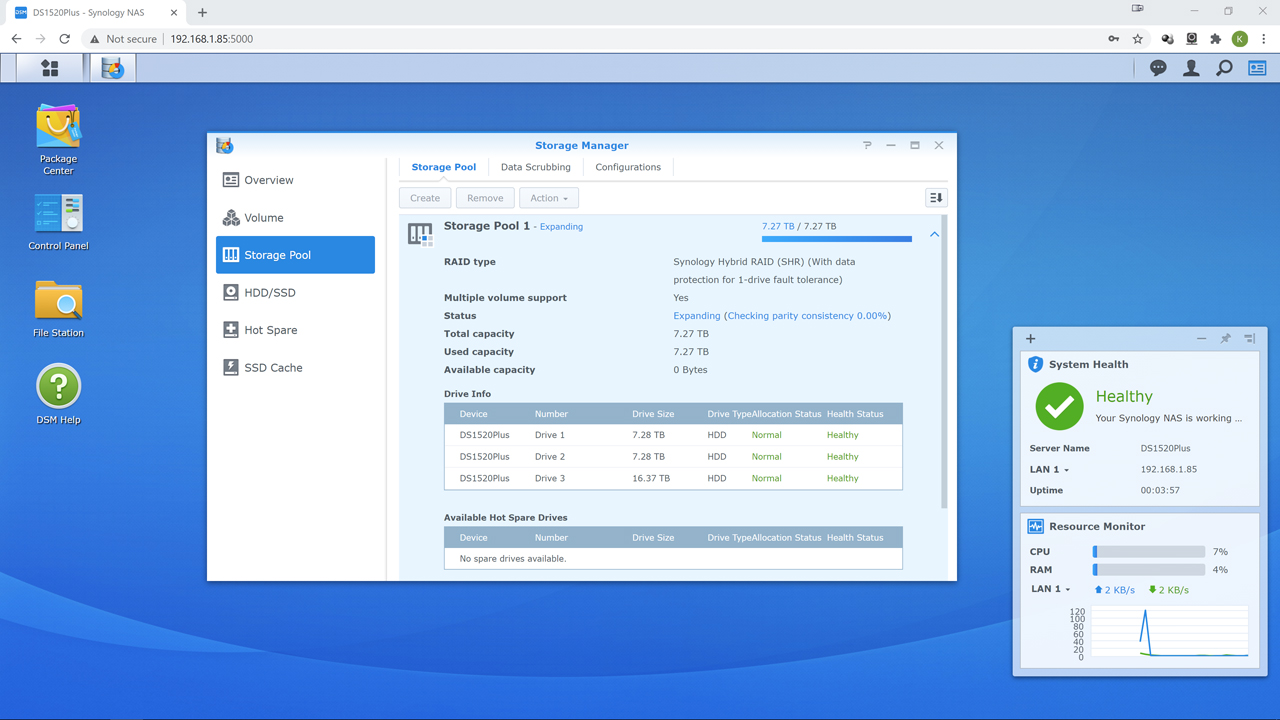
The other downside to any all of these RAID array options… is they all use mdadm as their foundation. Unlike ZFS, mdadm is rather stupid when it comes to expansion and rebuilding. It is not ‘smort’ enough (let alone actually smart) to only try to rebuild the blocks that are actually in use like ZFS. Instead, expect it to take noticeably longer than ZFS to expand the array every time you add a drive… as it will copy and then confirm the parity on each and every block. Used or empty block it does not care. For example, on SHR1 with three 8tb ironwolf pro drives, when we added a fourth to the pool… an empty pool without bad block checking enabled, it took nearly 34 hours to complete. This was with resync set to ‘high’ (aka 600 max 300min). You can also not stop nor pause this process once it starts. So, plan ahead and create your array ‘properly’ the first time. Then take a hit in lost time later when you need to add/modify your array.
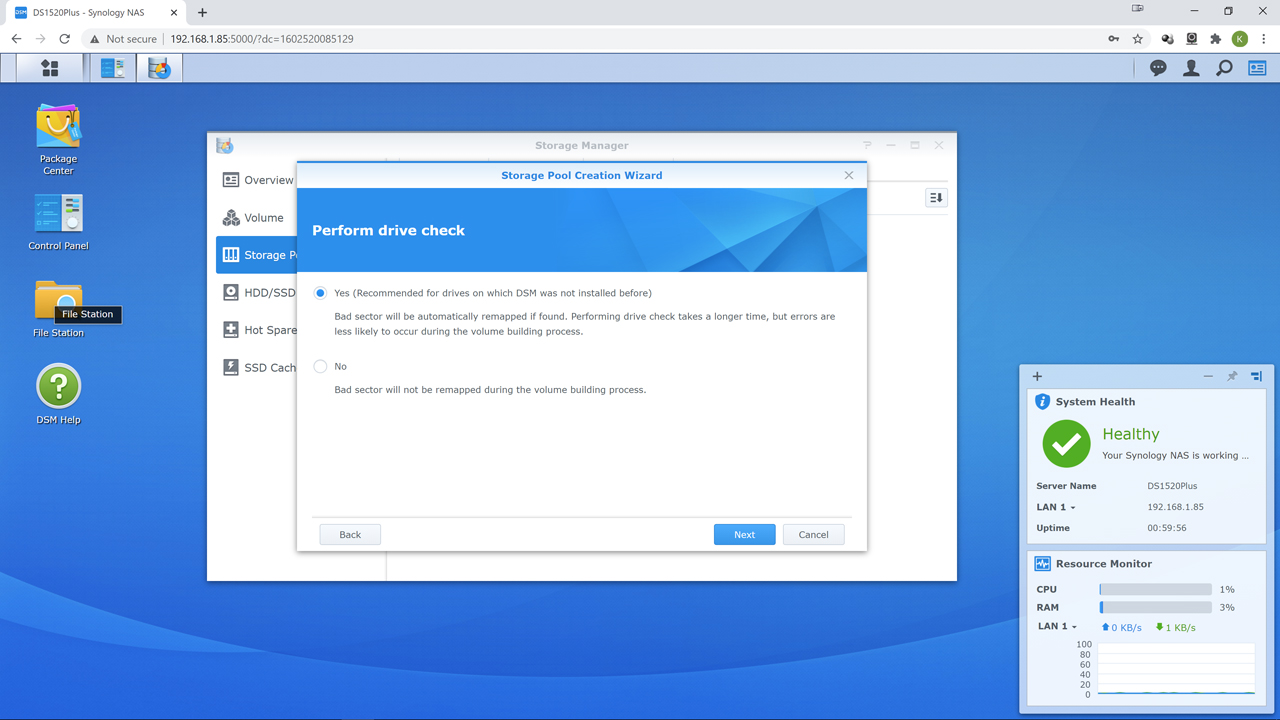
With new hard drives, we always tick the perform drive check option to make sure the new drive does not have a lot of bad blocks. Hard Disk Drives, like all PC components, are a mass-produced item. The occasional bad drive does slip past even the most OCD of quality control. Yes, this will take time. Yes, it is in our opinion time well spent.
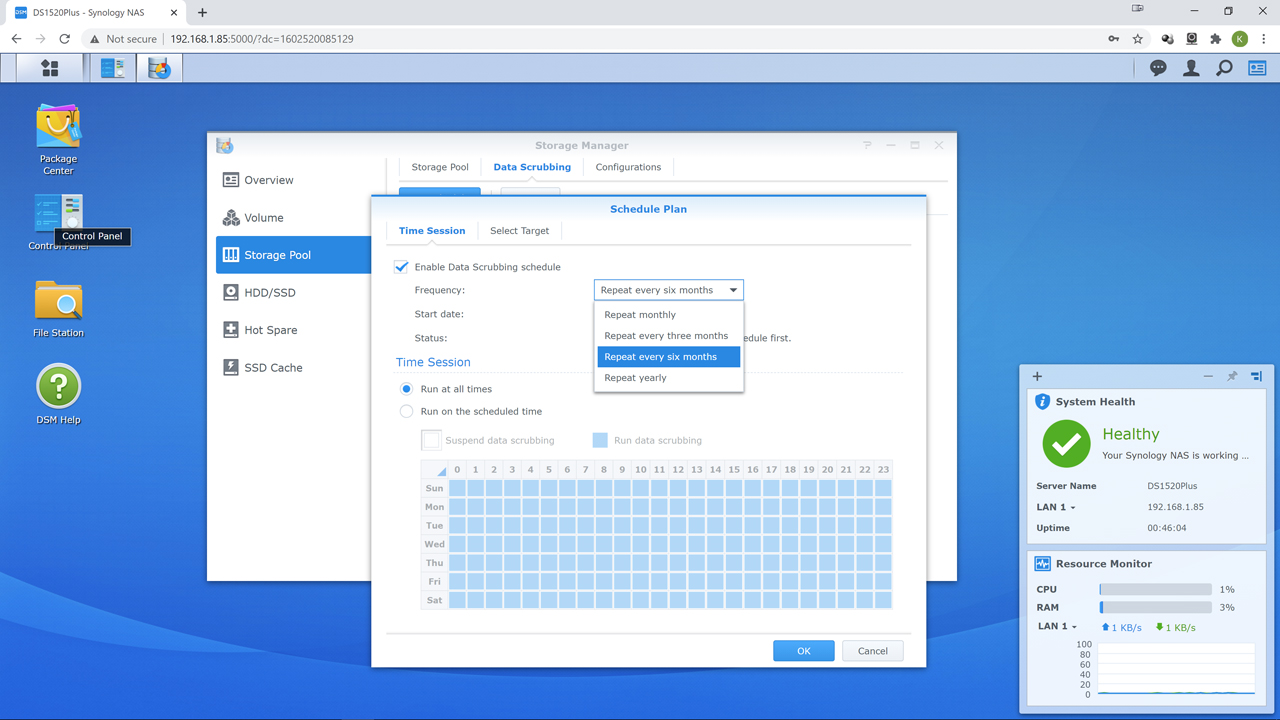
Once it is up and running, and we have checked to make sure all the drives we want are active and part of the array and pool, we then like to skip the Volume creation step and instead go for Data Scrubbing option. Data Scrubbing is a critical step in maintenance. We personally think the default of 6 months is too long between checkups. Instead, we choose either monthly or three months. Data Scrubbing is where the NAS will read every single used block in the array and check the results against its parity data. If corrupt, it fixes it. Thus, finding and then eliminating ‘bit rot’ corruption. It does take time. Time during which the NAS will be less than peppy. So, plan ahead and pick a time of the month that the NAS will not be used. For business that usually means starting it at 1am on Saturday morning. For home users… it could Tuesday or some other day you are not going to be using the NAS for 12 hours or more (potentially much more depending on array size, amount of data on said array, etc etc).
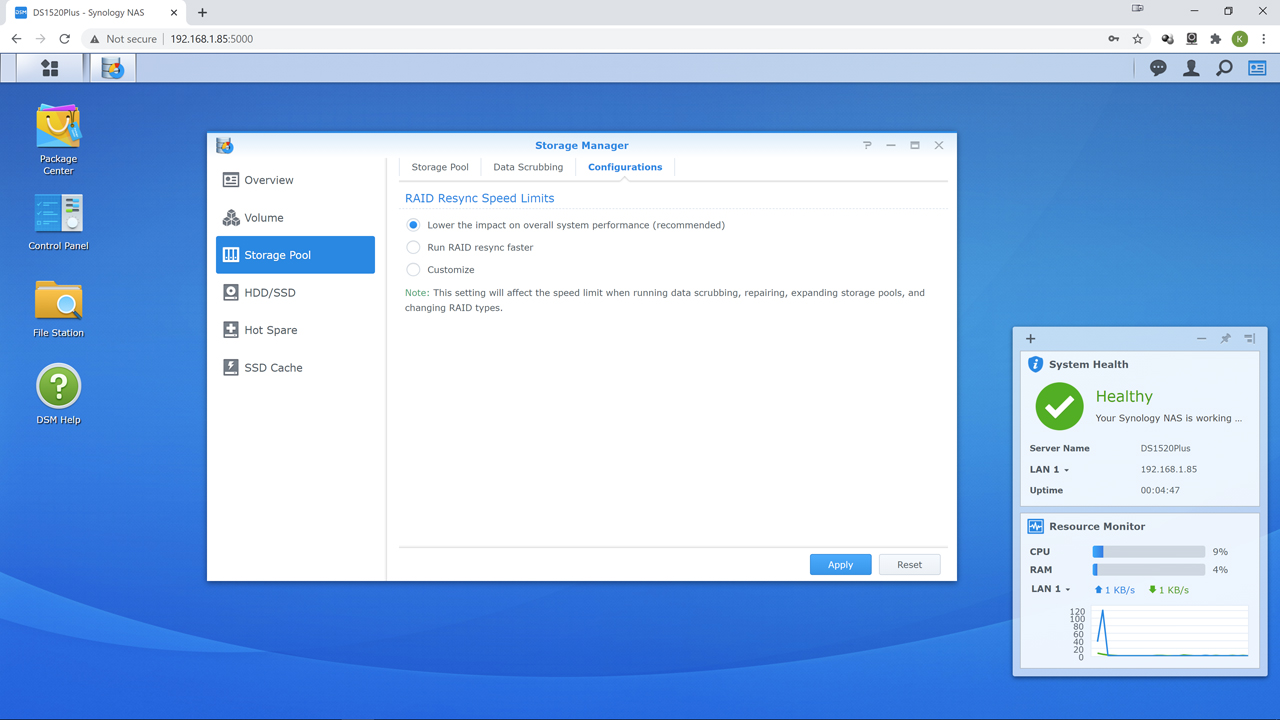
The other tweak we would recommend before moving on to volume creation is changing the resync speed of the RAID array. The default is ‘low impact’. It is just that and it can rescync without that big a performance hit. It is however… slow. Resync occurs when a drive ‘falls off’ (aka drive failure) or when a new drive is added to an existing array (aka increasing the capacity by using more drives in the array). During this process your data is at risk if you are dealing with a dead drive. It is as extreme risk if you use RAID 1, RAID 5 or SHR1, or two dead if using SHR2/Raid 6… as in, if another dies your data is gone. This is why ‘RAID IS NOT A BACKUP’. Have a constantly up to date backup. External drives are cheap. Your data is not.
To help minimize the window of time Mr. Murphy can mess with you… change the default to ‘faster’. This basically will increase resync speed (basically sets it to 300MB/s max, 100MB/s min per drive in the array) but will make the system respond slower. We personally feel this is a good trade off. If you want you can figure out what works best for you via the ‘custom’ option. Either way, we strongly recommend not using the default setting.
Software Installation and Configuration (p.3)
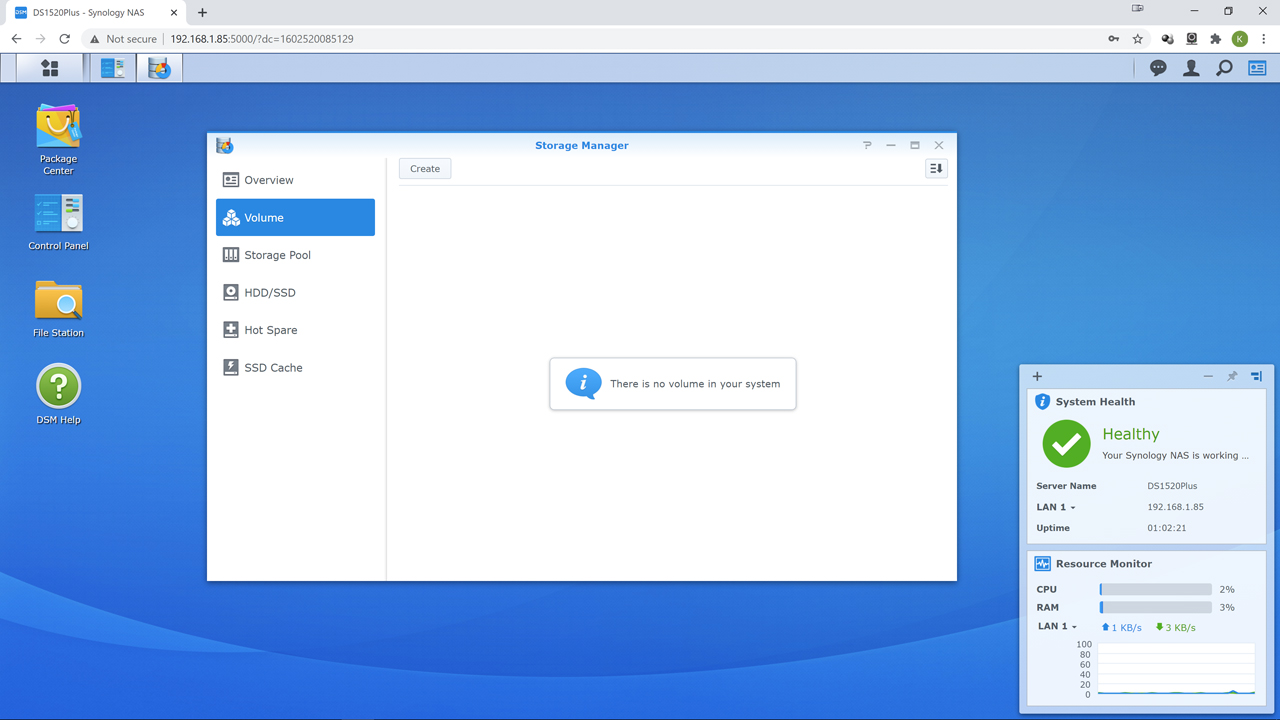
With the RAID array and storage pool taken care of the next step is to configure the volume. As made mention previously, the volume is the final ‘drive’ that the end user sees. In other words, it is the high-level setup of your pool(s) and the raid array(s). Without it… you will never see your ‘Z drive’ as it does not yet exist. If you have skipped the previous Storage Pool creation step when you click ‘create’ it will walk you through it. If you have done it the way we do things… do not panic when you see a different first screen. DiskStation Manager (DSM) is smart enough to not needlessly bug you. So, hit ‘choose an existing pool’ (if you have all your drives in the pool the other option will be grayed out).
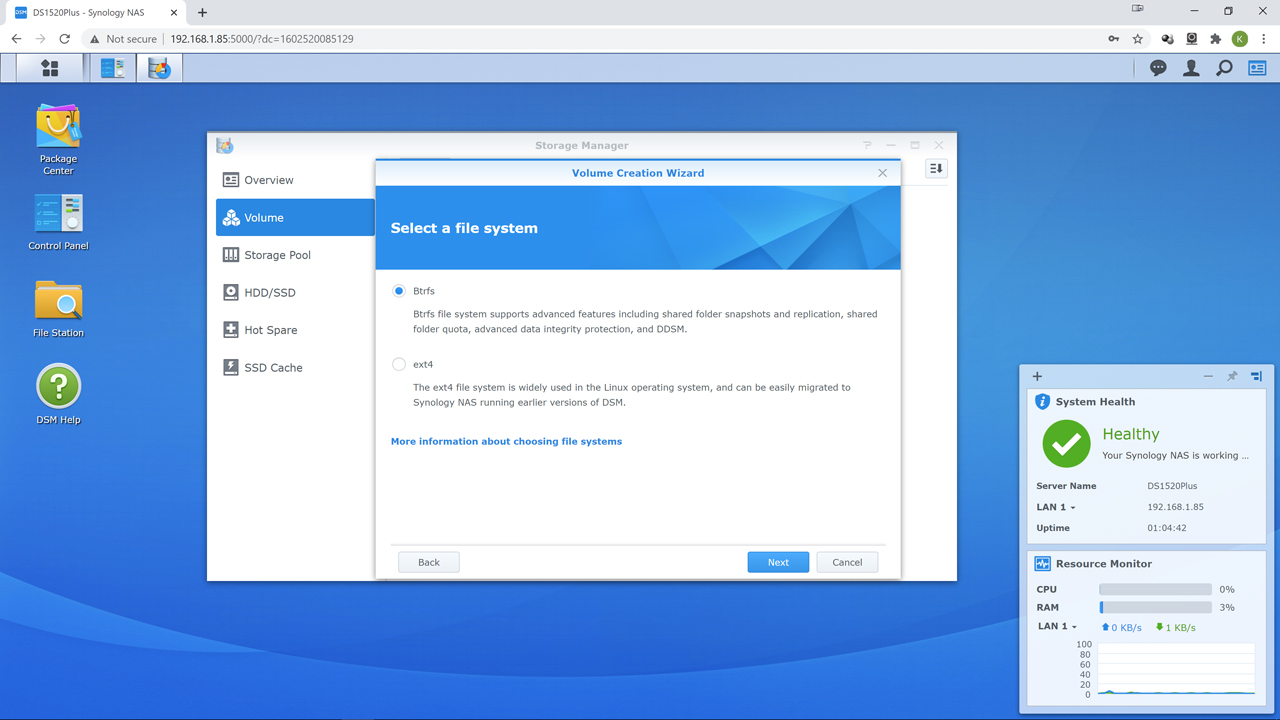
This brings us to the other main decision you will have to make: Btrfs vs ext4. Typically, if those are only two options… we would tick ext4. First time, every time. That is because ext4 allows you to take the drives out of a dead NAS (and all eventually die), place them in basically any Linux box and ‘recover’ the data… as they will be seen and read as a Linux RAID array… as they are a Linux RAID array.
Btrfs on the other hand, well… we typically are not a fan of sticking “Btrfs” and “RAID” in the same sentence let alone the same NAS appliance. It is much like sticking ‘data’ and ‘random loss of’ in the same sentence and is a great example of the phrase “This Is A Bad Thing To Do”. The standard Btrfs’ raid 5 and raid 6 implementation is broken and has been for years, with no solution even on the horizon. Put simply, the whole ‘write-hole issue’ makes it a non-starter for us. With that said as a file system it does have a lot going for it. It offers a lot of features that almost make it the equivalent of ZFS. Synology is aware of all this and has created a solution. A solution where you get essentially all the important advanced features of Btrfs without the ‘sorry but your data is gone’ problems that typically tag along for the ride.
Basically, Synology has not gone ‘all in’ on Btrfs. Instead, it is just used as the upper layer in the configuration stack… as the file system, and only file system. Right now, Synology is being a wee bit vague on the exact methodology and customization they have done, but from the way this NAS acts and what they say they are doing is not complicated. Elegant but not complicated. In a nutshell, instead of Btrfs at the lowest levels you have Linux’s LVM (logical volume manager) to present multiple RAID arrays as a unified storage space, and good old mdadm for the ‘RAID’ portion. Mdamd with LVM is a tried-and-true solution. One that has been used by countless enthusiasts, companies, and manufactures over the years as it ‘just works’ (usually). We have zero issue with that combination. Then, and only then is Btrfs added in on top. Since it does not have access to the lower levels its problems are not your problems… as the poorly implemented portions are not used.
So why choose this “Btrfs Bodge” over tried and true ext4? Especially when you will be giving up a bit of performance (for those interested in testing, and depending on configuration, it varies from nearly nothing to single digit to low double-digit difference)? Simple. You get more advanced features such as self-healing (e.g. file checksum) and basically a more advanced file system that may not equal ZFS in the proven reliability department but is more than ‘good enough’ for the average home or even small business. It also now has a proven track record as Synology has been using their customized version for years now. That is why we say go for the Btrfs option. Synology’s implementation is one of the few exceptions that prove the rule.
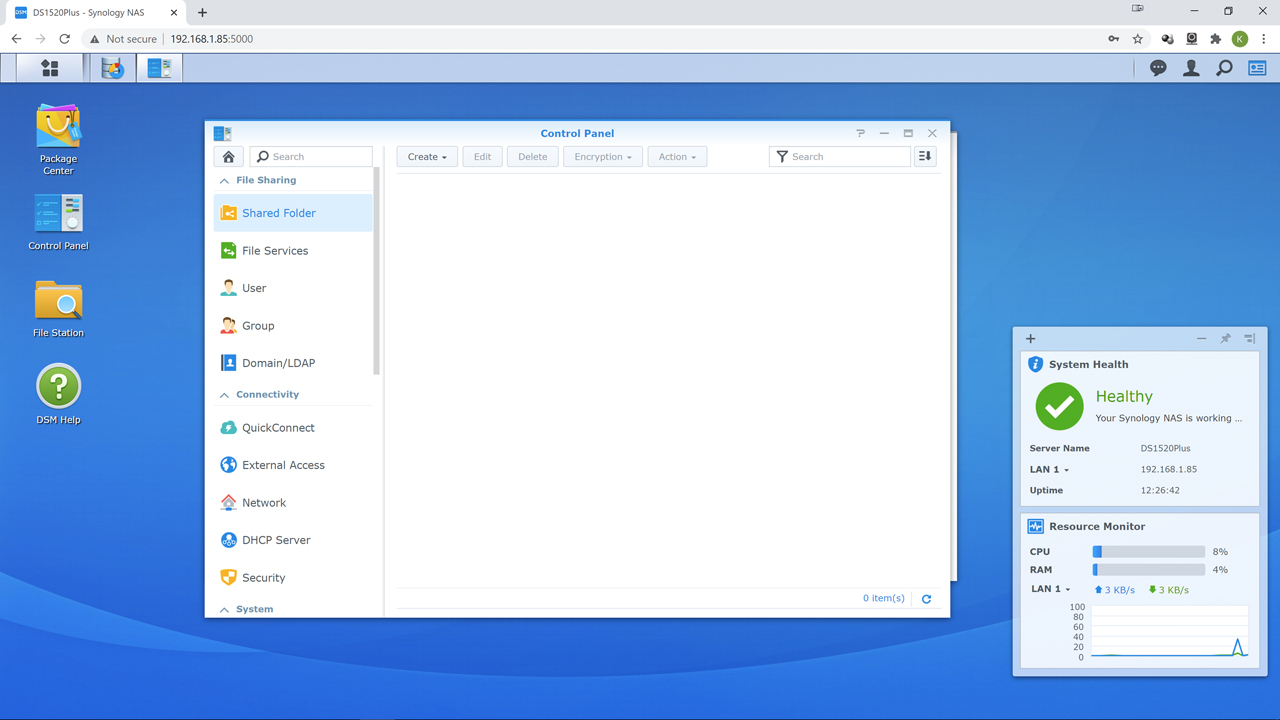
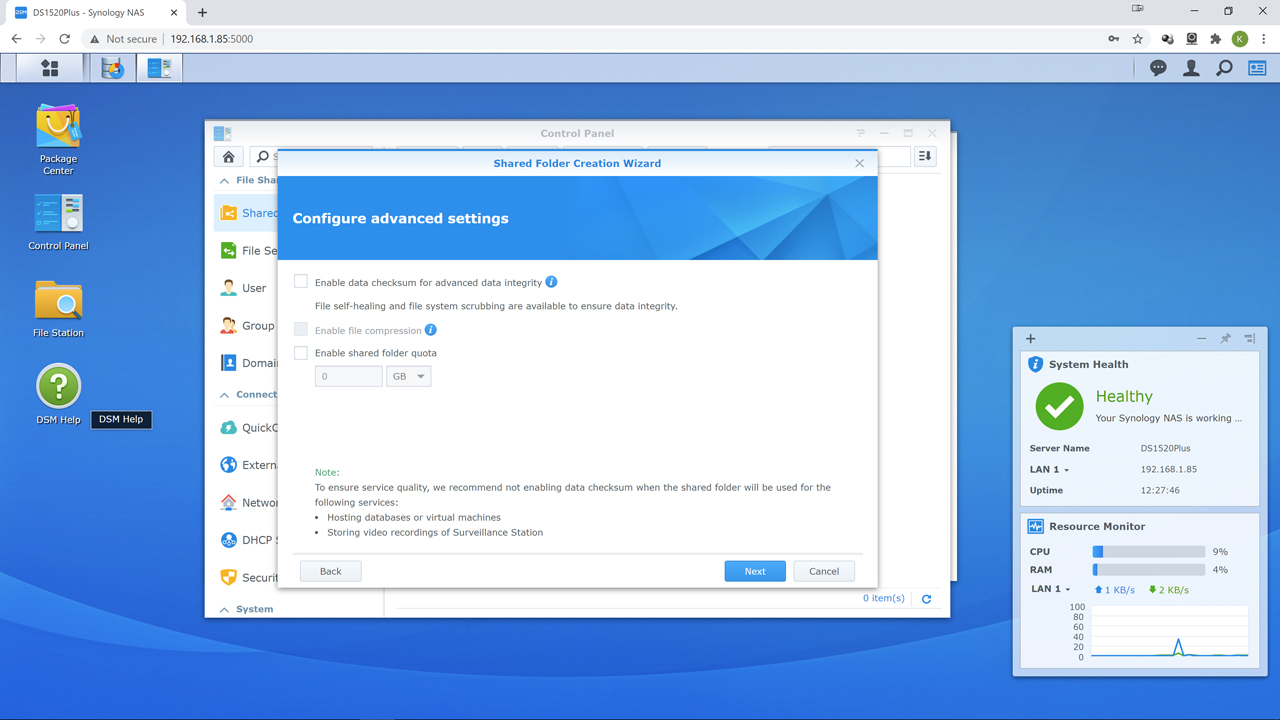
Once the status changes to ‘active’ from ‘creating’ you can then create your shared folder… your ‘Z drive’ that everyone will see. On the DSM ‘desktop’ click “Control Panel” and then scroll down to ‘Shared Folder’. This will start the wizard and get you up and running in no time flat. Just be aware that if you did choose Btrfs you really… really should tick ‘enable data checksum for advanced data integrity’. This is part of the whole ‘self-healing’ that Btrfs offers and not using it removes a lot of the reasons for picking it in the first place. If you opted for ext4 you donna get this option. So use it if you got it.
Once you have done the wizard boogie… congratulations! You now have a NAS that can actually be used. Not optimally, but useable. To help in mapping your shiny new ‘Z drive’ in your client computer’s OS Synology has a handy dandy app called “Setup Assistant” which you can download from Synology’s website under ‘Desktop Utilities’ here: https://www.synology.com/en-us/support/download/DS1621+#utilities
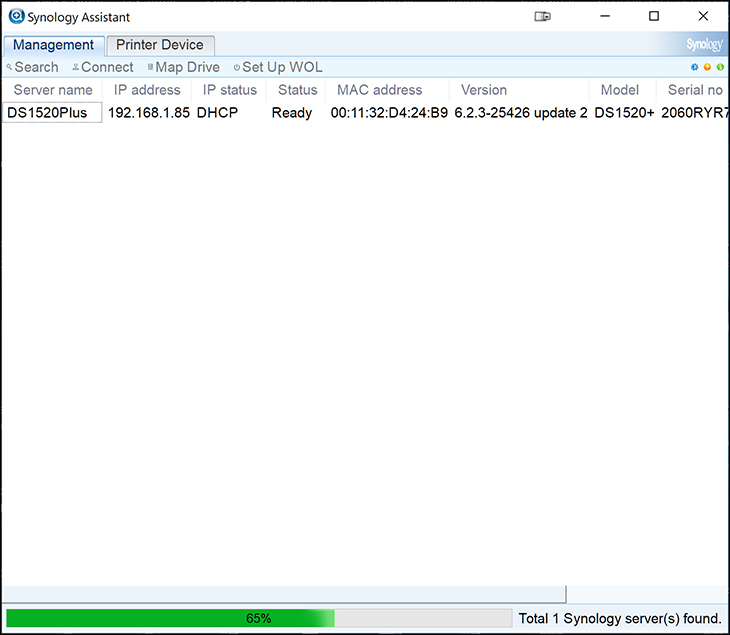
It is only a couple Megabytes in size and, as long as you pick the right OS version, works and works well. When you run it, it will scan your network, find your NAS and by clicking ‘Map Drive’ step you through a simple wizard that will automagically let your OS see the ‘Z drive’ even after you reboot.
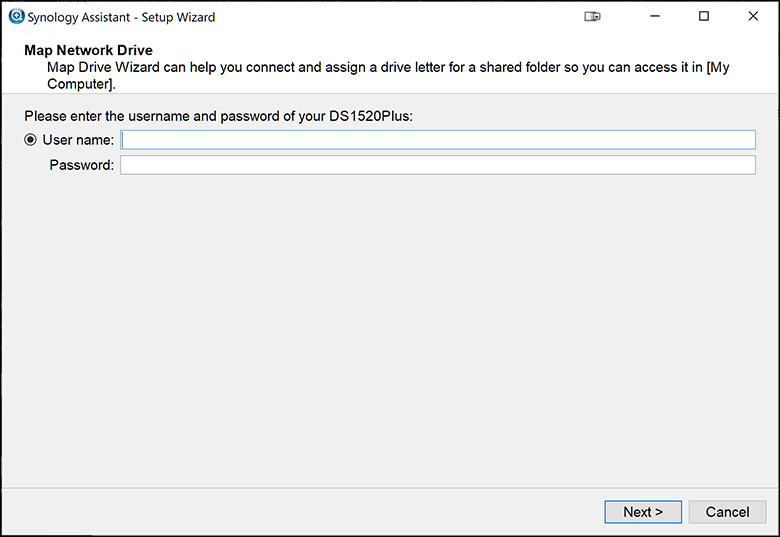
At this point you are pretty much good to go. Anything beyond this step is optional and such you can ignore the next page if you so choose. We would not, but if you are impatient to get it over and done with you can.
Software Installation and Configuration (p.4)
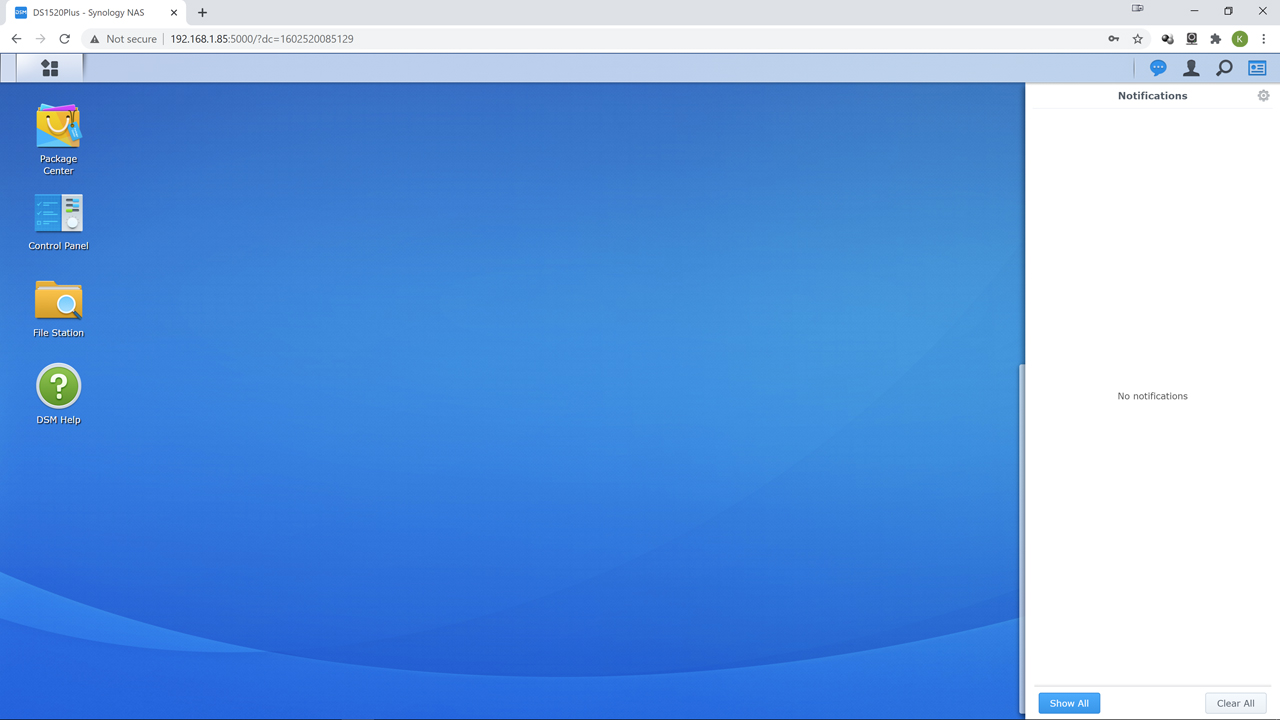
At this point you do have a fully functional Network Attached Storage appliance that for the most part can take care of itself. What you do not have is a system that is optimized for you. For example, when something goes wrong the device has no way of notifying you beyond a small amber LED and the occasional ‘beep’. That is sub-optimal.
So, the first thing we would do is navigate to the Control Panel and then scroll down to the ‘Notification’ option. Depending on how you want to be notified you will want to enable at least one option. We prefer Email. Type in your details, if necessary logging into Gmail in the process, and then hit the ‘send a test email’ button. If you get it, you are good to go. You will be notified when something squirrelly happens.

To give yourself another way communicating (read fixing) your new NAS we would then scroll down to the ‘Terminal & SNMP’ section of the Control Panel column. Tick Enable Telnet service, and enable SSH. Worst comes to worst you can use Putty and log in to get your NAS back up and running. Having more options when things go wrong is never a bad thing.
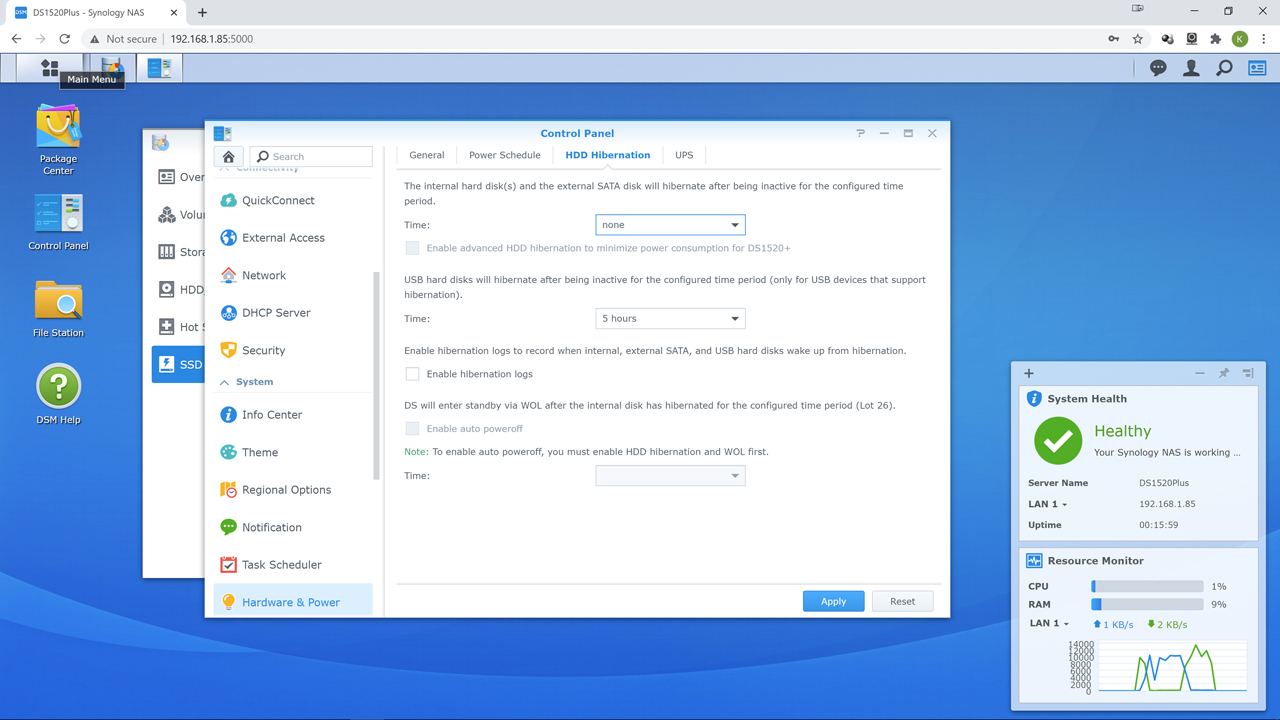
Next, navigate to the Hardware & Power section of the Control Panel. We dislike the idea of the hard disk drives spinning down unless they have to. To be honest, unless the NAS is only going to be used sparing – for example weekly or monthly – the wear and tear on the drives would be greater than letting them spin all the time. Equally important… most drives that last more than a few months (and thus the ‘bad’ drives are weeded out) die on startup. Going from dead stop to 7200rpm is stressful on the motor. Don’t do it more than you have to. Thus, tick ‘none’ for when the drives hibernate. If you only backup to your externally connected ‘back up drive(s)’ daily or weekly do the same. If monthly, you can do 5 hours or the same. Entirely up to you.
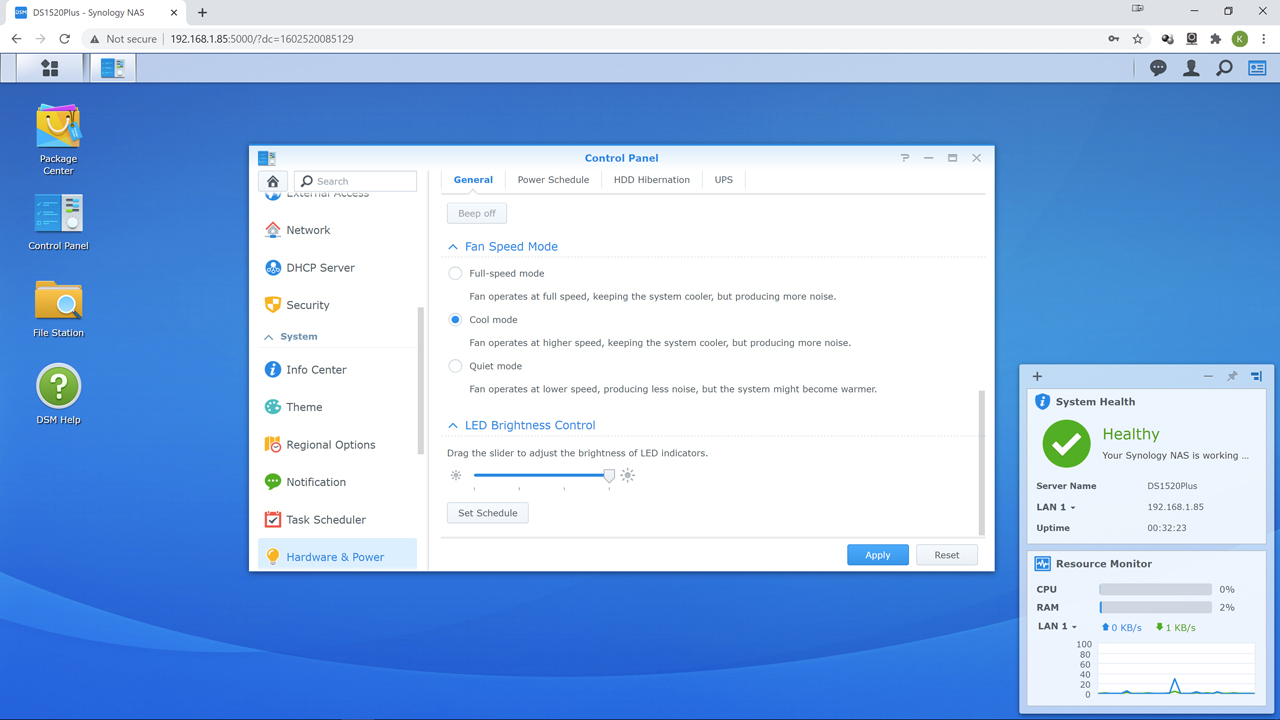
While here, we would also take the time to modify the fan speed. The default ‘Quiet mode’ is decent enough and does a good job of balancing heat vs. noise. We personally think the ‘Cool’ mode is more optimal for most users. The CPU and drives (especially M.2) will run cooler and thus be happier. Happier components typically last longer.
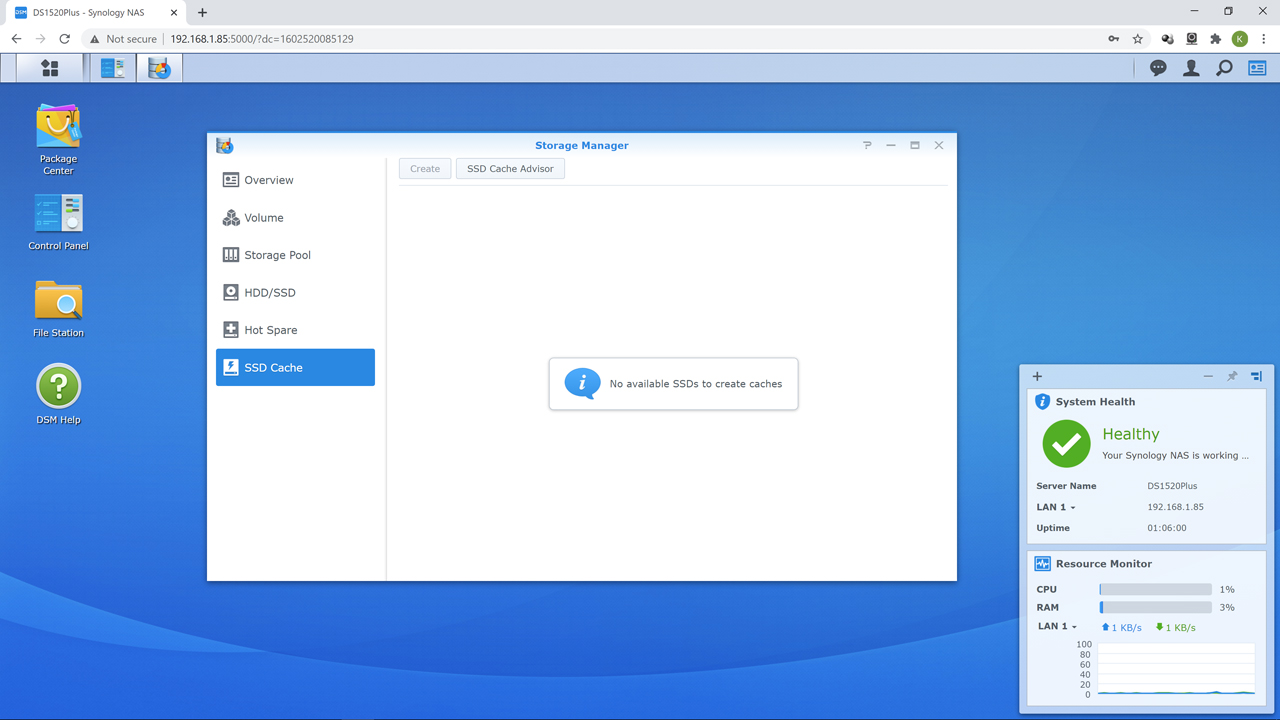
Next, if we are using this feature, we would configure our M.2 drives as cache. We have already gone over the pros and cons in the closer look section so will not rehash the debate. If you want to do it, go to Storage Manager and click SSD Cache. Create the r/w cache and move on knowing full well that it is not a magic bullet and does have down sides.
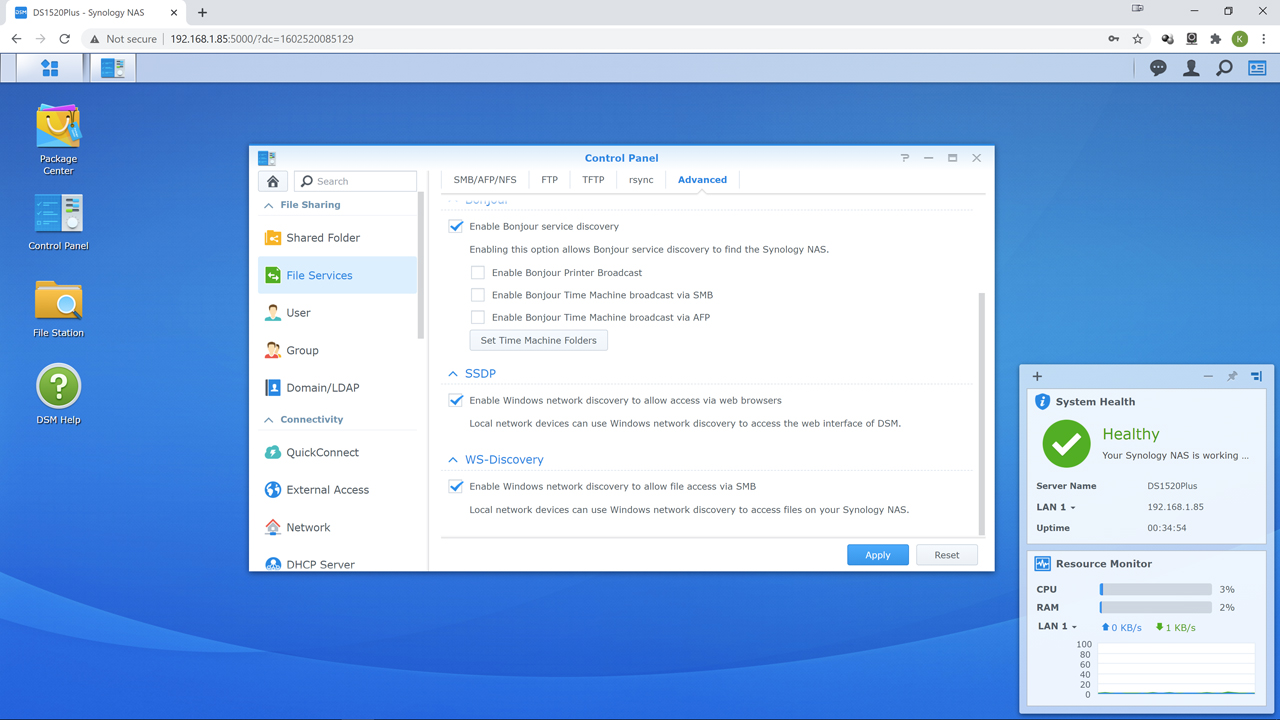
If you need SMB/AFP/NFS or rSync… you already know what to do. If you do not know what any of those acronyms mean… you probably do not need to enable them. Either way, they are located under Control Panel and then ‘File services’.
The Regional Options section of the control panel will let you set the date and time and for OCD people will make them less… twitchy. Some will not care all that much if it displays the right date and time, but best practices include it. Knowing exactly when and how long ago a problem started can be invaluable in tracking down a randomly occurring issue and squashing the bug that is causing it.
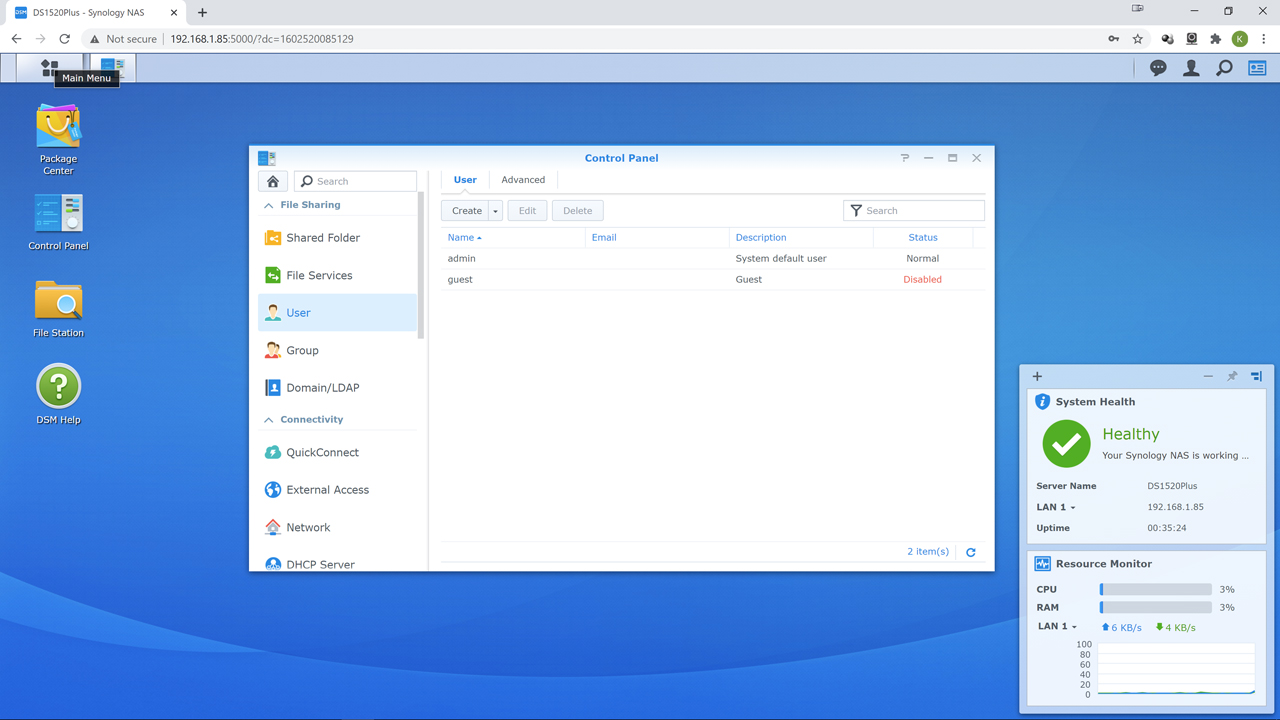
Best practices also include not using the default administrator user account for day to day tasks. Instead go to ‘User’ and make one with fewer permissions… and keep the administrator account for those times you actually need all that power. If you have random people connecting to your network, and this includes ‘friends and family’… we strongly suggest a guest account with limited access at the most. This is why the default for ‘guest’ is disabled as they will have less options. Think long and hard before you give access to your NAS to anyone, even those who you know and know where they live.
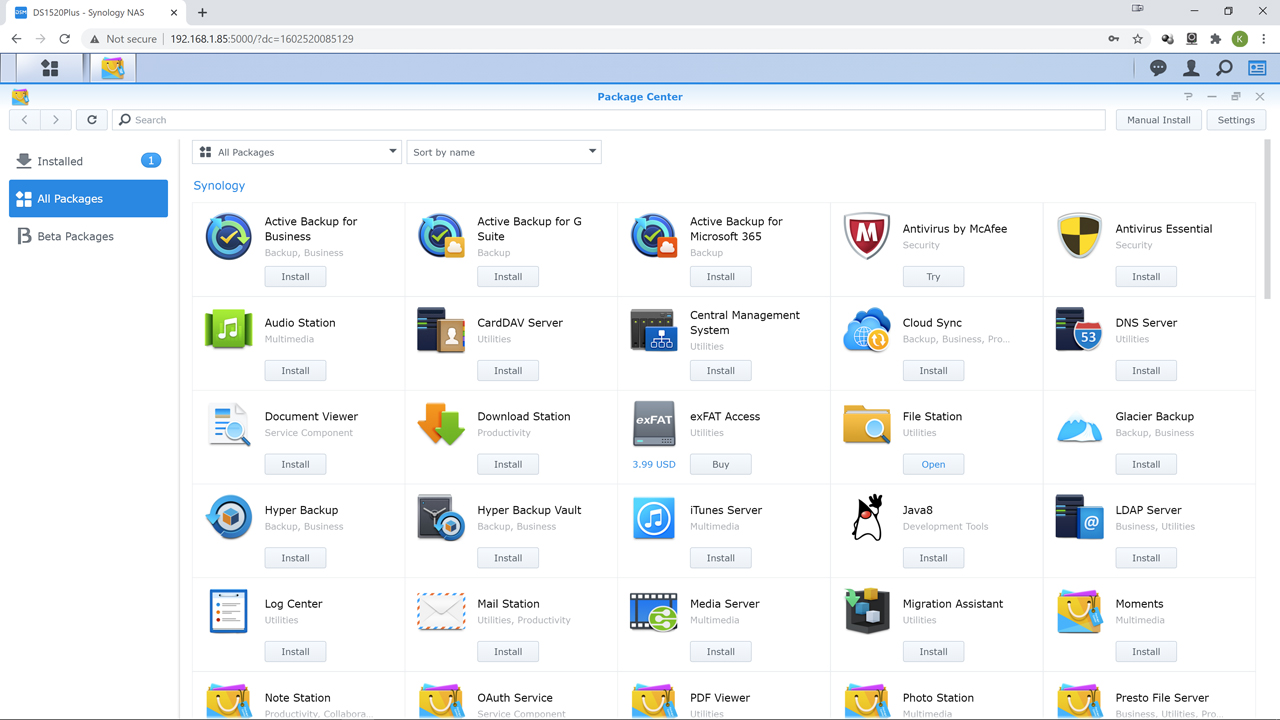
For what software packages to install, well that is a personal decision based on what you want the NAS to do besides being a file server. As time goes by you will figure out what you need and do not need. We personally err on the side of ‘less is more’ and typically any NAS appliance gets maybe a free anti-virus, a decent backup option if using USB, file stations, OAuth Service, Universal Search, and maybe docker installed. Everything else gets run from a PC. Remember, the more optional packages you install the more overhead they take.
DSM 6 includes a decent sync option in the control panel and for most it will provide a fairly hassle-free off device backup without having to worry about the foibles of USB attached storage. Though many may find the Hyper backup package easier to work with. Personally, we would use a combination of snapshot replication and hyper backup. To us restoring from a single file ‘derp moment’ is easier via snap shot, but when the fecal matter hits the rotary impeller and you NAS got dropped in the dunny by Mister Murphy… a full array’s worth of data restoration via hyper backup is easier. Different tools for different scenarios. One is an icepick, the other is a jackhammer. Use them both responsibly. In either case, if you do not feel you are ready for the ‘next step’ and instead just want a simple and easy backup process an inexpensive single or dual bay eSATA device would be our recommendation. USB is always slow on NAS appliances. It just is. So, if you have a NAS appliance with eSATA port(s)… use them. That is why Synology includes this feature in the first place!

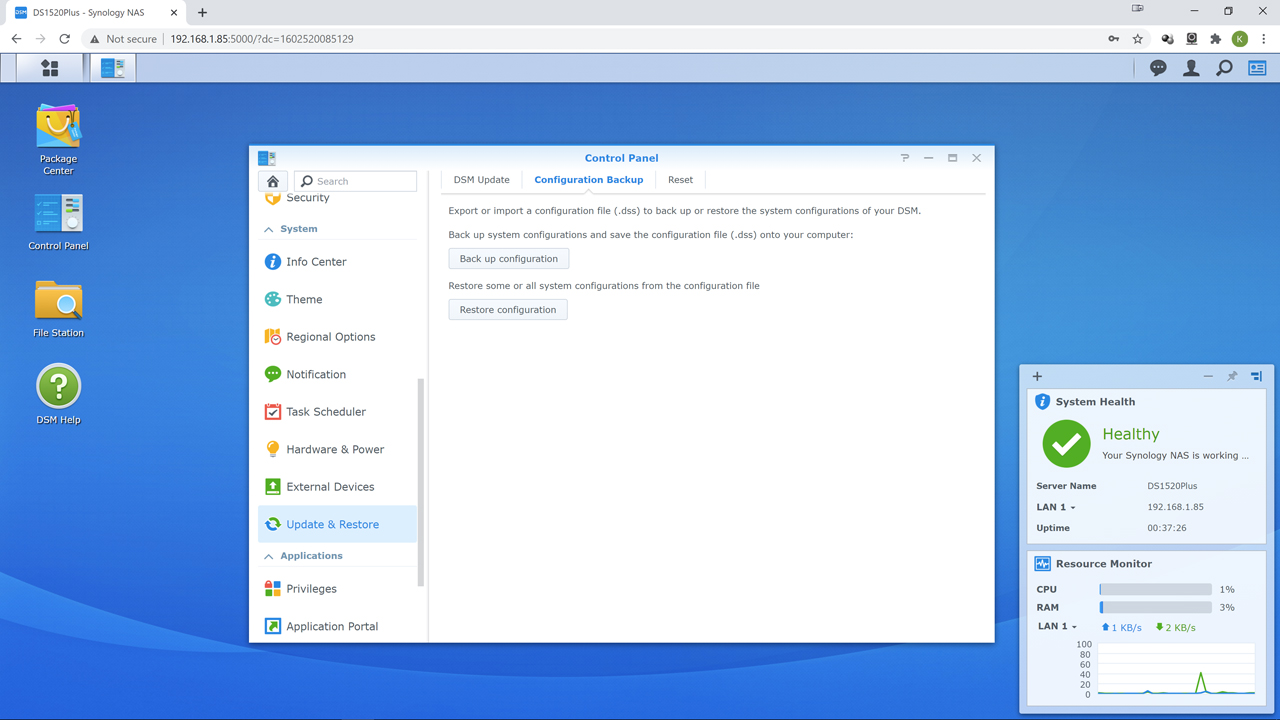
The very last thing we would do is go to Update & Restore section and make a backup of the configuration. That way if a DSM update borks your system… you can unbork it and be back up and running in a jiff. Just make sure to store the created file somewhere safe, and somewhere you will be able to find it in a year or five.
While extensive, do not consider this an exhaustive or all-inclusive run down on DSM. It has a lot of powerful features we did not go over (for example drag and dropping options to the ‘desktop’). It will however get you up and running with a configured NAS in a safe, repeatable and reliable manner. Just remember one thing… have fun. Network Attached Storage is about making your life easier not harder. This is why Synology has spent so much time and effort making their devices as user-friendly as possible. So have fun. Learn a few things, and enjoy your new NAS.
Testing Mythology
The reasons to purchase any Network Attached Storage device are as varied as the consumers who purchase them. For some it just an easy way to centralize all their photos, documents, and backup of other miscellanea that we all collect over the years. For others it is going to be their central storage location and streaming device for their music, and video collections. Other still, it will be used in a more professional environment and will be used hard by multiple people… maybe even with VM’s running off it.
With such a wide variety of criteria it behooves us to use as wide and varied a list of testing protocols as possible. As such we have used a blend of synthetic and real-world benchmarks, as well as custom recorded real-world benchmarking.
For synthetic tests we used a combination of the ATTO Disk Benchmark, NAS Performance Tester, and IOMeter.
For real world we timed how long a single 100GB rar file took to copy to and then from the devices. This represents large file, low queue depth, sequential performance. We also used then 30gb of small files (from 100kb to 200MB) with a total 36,000 files in 1200 subfolders. While a bit extreme in size, this test will help replicate small file performance of the NAS under typical usage scenarios.
For custom recording benchmark, we use Intel’s NAS Performance Toolkit.
Each benchmark test is run four times and the average of all the runs is used. In between each test run, the NAS is rebooted to eliminate the impact of successful RAM cache hits on overall performance.
For devices supporting Raid 6, test results will be shown for Raid 6, Raid 5, Raid 1, and Raid 0. Those that do not support Raid 6, RAID 6 test results will (obviously) not be included. The maximum number of hard drives a device natively supports internally will be used.
For devices offering cache support Raid 6 (when available, and Raid 5 when not) will have testing redone with a IronWolf 510 NVME 1TB cache module installed and configured. If the NAS supports Read and Write caching a pair will be used.
For devices offering 10GbE upgrades, but do not come with 10GbE baked in, an Intel X550-T2 will be installed and used for all 10GbE test results.
As Intel NASPT is an older application, windows XP 32bit with RAM limited to 2GB was used.
For Intel NASPT we have opted for the 4x HD Playback, HD Playback and Record, and the Photo Album tests.
4x HD Playback, uses a 1GB 720P video file and simulates four different users (i.e. queue depth of 4) simultaneously viewing it using Windows Media Player with 256KB read size.
HD Playback and Record simultaneously tests read and write performance of a 1GB 720P video with 256KB r/w size.
Photo Album simulates the typical home user opening and viewing a couple hundred photos of varying size (aprx 1GB in total combined size).
For NAS Performance Tester we opted for 400MB file size with a default of 5 loops per run.
Synology DS1621Plus: Upgrade Recommendations (ECC RAM)

Like most things in life Your Mileage May Vary. Only you know the particulars of your needs, wants, and desires. As such the following sections are simply our thoughts/musings on what we personally would do and when we would do it. Do not take anything as gospel as while we will do our best to lay out our thought process only you know your home networking storage needs, your home network configuration, and most importantly of all… your budget.
With that caveat taken care of let’s start with the most obvious upgrade path: the RAM. In many ways the inclusion of only 4GB of ECC RAM is the largest potential bottleneck of the DS1621+. For basic, read low queue depth and ‘light usage’ in network-based file storage and retrieval scenarios, it is enough. This will be especially true for average home networks which are only capable of 1GbE connectivity and where one or at most two users will be accessing the system at any time.
This however is an IT Enthusiast and entry level S/MB orientated NAS appliance. Both groups will, on average, find the 4GB to be limiting and a noticeable bottleneck in performance on above 1GbE networks. Some of this is because the AMD V1500B is a dual memory channel CPU that will only have one DIMM populated, some of it will be because 4GB may indeed be enough for the DSM ‘OS’ to work while leaving over 3GB (overhead for the DSM at idle is about 600MB) of room left over for caching duties but the underlying reason does not matter. It will be the largest bottleneck… especially if you have all 6 bays populated with high performance HDDs in RAID 0/1/10. Thankfully it is also the easiest bottleneck to remove.
The most obvious solution is to purchase a second 4GB Synology branded stick of ECC and double the RAM. We actually would recommend not doing so. While 8GB is pretty decent, we would instead recommend thinking about purchasing two 8GB sticks or 16GB sticks. Most will find 16GB plenty, others will need the fully 32GB Monty to be satisfied. It really will come down to case-by-case basis on which is best.
Synology themselves offer rebranded Samsung ECC RAM sticks for sale (to be precise, the Samsung rebranded Synology D4ES01 4GB and 8GB RAM sticks are using K4A4G085WE-BCTD RAM ICs). One stick of 4GB will set you back about 90USD. One stick of 8GB will set you back about 200 USD. Luckily, you have plenty of options as Synology does not make RAM. They purchase from other manufactures, batch test to ensure they meet their specs and then rebrand them as Synology RAM… so if you do not feel like paying the premium for guaranteed to work ECC RAM you do have options. Though these options will not be on the QVL for the DS1621Plus. Only three options are list, at the time of this review, and all three are Synology branded (D4E models) – 4GB, 8GB, and 16GB.
While it is indeed true that theoretically any Dual Rank (as Synology is hit or miss with Single Rank sticks) DDR4 ECC Unbuffered SO-DIMM 260pin 1.2V ram will work… the reality is a bit more nuanced. On POST Synology NAS’s do check the RAM (amongst other things) and if it is not ‘official’ RAM it will pop-up a nag screen (and log into the DSM). Every. Time. You. Reboot. Your. NAS. For examples of this ‘phenomena’ Kingston Server Premier (e.g. KSM26SED8/16HD) will nag you. But will work with no other problems beyond being nagged. However, in some instances, especially “brave” souls who use non-ECC RAM (though we are unsure why you want to do this… beyond saving a few bucks on the upgrade), the NAS appliance may not even POST with unofficial RAM installed and Synology tech support will not help you until you remove the offending sticks and reinstall the original RAM.
SAMSUNG are the most obvious and ‘safest’ choice as the D4ES01 series is Samsung ECC RAM. They however may prove to be the hardest to source choice as Synology D4ES01 series are based on the EOL’ed Samsung B-die RAM ICs. We personally would not get hung up on 512MB K4A4G’s ICs used as quite honestly 1GB K4A8G085WB-BCTD’s IC can basically be used interchangeably with 512MB K4A4G085WE-BCTD based IC’s… making your life a teeny tiny be easier (and if you source via business orientated sales departments it will be even easier). So Sammy M474A2K43BB1-CTD is also a decent choice.
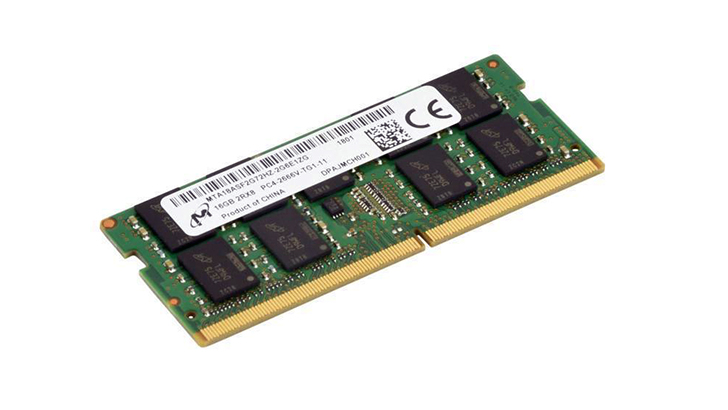
With all that said. Our personal recommendation and ‘go to’ option, based on decades of experience, is Micron/Crucial ECC RAM. In certain business circles there is an old saying (and one we have used many times) “Samsung for Speed, Micron for reliability and compatibility”. If Crucial or Micron say it will work in X system or with X motherboard… it will work. First time. Every time. Right now, that means 16GB DDR4-2666 CL19 MTA18ASF2G72HZ-2G6E1 (https://www.crucial.com/memory/server-ddr4/mta18asf2g72hz-2g6e1).
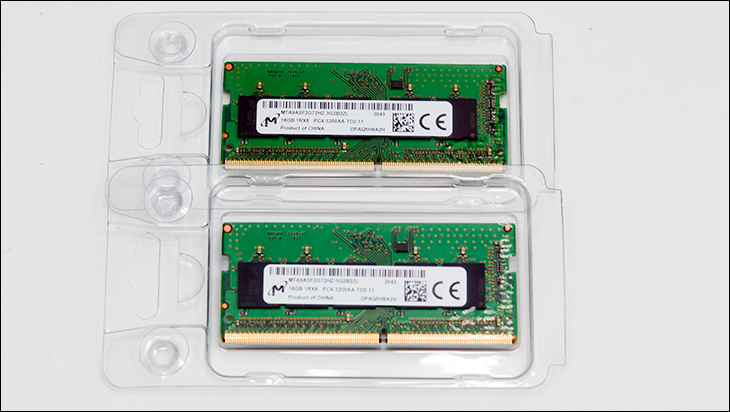
The sticking point is that is actually old RAM and is hard to find. In talks with Micron, they recommend MTA18ASF2G72HZ-2G6E4 which is the newer version of that particular set of RAM. The other option, and the one we used is MTA9ASF2G72HZ-3G2B2ZL. Yes this is DDR4-3200 ECC but beyond a speed bump (which this NAS can not make use of) it is good kit. In testing we used both and opted for the MTA9ASF2G72HZ-3G2B2ZL as ‘why not’. We can confirm that these sticks will give you zero issues, and no nag screen. Plus, they are extremely easy to find via typical e-tailer and retailer options.
The other very nice thing about this particular RAM is simple. They not only work perfectly, they will only set you back about $100-150 (USD) per stick (depending on particular kit and retail vs not retail… with business contacts netting you a better price). Put another way, you can go from 4GB to 32GB for not much more than one 8GB stick of Synology branded ECC RAM will set you back. The choice is yours. Just understand the full implications and do a risk vs. reward cost benefit analysis on any RAM you are thinking about before you buy.
Upgrade Recommendations (HDD)
Recently Synology released there new Synology Hard Disk Drive series – the HAT5300… and it has not been without controversy. Without rehashing internet debates, it all boils down to one thing: support. Some of this move is due to Seagate firmware ‘issues’ with certain 10TB models. Some of it is due to wanting to further improve their bottom line, but mostly it is because Synology makes business grade NAS devices and reducing the logistics of supporting these highly important niches is paramount. The easiest way to improve support while reducing overhead associated with said support is to eliminate variables. So instead of having to support multiple lines of Hard Disk Drives… future Synology enterprise models will only officially support a handful and really are meant to ‘just work’ with Synology models. Many of the big boys of the industry do this and few IT architects will even bat an eye at this change.
We seriously doubt this change in their hard disk drive QVL policy will ever trickle down to their consumer division. It would be the death knell of them in consumer and S/MB industry. Either way the HAT5300 does have some things going for it. The first and largest is they are Toshiba rebranded drives with custom firmware. Specifically, they are Toshiba enterprise grade MG drives with customized firmware meant specifically for NAS duties.
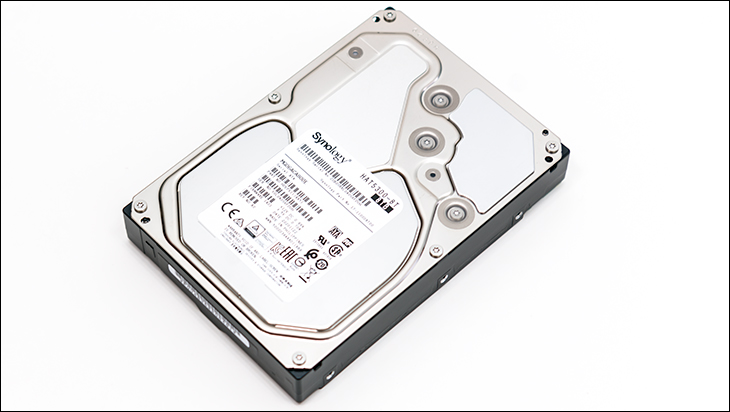
This is an excellent choice as each generation of Toshiba MG drives were meant to go toe to toe with Seagate and WD enterprise models and offer realistically viable, arguably superior, alternatives to them. They come with features such as persistent on-board write cache (PWC) that does not ‘forget’ and have to relearn with every boot cycle. They come with power loss protection (PLP) that (just like with a SSD with such features) means that in the event of a sudden and unexpected power loss… your data will be safely written to the drives before they do a graceful shutdown. Basically, they are robust, reliable, and (relatively) fast drives. What they are not however is custom tuned for NAS duties. Instead, they are meant for File Servers, E-Mail Servers… server Servers. Put bluntly they are more ‘jack of all trades’ type drives with jack of all trades firmware. Thus, custom firmware tuned for NAS duties is a Good Thing™. Further helping things along is you no longer will need to keep track of firmware upgrades… or even worry about firmware updating. Synology’s DSM will do both for you.
That is a lot to like, and for those interested in reliability with plug and play maintenance they are indeed a good choice. With that there are a few salient points that need to be addressed. Right now the HAT5300 series has three capacity options: 8/12/16TB. In all likelihood each HAT5300 capacity model represents a different generation of Toshiba MG series drives. For example, and taking different firmware into account, the MG06 is the foundation for the HAT5300-8T, the HAT5300-12T on paper looks a lot like a MG07, and the HAT5300-16T looks like a MG08. Apples vs. oranges firmware is why direct comparison is difficult but It is highly doubtful that all are one model… as the MG06 was never made in larger capacities than 10TB and we know for certainty that the 8TB variant of the HAT5300 is a MG06 drive.
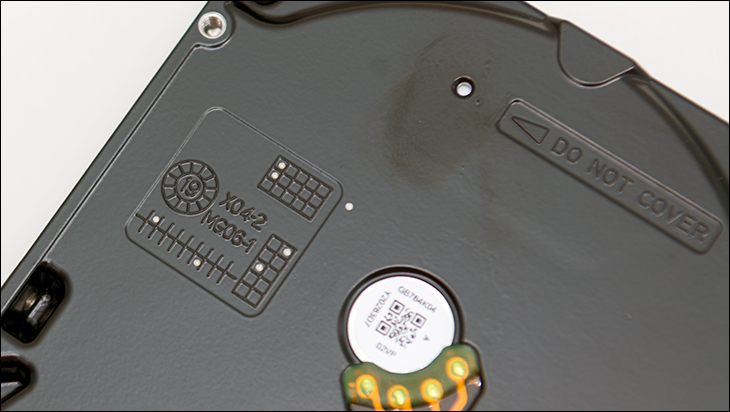
From a purchasing and even support perspective ordering three different models and having to create three different flavors of firmware is a downright odd choice. Even ordering and supporting two different generations is tough for a business the size of Synology. We however do suspect three different models as this 5300-8T is obviously an air and not Helium based model (“do not cover” vent hole on bottom)… and is stamped with a MG06-1 on it. Either way, the numbers from one specific capacity version will not in any shape nor form translate all that well to other capacity variants.
More troubling still is the smaller capacity versions are based on older technology (most likely foundation being the Toshiba MG06ACA800E – a 1.43TB per platter series). While it is indeed true the air (and not Helium) ‘filled’ Toshiba MG06 could go toe to toe with Seagate’s older models… Seagate has not used 1.4xTB platters for a while now. Synology will be one of few that are ‘releasing’ a 1.43TB platter-based drive in 2021. Customized firmware will only improve performance so much. Luckily, as you go up the HAT5300 capacity ‘food chain’ you get a faster and faster tech foundation. Price of course also goes up.
Now down to brass tacks. Everyone likes to compare the HAT5300 to Seagate IronWolf models. We feel that is sub-optimal. A more optimal comparison is the Seagate Exos line. This is Enterprise vs. Enterprise comparison, with 5 year vs. 5 year warranties. A HAT5300 8TB’er will set buyers back about 240 dollars USD. 12TB capacity version is about 350 USD. 16TB are still not readily available, but obviously will cost even more. Compare and contrast this with the fact that a Seagate Exos X16 10TB is about $250, a X16 12TB is about $280, and an Exos X16 16TB is about $330. Obviously, you are going to be paying a premium for ‘plug and play’ simplicity.
For those that argue that the HAT5300 vs. Exos is not a fair comparison, an even more ‘apples to apples’ is Synology HAT5300 vs Toshiba MG drives. A Toshiba MG06 8TB goes for about $190. The MG07 12TB’ers goes for about $250. MG08 16TB goes for $340’ish. Once again you are paying a premium for more finely tuned firmware and ease of long-term use. Only you can decide if the extra cost is worth it.
Upgrade Recommendations (NIC)
Of the three main upgrade options… NIC options are going to be the most controversial. Thankfully, for the next couple years, it will be the least likely component to be upgraded. For many, arguably most, DS1621+ users the four 1Gbe ports integrated into the unit will be more than enough. Barring a massive reduction in network infrastructure costs upgrading to 2.5Gbe is contra-indicated for most on a price vs. performance basis. Instead, most who will upgrade are going to skip past 2.5 and even 5Gbe options and go for the tried-and-true 10GbE options (but probably will not go the 40Gbe route… yet).
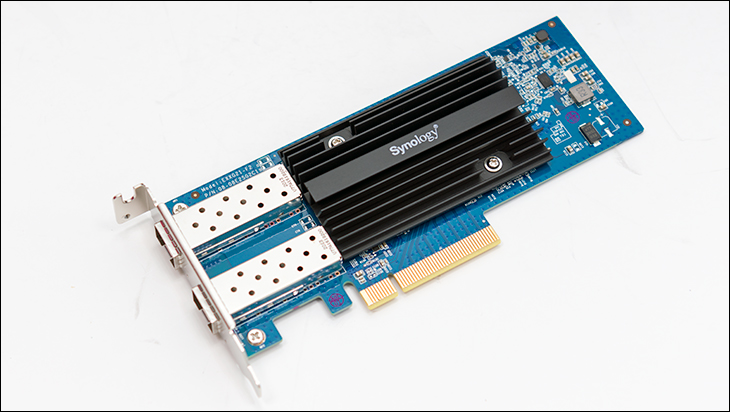
For those who want absolutely, guaranteed combability… go to Synology’s website and look at the latest QVL list for the DS1621+. The E10G21-F2 is indeed on there. This is a Marvell (aka Cavium aka QLogic) FastLinQ 41000 Series based controller with dual SFP+ ports. To be precise it is a QL41102-A2G controller based Networking Add In Card… and is the same as what HP use/used in their “Gen10 Plus Ethernet Adapter” series. It just works. Good performance plus no hassles is indeed a good combination.
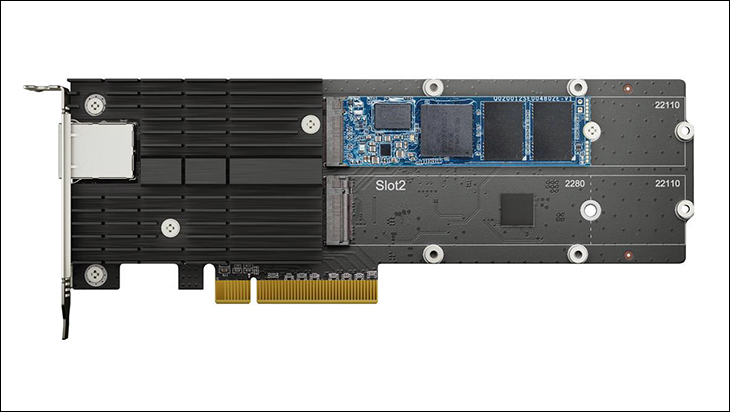
Where the DS1621Plus only comes with one PCIe slot, some may be tempted to go the combo dual M.2+10GbE NIC route. Of these we prefer the Synology E10M20-T1. We don’t prefer it just because it will give you two M.2 NVMe ports along with 10Gbe abilities, instead it is because of the increased cooling associated with having to keep both a moderately hot running 10GbE controller and a pair of modern NVMe SSDs cool. Keeping both cool while also being passively cooled (due to space limitations / concerns) is tough. This is why the brute force approach of increasing the heat sink dimensions is optimal. Bigger sink with bigger surface area means better temperatures. The E10M20-T1 comes with two (relatively) massive heatsinks (one dedicated for the M.2 110 slots, one for the 10GbE controller).

Thus, the Aquantia AQC107 based Synology E10M20-T1 is an excellent choice from a cooling perspective. It however is not on the QVL for this specific NAS. Also in the negative column is the reliance on the AQC107 is less than optimal. Aquantia controllers have a bit of a reputation of being divas who do not play nice with every 10GbE hardware out there. Put bluntly, they have been accused of causing random issues (especially with Ubiquiti hardware). Networking issues which ‘suddenly’ disappear when the Aquantia hardware is pulled and replaced with Intel or Chelsio or Mellanox. In this regards… they have gotten better (as they are now owned by Marvell). Arguably ‘good enough’ to not be a deal-breaker for most home users. Sadly, on top of this issues is the fact that the Synology E10M20-T1 is (obviously) a single 10GBase-T enabled device. For our peace of mind, and conservative nature, we typically opt for dual port models… as ports do go bad. Thus, the Synology E10M20-T1 may not be an optimal choice for all users and scenarios. Only you can decide if these issues are important to you or not.
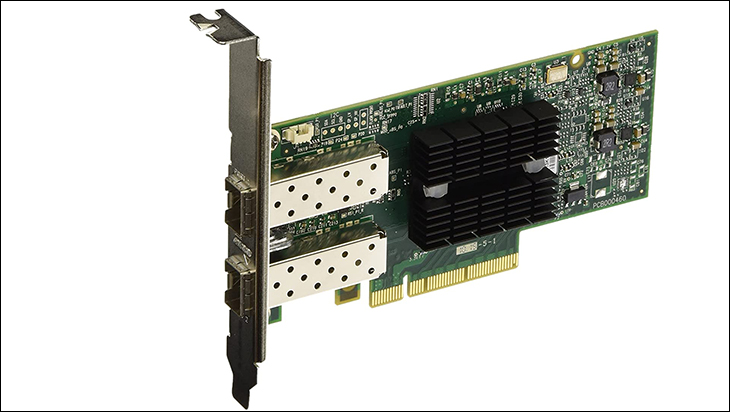
Setting aside the whole the NIC vs. NIC+M.2 question on what to populate the single PCIe slot with, we feel that those interested in the 10GbE, or faster, route should first answer one simple question: is the ‘safe’ option of picking from the QVL list the best option? Our personal ‘go to’ 10GbE (or faster) NICs of choice are the Intel X540, Intel X550, and Mellanox connectX-3/3 pro controllers (and Chelsio if dealing with TrueNas based systems). None of which are on the QVL. Ironically the Intel X710 (one of our least favorite high’ish speed NiCs going) is on the QVL. For 10GbE, we typical recommend SFP+ over 10GBase-T as they run cooler and consume less power. For switch-to-switch interconnection (6-12inch “patch cables”) we prefer DAC, but prefer active optical cable (aka AOC) over twinax copper (aka DAC or ACC if active) for connections from the device to the switch – higher power, latency and cost or not as they typically ‘just work’ where twinax can be finicky (especially when dealing with various NICs, various brand switches, various DAC/ACC cable manufactures, and varying run lengths). Either way, Intel 540 NICs and Mellanox X-3’s are cheap these days (used they are almost free), Mellanox X-3 pro and X-4s (both with 25/40/50 or faster futureproofing abilities baked in) are rather reasonable, and newer Intel controllers are not what we call expensive. These options ‘just work’ in Synology (and Qnap for that matter) NAS appliances… not matter what the QVL says.
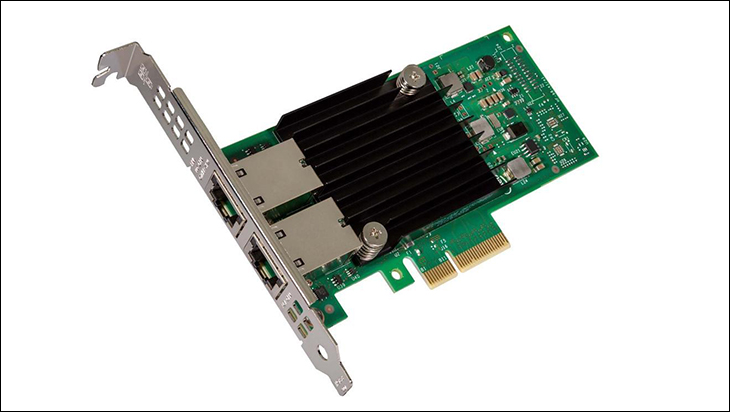
Just be careful with Intel fakes as there are a ton of them out there and it is easy to get caught by scammers… so non-Intel based options may prove to be safer (and cheaper) if you do not have a working relationship with a hardware supplier. As with every other upgrade decision, the final decision must be yours. Think about what you want/need/desire, what your budget is, and what your comfort level with non-QVL’ed models are. Then purchase… and enjoy the much better networking performance 10GbE (or faster) brings to the table.
ATTO Disk Benchmark
ATTO Disk Benchmark
The ATTO disk benchmark tests the drives read and write speeds using gradually larger size files. For these tests, the ATTO program was set to run from its smallest to largest value (.5KB to 8192KB) and the total length was set to 256MB. The test program then spits out an extrapolated performance figure at a given file size.
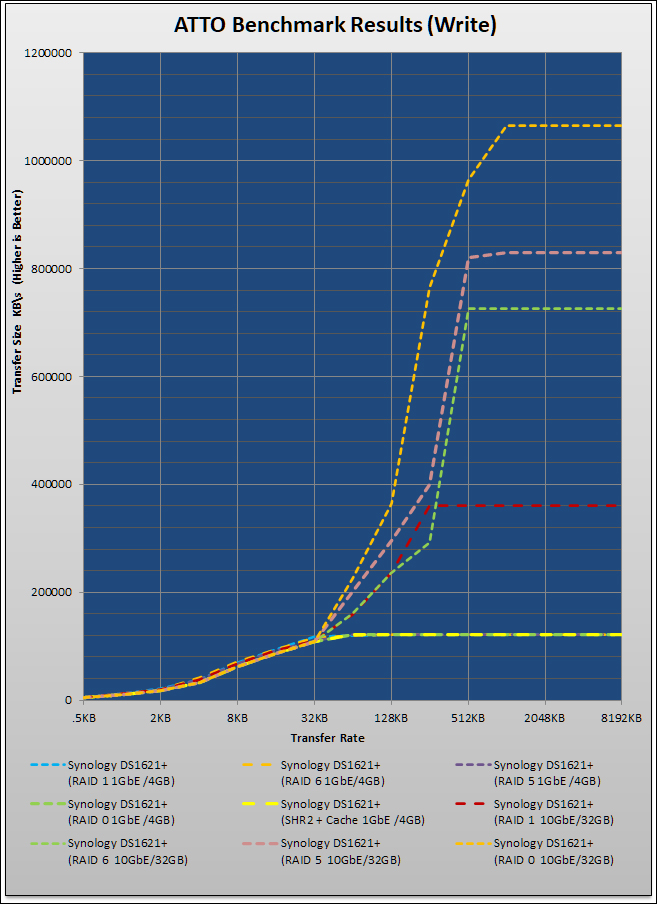
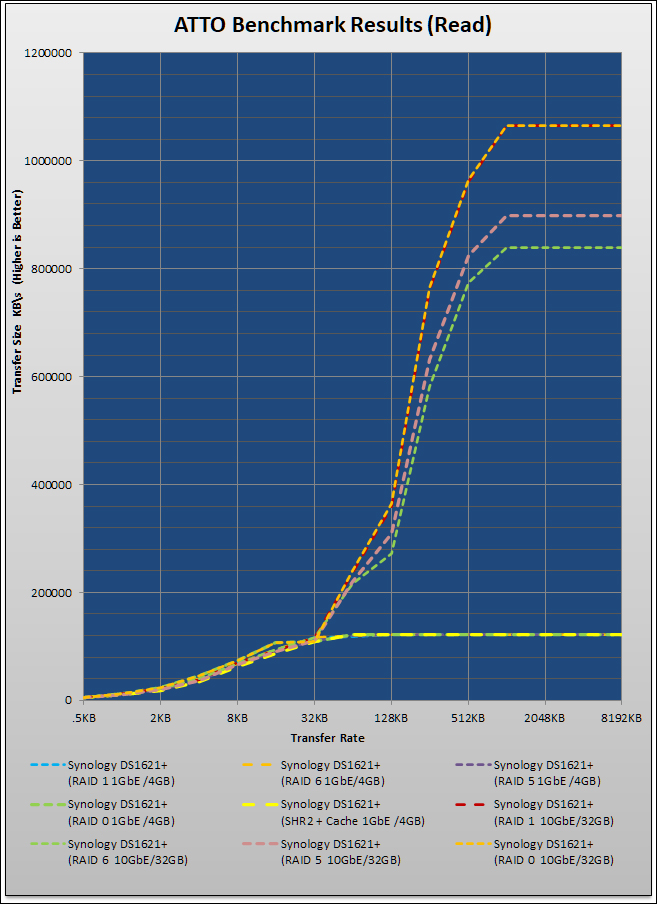
NAS Performance Tester
NAS Tester Performance Results
This free utility benchmarks the read and write performance in megabytes per second of network attached storage connected through SMB/CIFS network shares. How it works is temporary files of arbitrary sizes are generated and copied to and from the NAS a number of times, whereafter the average read and write speeds are calculated. We opted for a file size of 400MB and 5 loops per run.
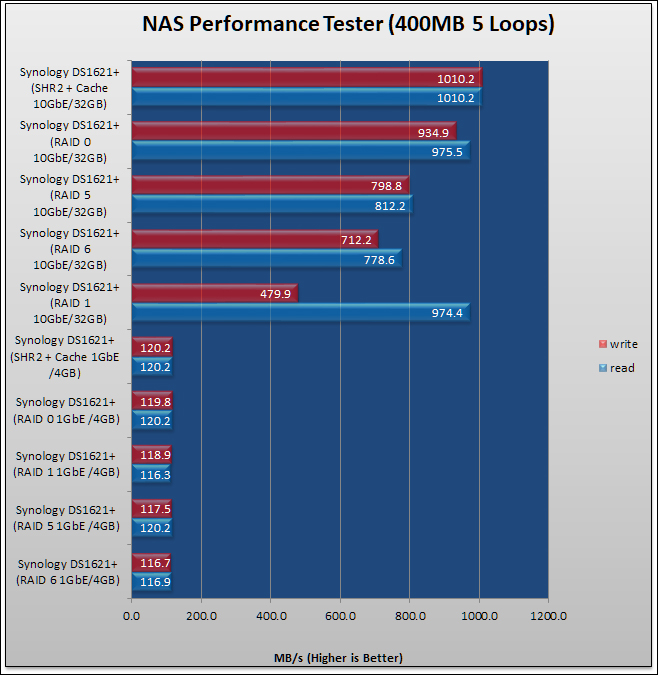
Intel NAS Performance Toolkit
NAS Tester Performance Results
The Intel® NAS Performance Toolkit (NASPT) is a file system exerciser and analysis tool designed to enable direct measurement of home network attached storage (NAS) performance. Designed to emulate the behavior of an actual application, NASPT uses a set of real world workload traces gathered from typical digital home applications. While it is EOL and really only runs optimally on Windows XP or Vista it still validity in today’s networking environment.
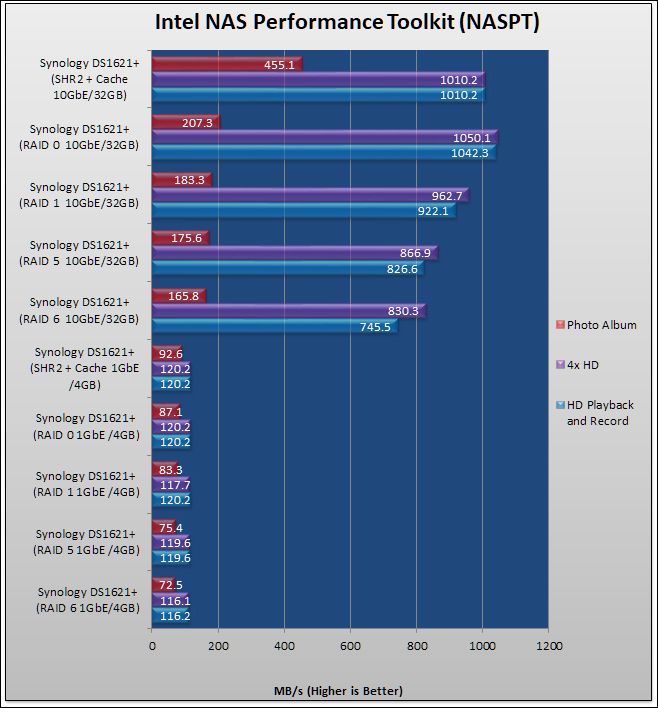
IOMeter
IOMETER: File Server Test
To test each drive we ran 6 test runs per device (1,4,8,16,32 queue depth) each test having 5 parts, each part lasting 10 min w/ an additional 20 second ramp up. The 6 subparts were set to run 75% random, 75% read 25% write; testing 512b, 4k,8k,16k,32k,64k size chunks of data. When each test is finished IOMeter spits out a report, in that reports each of the 6 subtests are given a score in I/Os per second. We then average these results and this average score for that particular queue depth is heavily weighted for file server usage.
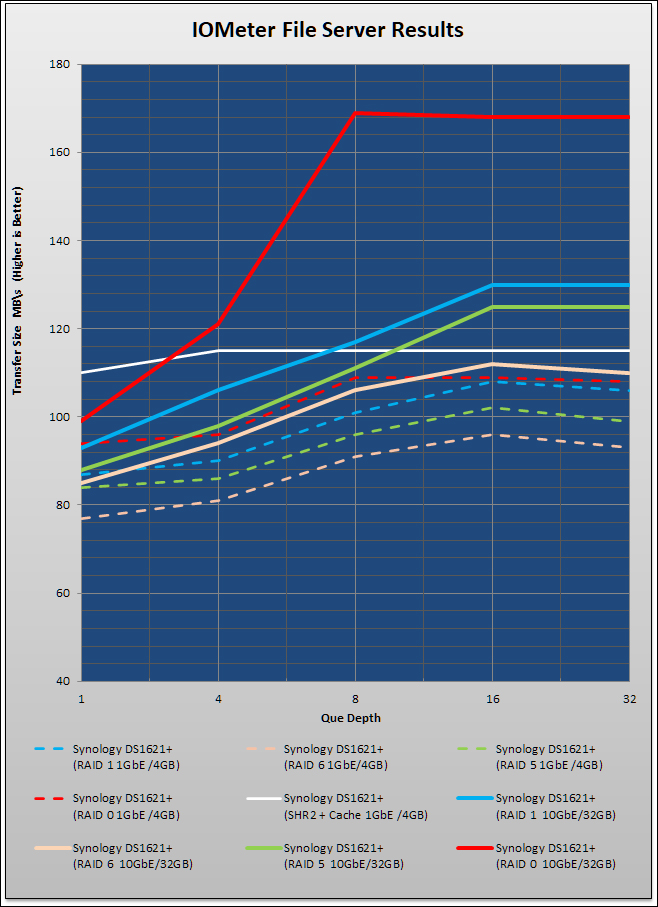
Real World Performance
Real World Data Transfers
No matter how good a synthetic benchmark like IOMeter is, it cannot really tell you how your hard drive will perform in “real world” situations. To this end we will be running timed data transfers to give you a general idea of how its performance relates to real life use. To help replicate worse case scenarios we will transfer a 100.00GB contiguous file, then a folder containing 1200 subfolders with a total 36,000 files varying in length from 200mb to 100kb (30.00 GB total).
Testing will include transfer to and transferring from the devices, using MS RichCopy and logging the performance of the drive. Here is what we found.
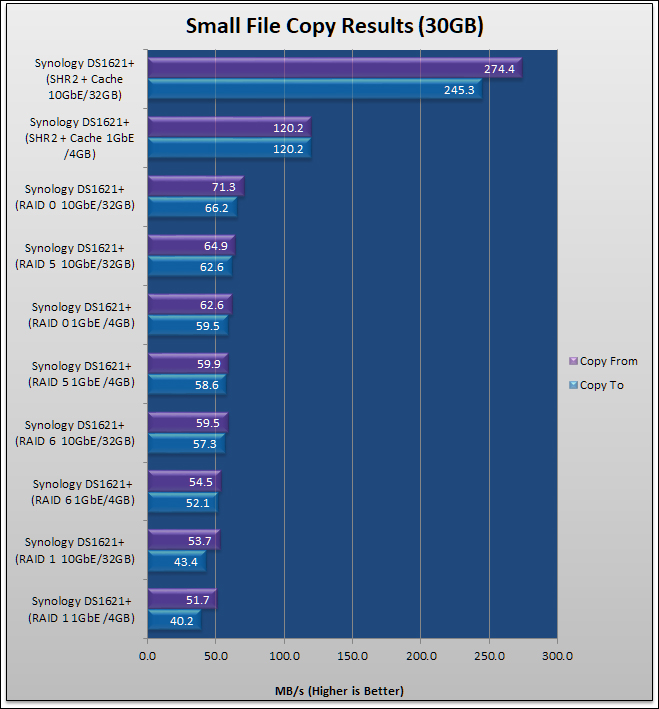
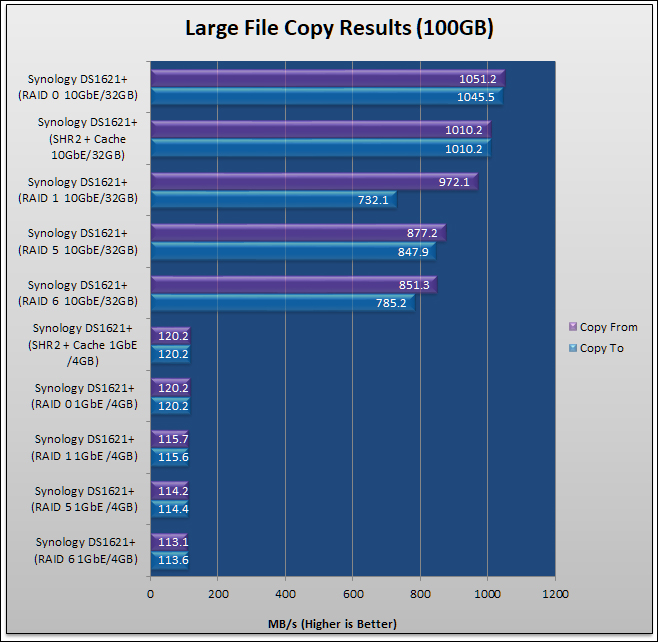
Analysis and Comparison
Unlike its smaller 5-bay cousins, the 6-bay Synology DiskStation DS1621+ faces stiff competition for buyers hard earned money. This should come as no surprise as, next to 4-bay models, 6-bay models are the most popular NAS appliance variants going – and have been for some time. Put simply, the combination of good to excellent array configuration flexibility with a good to very good price vs. performance ratio make them hard to beat for home use.
Regardless of the hows and why, the fact remains that QNAP alone have two and arguably three models that are direct(ish) competitors to the DS1621Plus. Each with their own strengths and weaknesses. All viable choices. These two main competitor models are the TS-653D and the TS-673A. One could argue the non-A variant of the 673 series also compete with the Synology DiskStation DS1621+ for your hard-earned money… but honestly, we are ignoring it as it is an AMD ‘Excavator’ based model and thus is using a rather old processing unit. One that is well past its… ‘sell by date’.
Unlike the Synology DiskStation DS1621+, both QNAP models come in two ‘stock’ or ‘factory’ configurations. A ‘-4G’ and a ‘-8G’. The G stands for Gigabytes, as in how much RAM it has, and makes it rather self-evident what separates one variant from the other. Make no mistake, just like Synology… both 4G and 8G QNAP variants only come with one memory slot populated. Not two. This however is still a positive for QNAP as 8GB of memory results in a more flexible NAS appliance than one with only 4GB of RAM, and upgrading to 16GB only requires you to buy one stick of 8GB RAM. Not two, like with the QNAP -4G models and the Synology DiskStation DS1621+.
Counteracting this is one salient fact: you are going to pay a premium for the 8G variants over what it will cost you to buy a 4GB stick of (3rd party) RAM. To be precise the -8G variant of the 653D series goes for about $750 (USD) vs. $700 (USD) for the -4G variant; whereas the -8G variant of the 673A goes for about $900 (USD) vs. about $800 for the -4G variant. Considering how easy it is to install a stick of RAM… this really is not that much of an advantage. It however is an advantage and one you should be aware of. At the end of the day only you know if you are willing to pay a minor price premium to obtain more ‘out of the box’ memory or not.
In ‘apples to apples’ comparisons the DiskStation DS1621+ is right in the same ballpark as the QNAP competitors on the asking price front- $700 vs $800 vs $800. To simplify things, at this point buyers need to answer one simple question: do I want an AMD Ryzen V1500B based NAS appliance or do I want an Intel Celeron J4125 based processor? For most our recommendation would be that the V1500B (and its ECC RAM capabilities) is worth an extra $100. As such we are now going to focus in just the QNAP TS-673A vs. Synology DiskStation DS1621+.
Both of these NAS appliances use the same CPU; obviously offer ECC RAM abilities (while QNAP typically use Micron and Synology use Samsung… such differences are moot for the scope of this comparison, the same is true of the official 32GB vs 64GB support as Synology simply does not offer a Synology 32GB ECC stick of RAM and thus ignore it as legit upgrade); offer 6 externally accessible hot-swap drive drays that are lockable; multiple internal M.2 drive ports; at least one PCIe 3.0 x4 slot for future upgradability; software RAID solutions with extensive ‘bit rot’ protection (ZFS or BTRFS based); make use of internal 250 watt power supplies; come with dual 92mm rear cooling fans … and both even come in metal clad chassis. The last of which is a recent parity for Synology which up until now used a polymer shell.
There are however some differences which will run the gamut from minor to major… depending your personal priorities. Synology may have finally gone for metal for the exterior but they are still stubbornly not allowing users the basic ability to use the included dual M.2 ports for anything but caching duties. QNAP on the other hand allows their users the luxury of using M.2 drives as raw storage. On the surface this makes QNAP ‘obviously’ superior. The devil is the details however and both the QNAP and Synology M.2 backplanes are only PCIe 3.0 x1 lane enabled… and thus are limited to 985MB/s. Total. Put another way, NVMe M.2 drives are basically limited to less than SATA speeds unless you only use one drive, not two. If you use only one, they still are limited to being less than twice as fast as SATA. Yes. Neither QNap or Synology are taking even half advantage of older PCIe 3.0 x4 M.2 SSDs… and neither manufacture’s options will work with SATA. They are NVMe only, and are pretty much wasted in direct storage configurations. Thus, for most, this negates the perceived performance benefits one will have over the other.
For those interested in PCIe + Solid State Storage (NAND/3D Xpoint/Storage Class Memory/ReRAM/ unobtanium/etc.) based arrays the only ‘real’ option is to use the included PCIe 3.0 slot(s) and an adapter card. Both QNAP and Synology PCIe slots are bandwidth limited to four PCIe 3.0 lanes – or a shade under 4GB/s. Total. Considering most Add In Cars are dual M.2 this means 1970MB/s per drive. On the surface this means parity between QNAP and Synology. Unfortunately for Synology, the 673A comes with two PCIe 3.0 slots. Not one like the Synology DS1621Plus. For some the choice will be clear (6 HDD + 6 SSD vs 6+2)… while others will not care. Further muddying the waters is the QNAP PCIe slots also officially support General Purpose GPU upgrades. Right now, the QVL list has a grand total of 3 NVidia GTX 10-series cards (and if it is a dual slot form-factor, the card will cover both PCIe slots), but three is better than the zero Synology officially supports. We personally would be hesitant to use a discrete GPU card in a NAS appliance but some may feel this too is a net benefit for QNap.
Moving on. While it is indeed true that both units come with two 92mm fans, as well as a 250 watt internal power supply that has its own fan… QNAP upped the ante with a smaller tertiary cooling fan for the PCIe slots (new for the 693A variant) and the internal power supply’s fan exhausts its hot air directly outside the case. For some this is a net positive for Qnap, for others Synology. Yes, the PSU in the QNAP can push directly to the outside instead of increasing internal air temperatures… but that is a double-edged sword. Being directly outside means any and all noise that little fan makes will not be muffled by the case… and they are loud little fans when running flat out. Furthermore, the Synology PSU fan’s exhaust is basically inline with the two 92mm fans… so little if any of the heated air from the PSU will reach any of the internal components (remember these all have front to back air flow patterns).
For many the big differences, and thus final decision, will come down to the included external connectivity options. In this area there are distinct differences, with two distinct philosophies at play. First the USB differences. The QNAP TS-653A offers one USB 3.0 port (aka USB 3.1 gen 1 / 5Gbps) and three (two Type-A, one Type-C) USB 3.1 (aka USB 3.1 gen 2 / 10Gbps). Synology’s DS1621Plus offers 3 USB 3.0 ports and two eSATA ports. Until Synology offers parity in the USB department, the Qnap options will prove to be more optimal for the niche amount of users with 10Gbps external storage solutions. The converse however is true who want to use an expansion unit. We personally will take the more robust, and reliable, 6Gbps eSATA connectivity over USB when it comes to expansion units (or external backup devices for that matter). More importantly, since SATA controllers do not share bandwidth on a per device basis, adding in a second expansion unit will not result in half the bus bandwidth being used for one and the other half for the second (thus making the comparison 5Gbps+5Gbps USB vs. 6Gbps+6Gbps eSATA)… nor will the overall performance of the expansion units suffer if you add in a USB ‘portable’ backup device to the mix. This too will be a niche of the intended consumer base, but it is a difference in philosophies. QNAP take a more home user approach to this price range (where USB is the de-facto standard), whereas Synology is more Small / Medium Business friendly (where reliability and performance trumps availability). The choice is pretty clear depending on your needs.
The other difference is in the included NIC options and abilities. Synology has once again gone with their S/MB orientated 4x1GbE configuration, whereas QNAP has upgraded from dual 1GbE to a dual 2.5GbE configuration. With 4-way NIC teaming and at deep queue depths the difference in speed is not that great – about 310MB/s (single 2.5GbE) vs 440MB/s ish (1GbE 4way LAG) in the real world… but if you are a power user, or S/MB system admin with the networking gear to handle a Link Aggregation Group / “NIC teaming”, dual 2.5’s are clearly superior… with a potential for 310+310 vs. 110+110+110+110. Honestly, few buyers of these types of NAS appliances will have a network that is anything other than 1GbE based. Fewer still will have 2.5GbE. Instead, most with better than 1GbE networks will have already moved on to 10GbE hardware… making both sub-optimal and in need of an AIC 10GbE card. In the coming years 1GbE connectivity will become a handicap for Synology. Hopefully before that happens Synology will opt for 10GbE and skip 2.5GbE all together… as the Ryzen Embedded V1000 series supports dual 10GbE via the chip itself. Thus, not including (at the very least) a pair of 2.5GbE ports was an active design decision by Synology. One where you will either agree with their priorities… or you will not.
The last thing to consider is the ‘software’ side of the equation. While it is indeed true QNAP has made great strides improving the ease, useability, and robustness of their ‘QTS’ operating system (especially when paired with ZFS), Synology with their DiskStation Manager OS is still the gold standard and clearly superior in both ease of use and useability. For experienced users (still using pre-built NAS appliances) the differences these days are minor at best, but for first time users the Synology DS1621+ will still offer less stress and headaches.
This is our opinion and analysis on the Synology DS1621+ versus the QNAP offerings. Do not take it as gospel. Do your own homework and draw your own conclusions based upon the areas that matter the most to you as both companies make good NAS appliances. They just have slightly differing philosophies on what makes a NAS appliance a good NAS appliance.
Closing Statement
Final Score: 88%
It quickly became obvious that the Synology DiskStation DS1621+ is not your typical Network Attached Storage appliance; rather it represents a true leap forward for the entire industry. One where the demarcation line between ‘appliance’ and ‘home file server’ can at times become blurry. Throughout testing this AMD Zen based quad-core processor proved to be capable of plowing through the calculations needed for parity striping more like an entry level NAS/file server rather than a NAS appliance. So much so that to find obviously better performance buyers will have to look toward Intel Xeon D based models. Models which invariably cost more, consume more electricity, and require higher levels of cooling (and thus create more noise)… and really are entry level ‘network file server’ orientated CPUs. The AMD Ryzen V1000 embedded series suffers from none of those Intel based issues and is a true next-generation NAS appliance CPU. This alone makes it a wonderful replacement for the Intel Atom based DiskStation DS1618+ and will put this NAS appliance on the radar of many an enthusiast who were thinking about entry level homebrew TrueNAS/unRAID/etc build vs. a pre-built NAS.
The amount of processing power on tap however is only the tip of the spear. While yes, it certainly is not the first Synology to boast of using ECC RAM the Synology DiskStation DS1621Plus’ combination of excellent processing power at an excellent price point mean this will not be a ‘one of’. In all likelihood all (near) future Synology NAS models, with maybe the exception of their value/entry line, will be AMD based.
Honestly, this sea-change is a good thing. With the exception of the increases cost associated with ECC RAM, there really is no downside to using AMD Embedded V-x000 processors… and they are the (near term) future of the NAS appliance market. That is how fast the NAS industry is now moving – I.E. where once it was glacial, things now change on a dime. As such for those interested in a NAS appliance that is more than capable of handling home user, enthusiast, and even typical S/MB NAS scenarios, the Synology DiskStation DS1621+ should be on your short, short… short list.
Unfortunately, the Synology DiskStation DS1621+ is not perfect. Close, but some decisions do somewhat tarnish its luster. These issues all boil down to decisions of the Synology DiskStation DS1621+ design team. We honestly do not really mind the ‘lack’ of 10Gbe abilities (even if the V1500B comes with 2x10GbE baked right in). It is our opinion that in a couple years it will become a handicap, as more and more move to 2.5/5/10 network hardware, but right now it still is (sadly) a niche. One that including four of them would have increased the cost of the Synology DiskStation DS1621+ without really paying tangible dividends to the vast majority of owners… even if this is supposed to be an “IT Enthusiast” orientated NAS appliance. Some will disagree. If so, please include the cost of an Add In Card to your total cost of ownership.
We also only take minor issue with including only one 4GB stick of RAM. For entry level users 4GB will be adequate (or at least tolerable). For those that need more RAM… stepping up to 16GB makes a lot more sense than stopping at 8GB. As such few would feel the added increase in MSRP would have been ‘worth it’. It does however, put the Synology DiskStation DS1621+ at a distinct disadvantage compared to the QNAP TS-673A which does come in a factory 8GB capacity option… even if the 8GB option is $100 more expensive than the Synology DS1621+ and still only has one memory channel populated.
No. The main issue we take with Synology’s approach to AMD V1000-series processors is their reliance upon the V1500B variant. We have two issues with this particular V1000 processor. It lacks Frequency Boost for enhanced single threaded performance and, with the exception of the (relatively) uber-performance V1780B, it is the only V1000 model that lacks an integrated GPU (Vega 3/8/11 iGPU to be precise). This lack of 3GHz+ turbo boost will needlessly hamper parity calculations. Furthermore, the lack of an iGPU, means that for some users the overall performance will be less than optimal… as transcoding will be done via CPU / “software” and not iGPU / “hardware”. For some, especially PLEX users, the Synology DiskStation DS1520+ and the like may be more optimal solutions.
The only slightly more expensive (at the tray level) V1404I with its Vega 8 iGPU, or optimally the (comparatively even more expensive) V1605B and its Vega 8 would have both been clearly superior choices… even if they would have ‘stolen’ the DS1621xs+’s thunder (and sales). Synology did not and opted for one of the least expensive V1000 processor AMD makes (only the dual-core V1202B can be purchased for less).
So, while the AMD Ryzen Embedded V1500B is a performance beast compared to previous generation’s of CPUs used… a few small changes, and slight increase in MSRP, would have made the Synology DiskStation DS1621+ an instant cult classic. One that would have eliminated any comparisons with QNAP’s 673A option. As such it is a great NAS. One that will handle nearly anything you throw at it, but it may leave some IT Enthusiasts craving even more. We fully expect the 2nd generation AMD based Synology models to correct this misstep… as all ‘Zen 2’ V2000 processors are both iGPU and 1T Boost equipped. In the meantime, this ‘first try’ / ‘first generation’ AMD based model is still an excellent choice for a wide variety of buyers and we do strongly recommend it. Imperfect or not, doing otherwise would be doing a great disservice to your future self.


