While this monitor is not overly accurate ‘out of the box’ it does come with a decent On Screen Display that is backstopped by good physical buttons. This combination means it is not only worth your time and effort, but rather easy to manually adjust. Of course, manual adjustment using the old ‘Mark 1 eyeball’ results will never be as accurate as a colorimeter… but it most likely will be good enough for most.
Using our sample as a base line we would recommend the following steps. The first thing you will want to do is set the monitor in to a mode that allows brightness tweaking… ironically enough ‘sRGB mode’ does not allow for this. Next, turn down the brightness. This is a fairly bright monitor (as it is DisplayHDR400 rated) but do not assume the brightness is linear with ‘100’ being 400nits and 25 being 100 nits. Instead, 120 nits is about a setting of 9 (with it we got 121.2 output in the center of the screen).
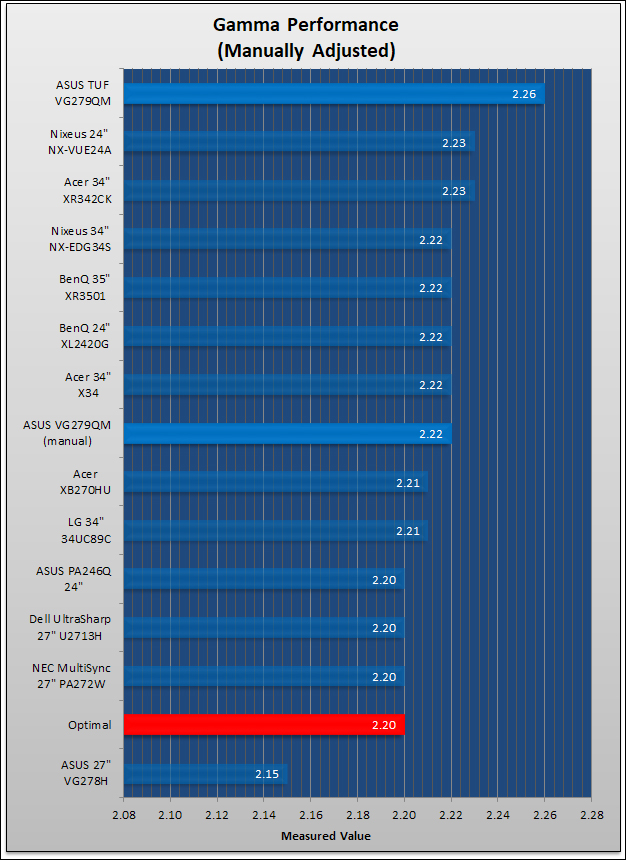
After these two steps you will want to set the contrast to about 75. Then you will want to adjust the RGB settings. You will need to set ‘color temp’ to ‘user mode’ to access RGB settings. The red is fairly decent with a default of 99 out of 100, but RGB levels work in conjunction with each other. You cannot simply turn down the blue and green and expect red to stay the same. With our panel, setting red to 99, blue to 95, and green to 97 resulted in a fairly accurate color profile. Not perfect, but most likely good enough. These tweaks will lower the gamma slightly closer to 2.20 but it may or may not be ‘good enough’ for your needs. If you absolutely, positively need perfection you should strongly think about investing in a colorimeter or at the very least renting one.
In either case, if you are willing to spend about 20 minutes manually adjusting this monitor you can get fairly accurate results. They will not be perfect but may get you into the ballpark. Just remember every panel is going to be slightly different as this model is not factory calibrated. So please, just use our recommendations as just that – recommendations. A place to start, not finish. Do that, and within in a few moments you can get a fairly accurate color profile. One that will blow the out of the box color profile out of the water.


