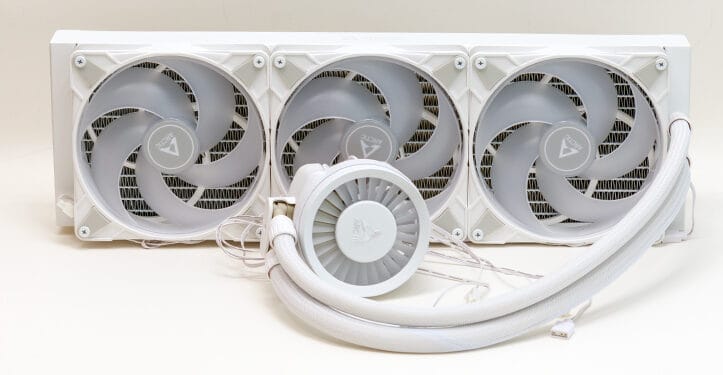
Before we begin, we must point out the typical caveat that goes hand in glove with all 420mm class AIOs. That is they do have specific issues that are only relevant to them… but they do get a bit of a bad reputation because of it. On the one hand some of the ‘hate’ is well deserved. This class of closed loop cooling solutions are attached to a big, heavy, sometimes award to maneuver radiator. Especially when dealing with a thick style rad like what the Arctic Liquid Freezer III boasts. There is no denying that. The other side of the coin is that 360-class AIOs are not all the much easier to work with and yet while many a case manufacture will falsely claim (and or have major asterixis next to it) that 360s will work… few cases that claim to handle 420s cannot actually handle them (as 420 users take that personally and we never forgive and never forget).
Yes. With 420s you may have to front mount it, instead of top mounting it, but most cases these days do not lie about 420 AIO compatibility. So if it says it can… it probably can. If it can’t… it will never, ever work. Put another way, with 420s you don’t have to do as much homework on real-world case compatibility as you do with 360s. Just understand that this is a thick cooling device and you do want to use as big a case as you can. Do that, and it will reward you with cooling performance that can only be exceeded by a good custom water loop. As such, we do have a soft spot for the underdog 420 class. That is our bias and that is why when we say that ALF III is both the easiest and most difficult 420 AIO we have worked with in a long while… you can be certain that we are not trying undermine the ALF 3 420 editions, nor scare off any builder from using a 420 class AIO. That would be a shame as 420s in general and the ALF 3 in specific is a cooling beast. It is just one that rewards patience when installing it, and punishes inattention to details.

Let’s start with the positives. Baked in ‘native’ AMD hotspot’s offset location is a great feature. It should have been done via a bigger cold plate, but not having to worry about it is great. The same is true on the Intel side. An actual mounting frame to replace the ILM? For free? Yum, and please sir may we have some more?! These are features that are now the gold standard upon which all AIOs should be judged as they demand to become the de-facto standard for all AIOs.

Counteracting this, and the argument that other manufactures who will not follow in Arctic’s footsteps, is simple. While neither feature is without merit… neither are without controversy either. Let’s start with Intel. Intel does indeed have a flexing problem with the LGA1700 socket. The reduced pressure ILM on most (if not all) LGA1851 (pardon the pun) reduces it to the point where an aftermarket mounting bracket is not really needed nor necessary for all builds. Thus, the ALF III’s included bracket is a nice but no longer essential feature for all but enthusiasts.

Which is actually a pretty good descriptor for the ALF III… as this is not a great option for novices and especially for first time builders. That pains us to say, but there is dipping your toes into building systems and then there is being thrown into the deep end… and contact frame / ILM replacement is the deep, deep end of the pool. Maybe too deep for a first time builder. To be blunt yanking, yeeting and replacing the ILM is not for the faint of heart. If you overtighten (aka tighten it like you would with the typical cooling solutions top brackets) you can damage the system in a warranty voiding manner for both the motherboard and CPU. That is the worst case scenario. What is more likely is if you do more than finger tight + 1/8th to ¼ of a turn you can introduce gremlins that a royal pain to track down.

Arctic is typically really, really good (bordering on fantastic) with their online instructions. With the ALF 3’s Intel instructions they are not. “Tighten” and “ILM / Contact Frame” do not belong in the same sentence without a specific force range modifier added… or at the very least the typical 1/8th to 1/4turn rule of thumb mentioned. Clarity is key and this lack of it will annoy enthusiasts as much as it gives false confidence to novices. Both of which needlessly damage Arctic’s sterling reputation in the community. Hopefully a future revision will include bother clearer instructions and/or a cheap “click” style tensioner ratchet set to whatever Arctic feels is best for the ILM mounting pressure. I.E we hope the instructions one day will be as follows “using the included x.xxNM tool you tighten till the tool clicks for each corner bolt in a X manner”. Till then, the ALF 3 would not be a gift we would give to a novice friend without the expectation of being there to walk them through it come build day.

The AMD side is much, much better… and yet worse. With the AMD offset baked in you can only install this cooler one way. Not two. Not four. One. So while we do love the clearly marked “L” and “R” classic brackets our inner libertarian twitches at this level of intrusiveness. Especially when it nukes our favorite top three M.2 heatsinks from being able to be used in a build.

The only other issue on Team Red side of the equation is the new waterblock’s integrated ‘leaf spring’ style tensioning system is rather finicky. Arctic say you should mount the two top brackets, then place the block in position and then screw it down. Good luck with that. The combination of high pressure with short captured bolts will annoy you to no end if you follow their instructions.

A more optimal solution is to either juuuuust attach each bracket to the motherboard and then juuust mount the block, and then do an X pattern with TL/BR/blockR/TR/blockL/Br pattern. It will be easier to do. Alternatively… juuuust mount the two brackets to the block by say 1 turn, then place it over the CPU, and juuust attach the brackets before doing the TL/BR/blockR/TR/blockL/Br pattern tightening to the bolts. Either work.

Our personal preference is for the latter, but novices may be more comfortable with the former. Either work better than the instructions which mark the first time in our memory that Arctic purposely included bad instructions… which aptly go hand in hand with the terrible Intel instructions. So Caveat Emptor is in full effect. Which you should already have known about as this is a 420 class AIO with all the quirks that go along with this niche size!

The last issue we must address is the really… really nice cabling options included. We love the fact that Arctic include both an All In One cable and a split cable. It truly is freeing and we wish all AIOs offered it. We even do not mind the fact that it is a bit finicky to plug, wrap, and then stick the cables under the side of the block. Take your time and, if necessary, a spudger or thin screwdriver is your friend.

On the other side of the coin is two issues worth mentioning. The first is simple. The multiport header option’s cable is not fused together nor clad in a nylon sheath. As such it is a bit of a mess and a rats nest that, thanks to the location on the block, is a royal pain to tidy up.

We can see many just going as far as zip tying it up and along the ALF 3 tubs until it comes closest to header and then have it drop back down to the motherboard. Which results in, as you can see in the above photo, a less than optimal overall aesthetic to say the least! Hopefully future revisions will either sheath them or fuse them together into one ‘big’ ribbon style cable… or better still do either and relocate the end of the block they come out so as to minimize the snaking across the motherboard that one has to do with the existing ALF 3 model.

The other issue is more concerning. Specifically these cables are 26AWG. 26AWG is in our opinion straight up bad when talking about ~175cm runs (2 wires x ~46cm for the run from the block to the rad, + 2x ~42cmm for the rad length). We would even go as far as saying it is not legally safe when dealing with potentially six 140mm 0.17A fans.
When we shared our opinion with Arctic… they were annoyed to say the least, but here is our reasoning. 26AWG is indeed technically rated for 1.3A @ 60C (and even 2.2A at 75C). That is the “safe theoretical” max. However, the (US) National Electrical Code sets it at 1.0A… which is basically 80% of safe max (1.04) rounded down to a full number (as electricians are not interested in advanced maths when on the jobsite… or off it for that matter). Thus the ALF 3 can easily be run in a legally unsafe, out of code configuration… just by daisy chaining a push-pull fan configuration via the waterblock header cable.
One can argue that this is an issue that will only impact buyers running in push pull configurations but the difference in price between 26 and 24 AWG is negligible. This is the epitome of “penny wise, pound foolish”. Furthermore, even if you want to only use it “out of the box” with three fans, darn near any online ampacity calculator (e.g. first hit in google for us was https://www.inchcalculator.com/wire-size-calculator/) will tell you that (with those lengths) it is 24AWG that is the safe minimum… and even then expect a barely tolerable 2.47% voltage droop. Hopefully, future revisions will fix this potential issue. In the meantime… just don’t plug in the fan cable. Instead unplug it at the first fan on the rad… and use your own cable. There are plenty of 24AWG based “4-pin fan extension cables” out there. Use one, and sleep like a baby knowing you couple buck investment is a good idea.
Overall the ALF 3 is not perfect when it comes to installation, but if you take your time the highly advanced features are worth the effort. Just don’t be afraid to “phone a friend” if you do not know the solution to the quirk/gremlin/problem you are running into with the ALF III.


